
Non Smart TV
How to Convert a Non-Smart TV into Digital Signage Using USB
Easy guide to converting a non-smart TV into digital signage using a USB device.
١٦ رمضان ١٤٤٧ هـ
Introduction
In today’s digital age, digital signage has become an essential tool for businesses, schools, restaurants, and retail stores to communicate effectively with their audiences. However, not everyone can invest in expensive smart displays or commercial signage systems.
A media player combined with digital signage software allows any regular TV to function as a professional digital signage display. The USB drive is used only for setup or installation purposes.
This step-by-step manual explains the complete process of converting a non-smart television into a digital signage system using the Wilyer Digital Signage platform. The setup is performed with an external Android media player readily available in your local market. By installing the Wilyer Digital Signage Android APK via USB, each media player can be prepared quickly and efficiently. This method is ideal for businesses, restaurants, and educational institutions, enabling rapid deployment with minimal setup time and making it easy to scale across 100+ screens with consistency and control.
Two Ways to Convert a Non-Smart TV into Digital Signage
There are two proven methods to convert a non-smart TV into a digital signage display using the Wilyer Digital Signage platform.
1. Using a Fire TV Stick
If you need a low-cost and simple solution for your digital signage needs, then the Amazon Fire TV Stick will suit your needs perfectly. With the Wilyer Digital Signage app installed on the Fire TV Stick, you have access to your digital signage content via an internet connection using the Wilyer cloud dashboard for easy management and control of your digital signage. This solution works especially well for small installations with minimal technical support required.
2. Using an Android Media Player
Android media players serve as a professional option for large-scale and advanced digital signage deployments. In addition to providing higher control over the device, they offer a much quicker installation speed via USB based APK installation methods, and they do not require a Google Play Store login to operate. These solutions are best used in environments where the need for consistent installations, remote management and long-term dependable performance is supreme.
Why Select an Android Media Player to use in digital signage.
Android media players are more flexible and have more control over consumer streaming devices. Android media players have a number of benefits when operating the Wilyer Digital Signage APK:
Increased control over the system such as the option to delete unwanted apps.
Professionally optimized signage.
Applicable in large scale applications of 100 or more screens.
Remote screen shots, updates and apps support.
The numerous models are rooted so that deeper system-level control is possible.
Quick Start Without Google Play Store Account.
The fastest deployment process is made possible by Android media players. No compulsory log into Google Play Store. The signage software can be installed immediately with the use of a USB drive and the Wilyer APK. This simplifies the process of preparing several media players within a durability and also the deployment of these players on a uniform basis throughout the locations.
Getting Started with an Android Media Player
To begin, select an Android media player that is available in your country. You may need to purchase a compatible device before proceeding with the setup.
What You Need to Set Up Digital Signage on a Non-Smart TV
Before starting be sure you are equipped with the following:
Android TV Box or Smart TV Box
A USB drive/pendrive (not less than 4GB memory)
Your non-smart HDMI input TV.
Internet connection (Wi-Fi)
Wilyer Digital Signage software downloaded via USB drive
Installation Guide step-by-step.
These are the steps that can be detailed in order to turn your ordinary TV into a sophisticated digital signage display. A screenshot will be provided in every step to help you to follow the process.
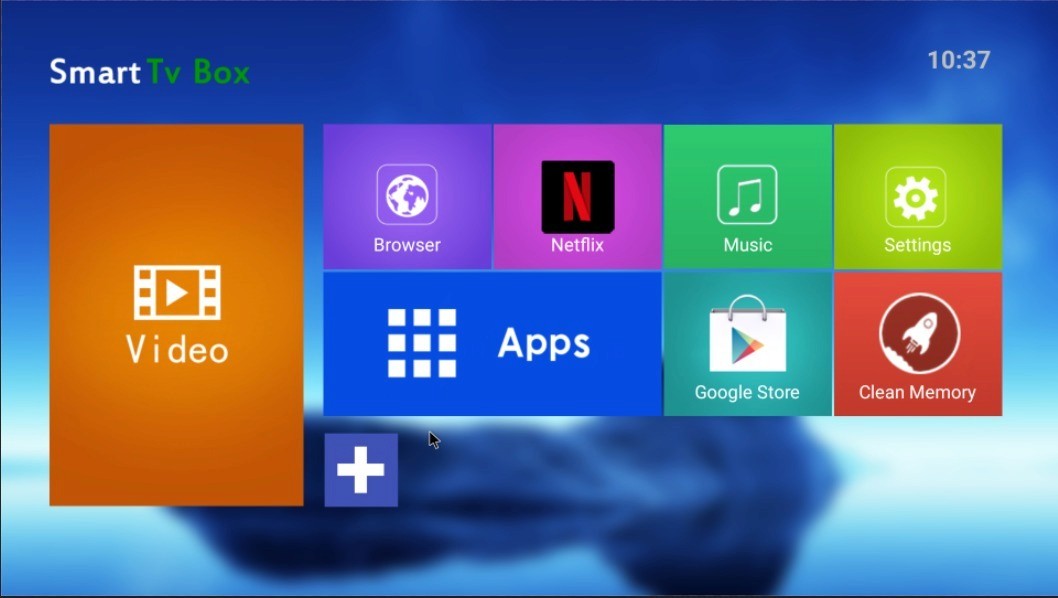
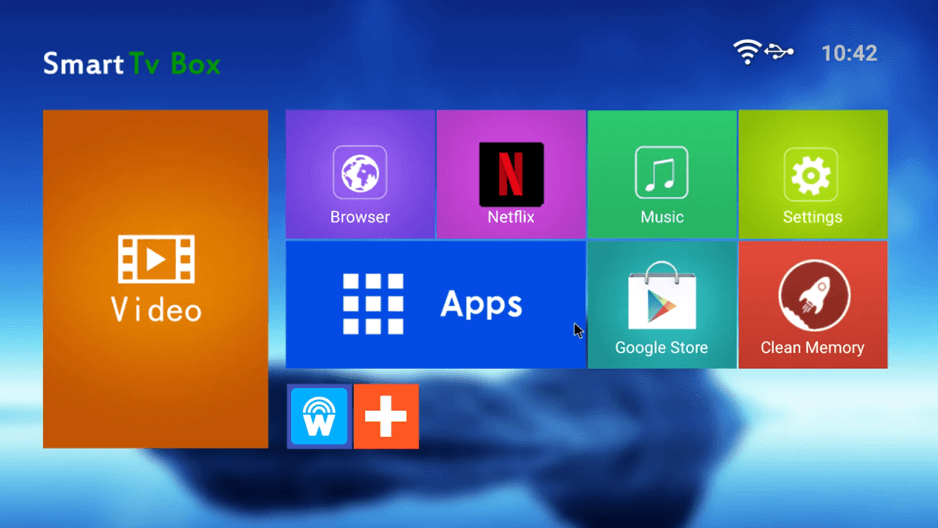
Step 1: Power On Your Smart TV Box
Install your Android TV Box on the non-smart TV using HDMI cable and connect it to the power outlet. The Smart TV Box home screen will be visible with a number of apps such as Browser, Netflix, Music, Settings, Apps, Google Store, and Clean Memory.
Wilyer Latest APK: https://files.wilyer.com/apks/cloud/wilyer-signage-v3.9.6-nov-3-2025-c96-official-release.apk
The Wilyer Digital Signage application can be downloaded to a laptop using the provided link. After downloading, the application file can be copied to a pen drive. The remaining installation steps can then be completed by following the instructions outlined in this blog.
Step 2: Insert the USB Drive for media player
Take your USB drive with Wilyer Digital Signage APK file, and insert it in one of the USB ports of your android TV box. The USB device will be automatically detected by the system.
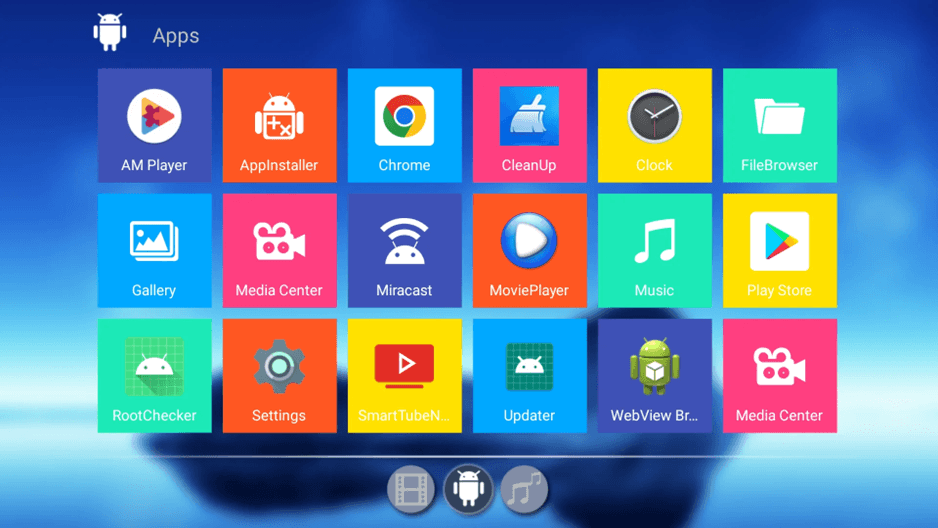
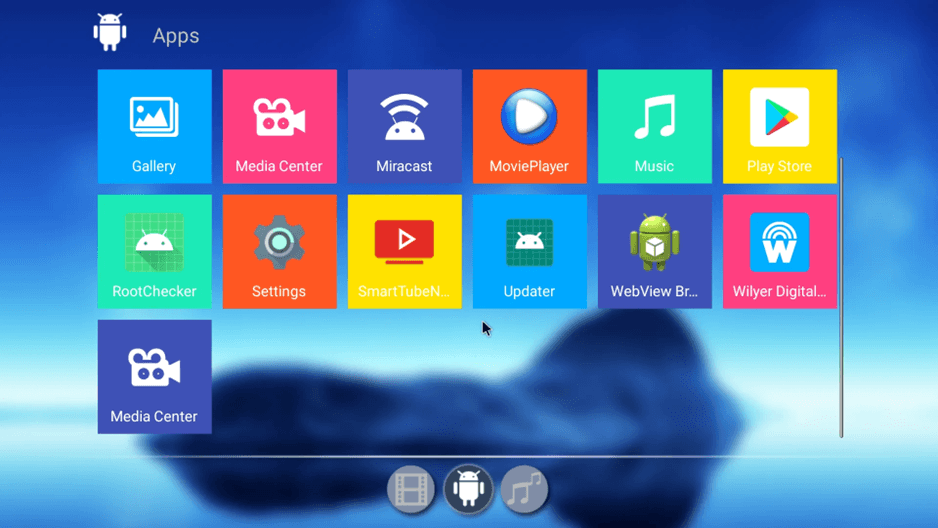
Step 3: Navigate to Apps Section
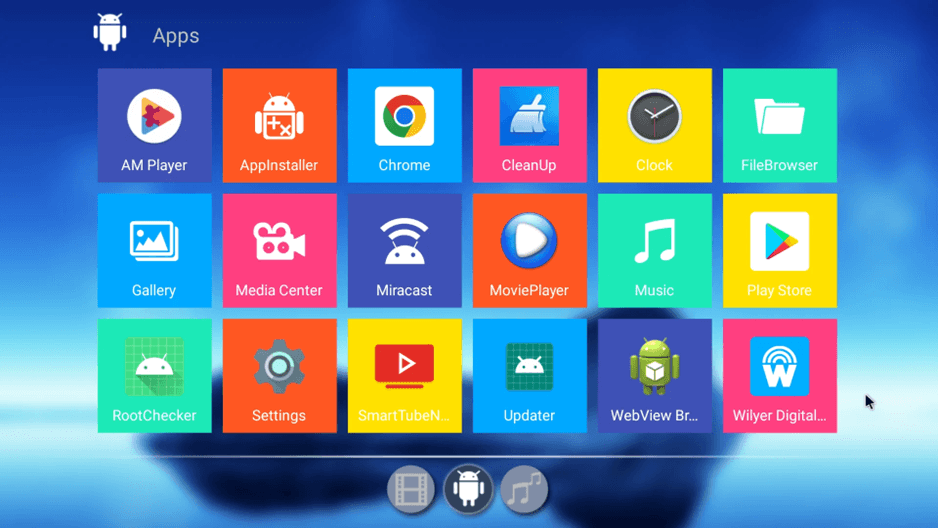
Go to the home screen and tap on Apps. This will open the applications menu that will contain all installed applications and system tools.

Step 4: Open the File Browser
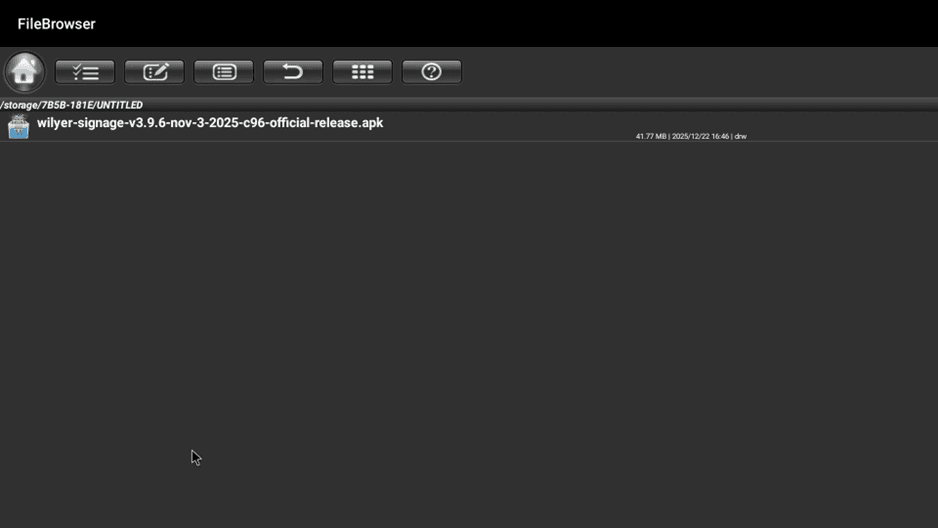
Under the Apps menu, you will find different applications. Find and click on FileBrowser (with a folder on it). You can access files on your USB and install apps using this app.
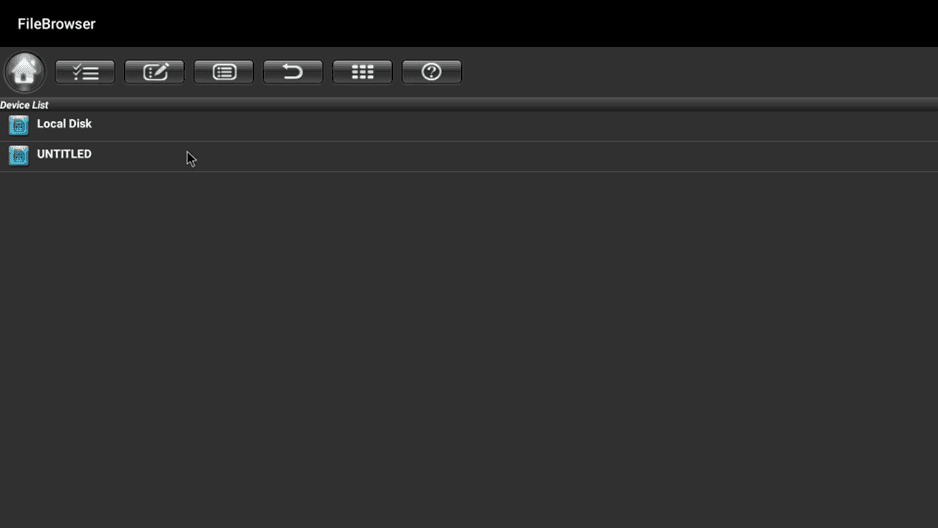
Step 5: Access Your USB Drive
After opening the FileBrowser, you will have two storage locations, 'Local Disk' and (UNTITLED) (or the name of the USB drive). The USB drive should be named using USB or the name you have put.
Step 6: Find Wilyer APK File.
Click on USB-drive (UNTITLED). There should be the Wilyer Digital Signage APK file. In this case, the file is called wilyer-signage-v3.9.6-nov-3-2025-c96-official-release.apk (41.77 MB).
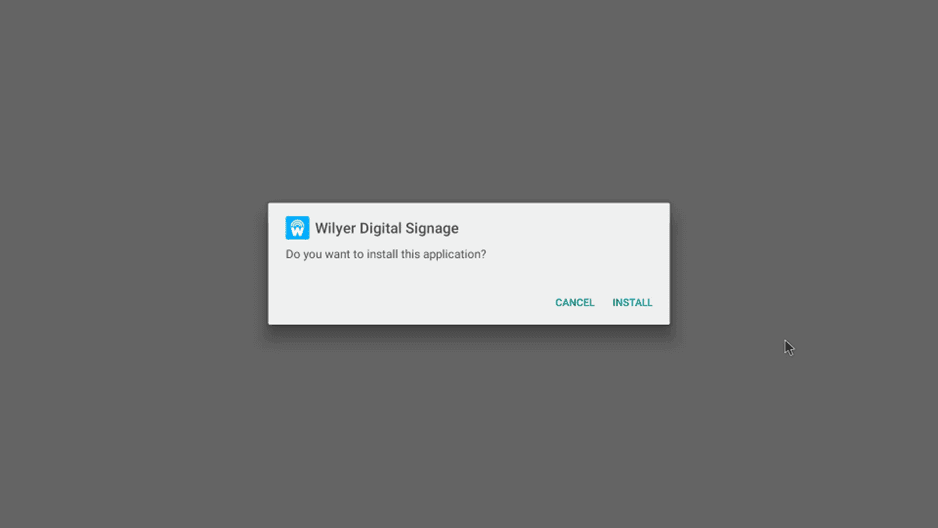
Step 7: Begin Installation
Click on the Wilyer APK file. The system will initiate staging of the app to be installed. It will display a dialog box that contains.

Step 8: Confirm Installation
Once staging is done, you will have a confirmation installation dialog. The dialog will contain the name of Wilyer Digital Signage and the question whether to install this application. The next step is to use the 'INSTALL' button.
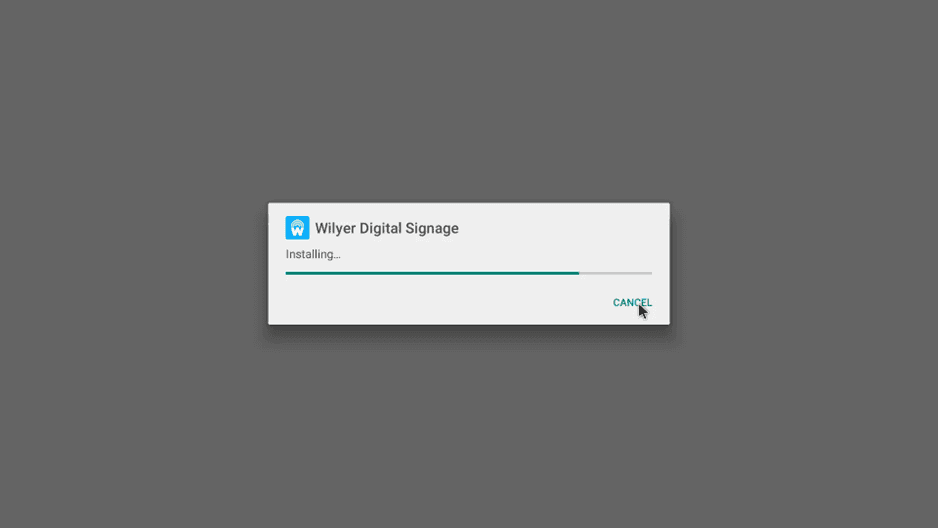
Step 9: Wait for Wilyer Digital Signage App Installation
The process of installing the same would commence. You will find the progress bar with the indicator Installing. Installation is normally done in 30-60 seconds based on the performance of your android digital signage media player.
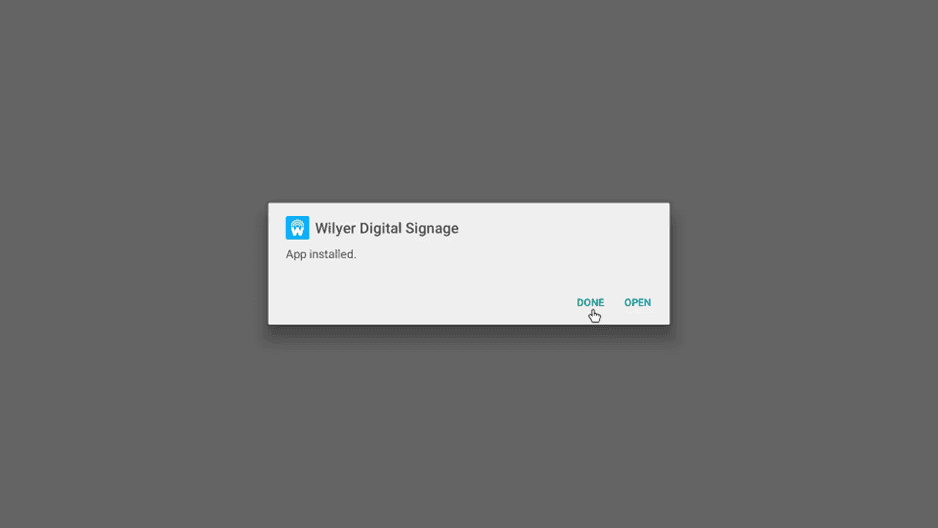
Step 10: Complete Installation
After installation, the system will display a confirmation message App installed. and will give two choices: DONE and OPEN. Click on DONE to get to the apps menu. The next steps will be to configure the app.
Step 11: Return to Home Screen
On clicking DONE, you will return to the Apps menu. And here you will find a new app icon created - the Wilyer Digital Signage app (marked with a “w” icon). The back button is also visible in case you are required to go to the home screen.
Step 12: Navigate Back to Apps
Go back to the main Apps screen where you will be able to view all of the installed applications. The Wilyer Digital Signage app must have appeared in the list of your apps.
Step 13: Launch Wilyer Digital Signage App to continue.
Find the Wilyer Digital app (with the recognizable red and blue Wilyer logo) and then click it in order to start using the application the first time.
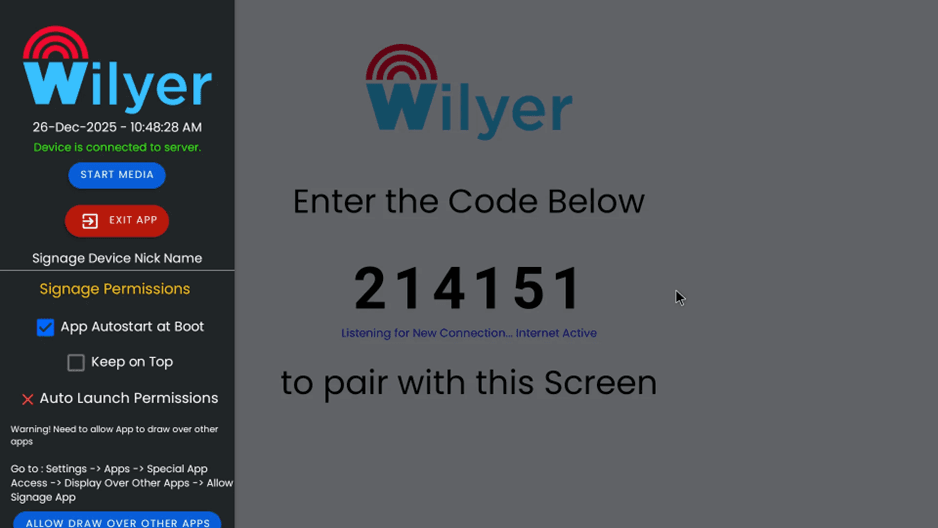
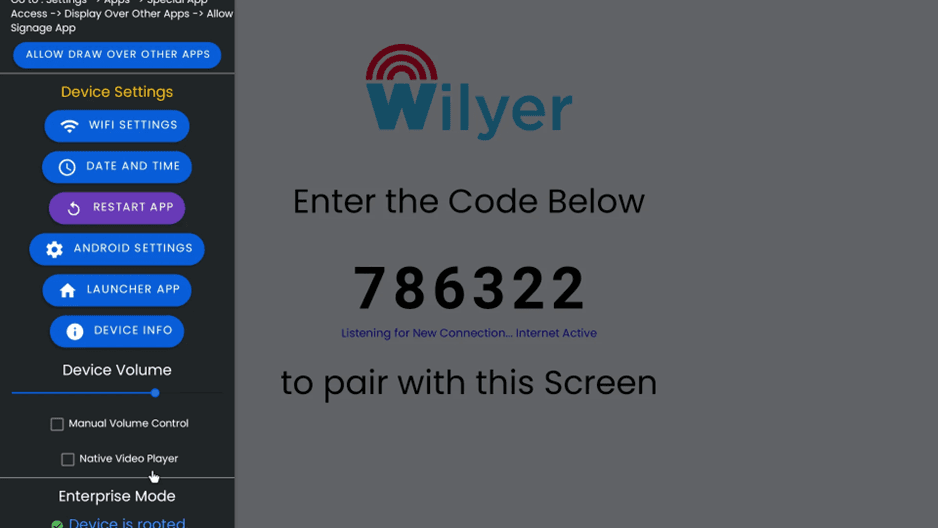
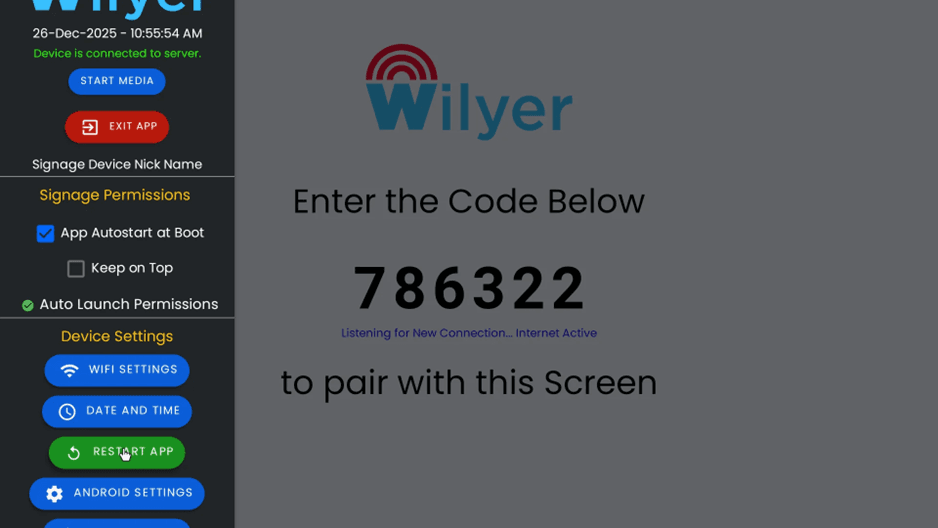
Step 14: First App Configuration.
Upon opening the Wilyer app, the first thing that you will encounter is a configuration screen where you will find some critical options in the left panel such as device settings and permissions. On the right side, you will find the pairing screen with a 6-digit code which you will use to pair your device with the Wilyer cloud platform.
Step 15: Check Network Connection.
You will need to make sure that your Android TV Box is connected to Wi-Fi before making any further configuration. When successfully connected, the app will show a green text that has a checkmark with a message if the device is connected to the server.
Step 23: Auto-Start at Boot.
Once media access has been granted, you will be taken back to the Wilyer configuration screen. On the left side in the Signage Permissions, there are two significant checkboxes:
App Autostart at Boot - This feature on or off makes the app run automatically when the TV is switched on.
Keep on Top - This is available to make sure the signage display does not disappear.
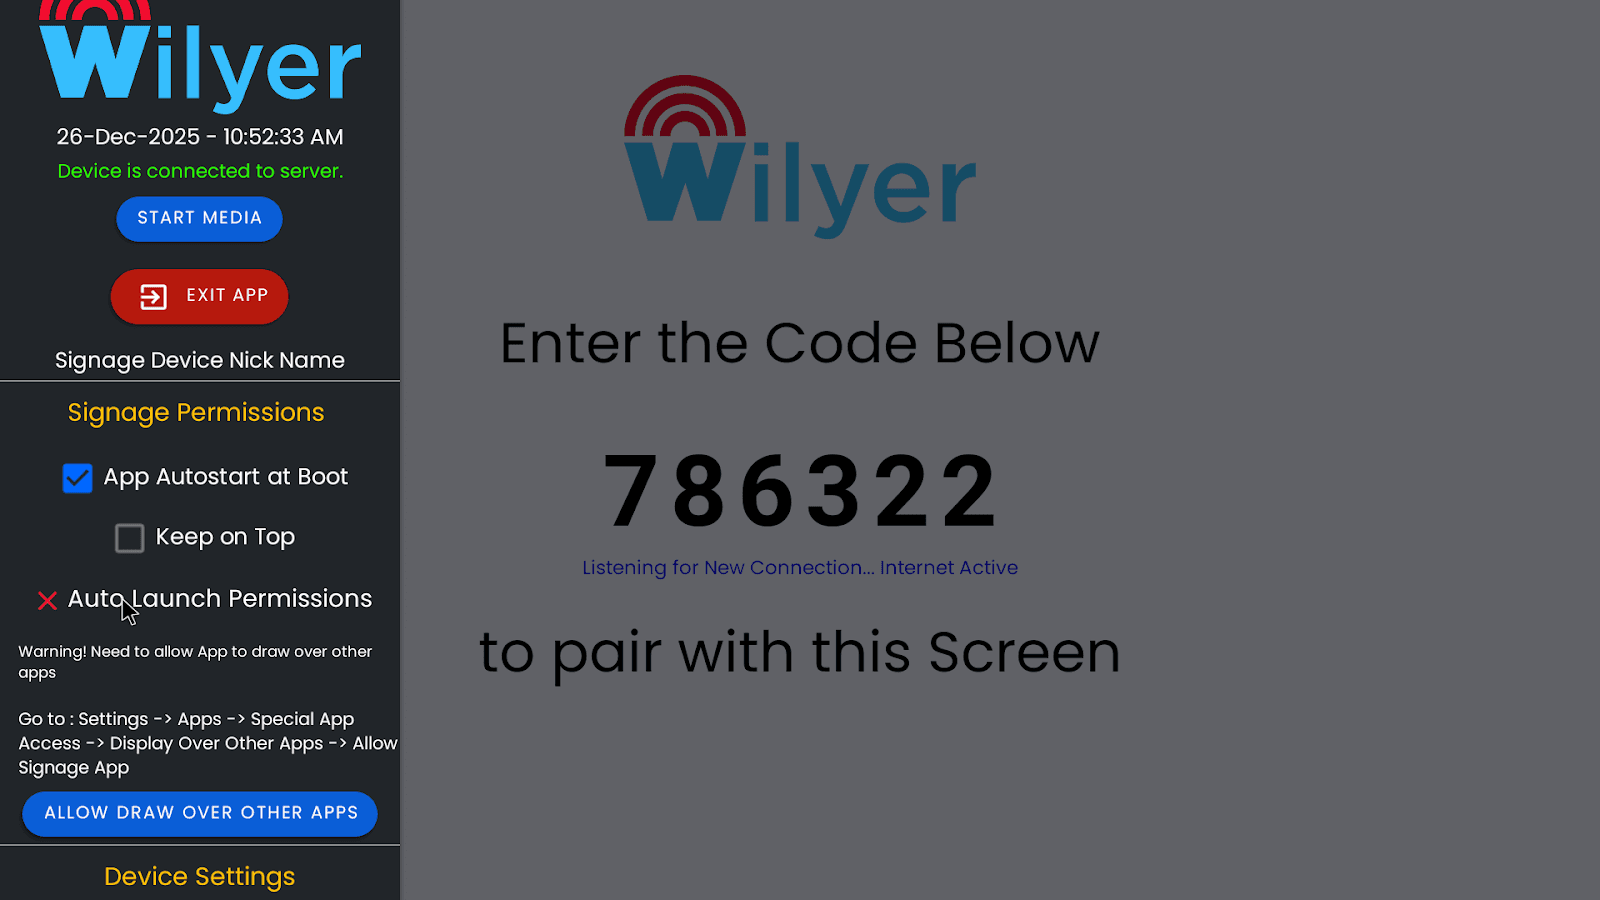
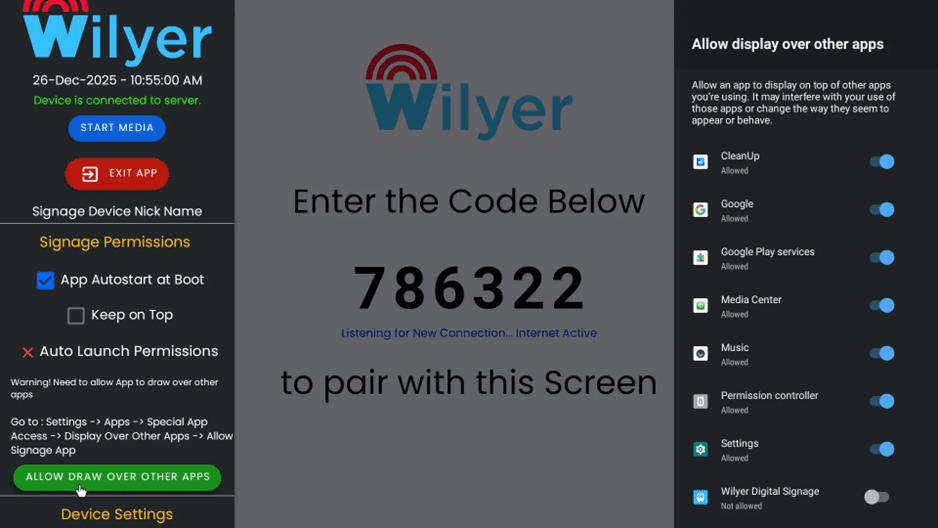
Step 24: Display Overlay Permission.
In the Auto Launch Permissions, there would be a warning note: Warning! Requirement to permit App to draw over other apps. This is required to allow the Wilyer Digital Signage app to automatically launch when Android devices running Android 10 or later start up.
The system gives instructions: 'Go to: Settings -> Apps -> Special App Access -> Display Over Other Apps ->Allow Signage App'.
To set this permission, press the Green button in the right-hand corner, which is ALLOW DRAW OVER OTHER APPS.
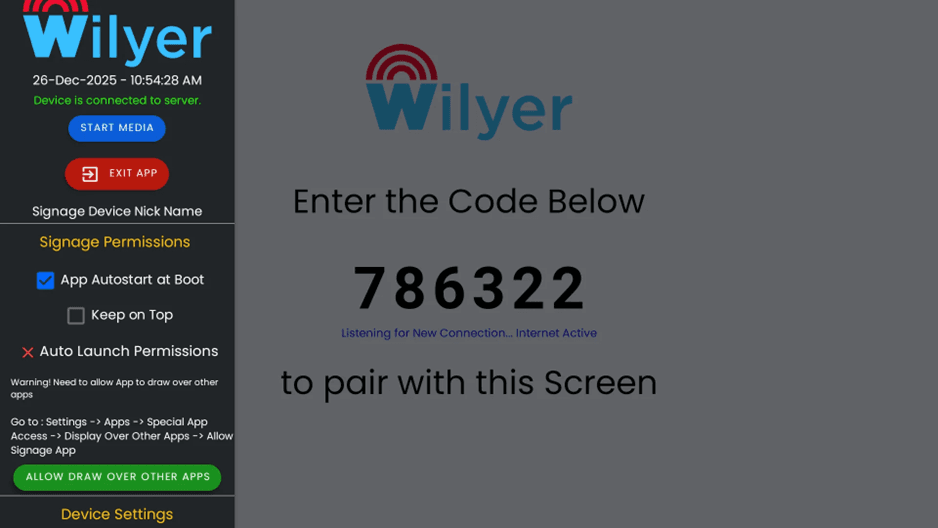
Step 16: Restart the Application.
Once the permissions are set, press the button in the Device Settings section that is named restart app. This will reopen the Wilyer application and set all of your permission settings.
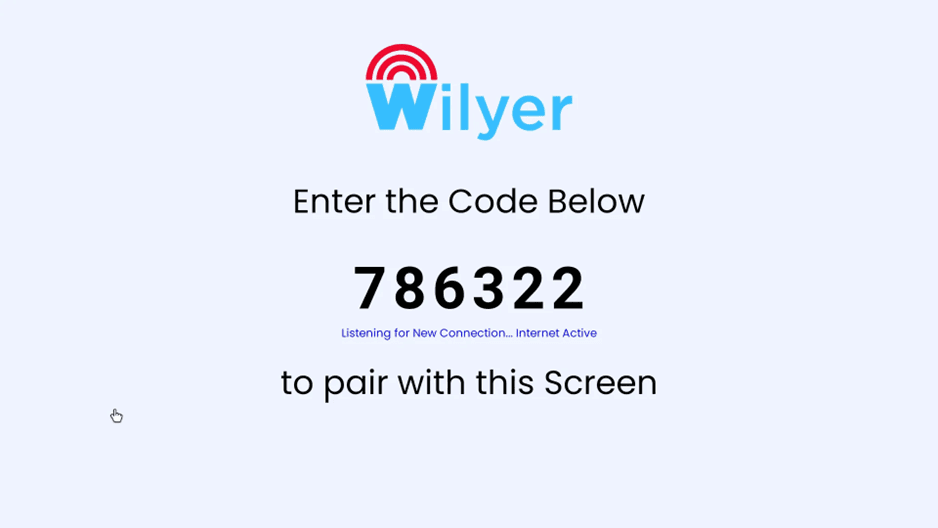
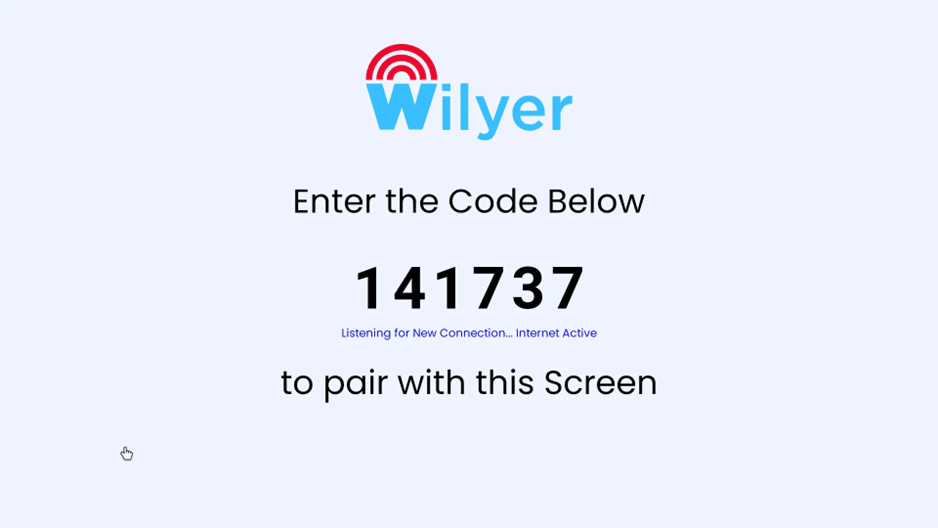
Step 17: The app has been rebooted and restarted.
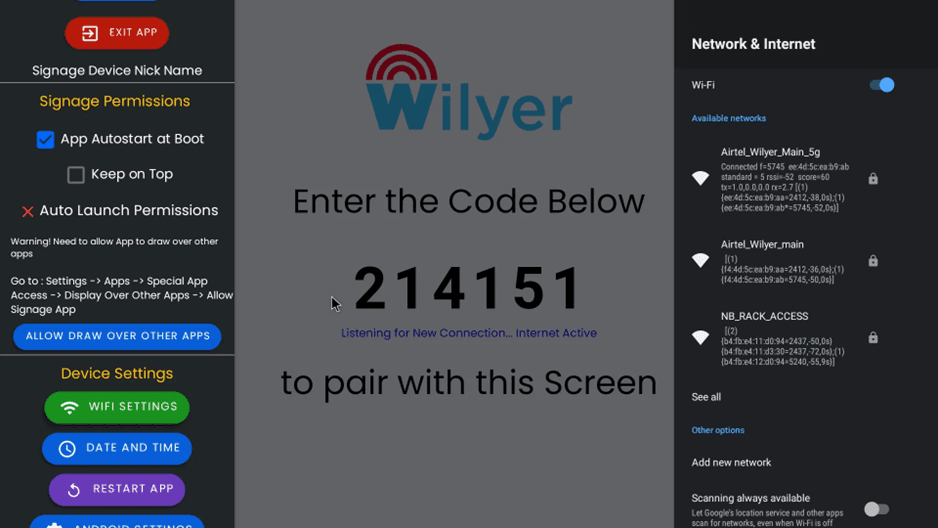
Once restarted, then you will see a clean pairing screen with the Wilyer logo and a new 6-digit pairing code. On the screen, the message is Enter the Code Below and Listening to New Connection. Internet Active To match this Screen.
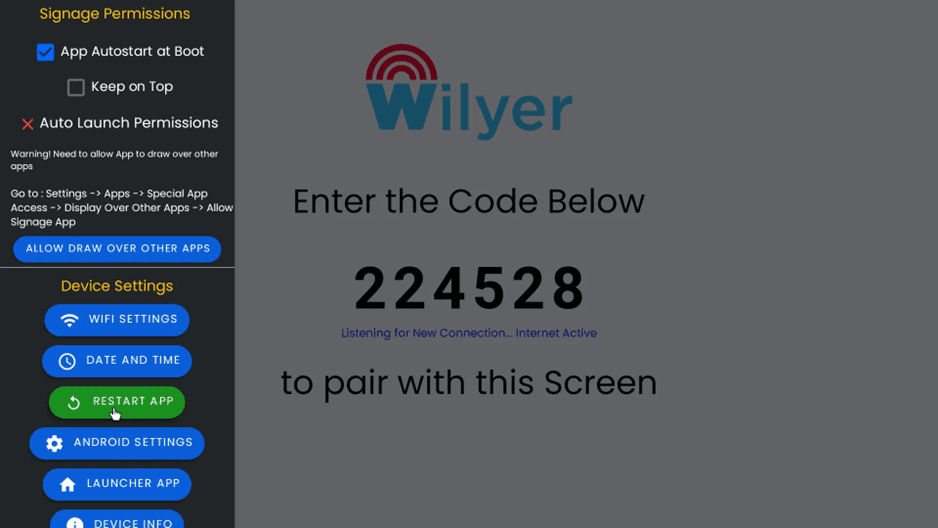
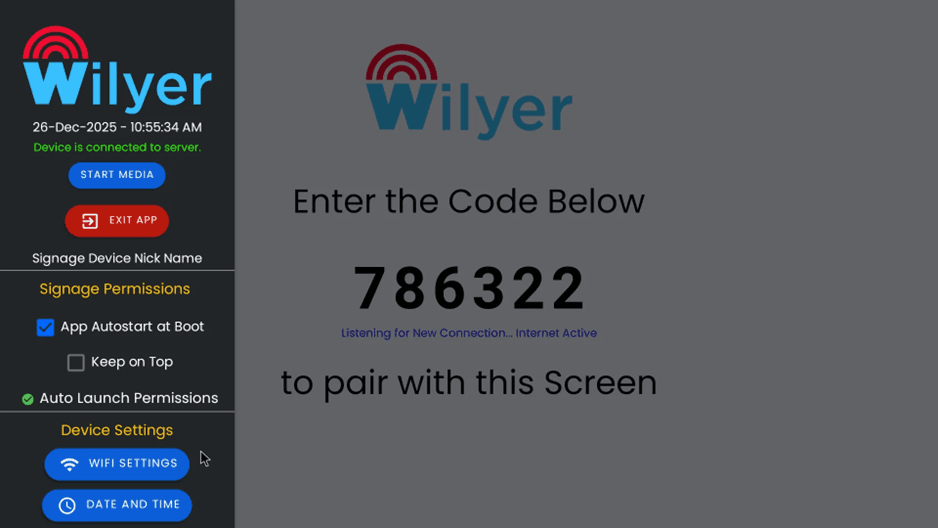
Step 18: Enter into the Access Device Settings Menu.
The left side of the main pairing screen has the menu of device settings. The following menu displays significant configuration items such as; device settings which have various buttons such as Wi-Fi settings, date and time, restart application, android settings, launcher application, and device information.
Step 19: View OS Permissions
The left panel has a scroll bar which, when used, will help one locate the OS Permissions section. You will find several permission statuses here such as Location Access, Camera Access, Microphone Access, Storage Access and All Files Access. The red X marked permissions have to be allowed to be used fully.
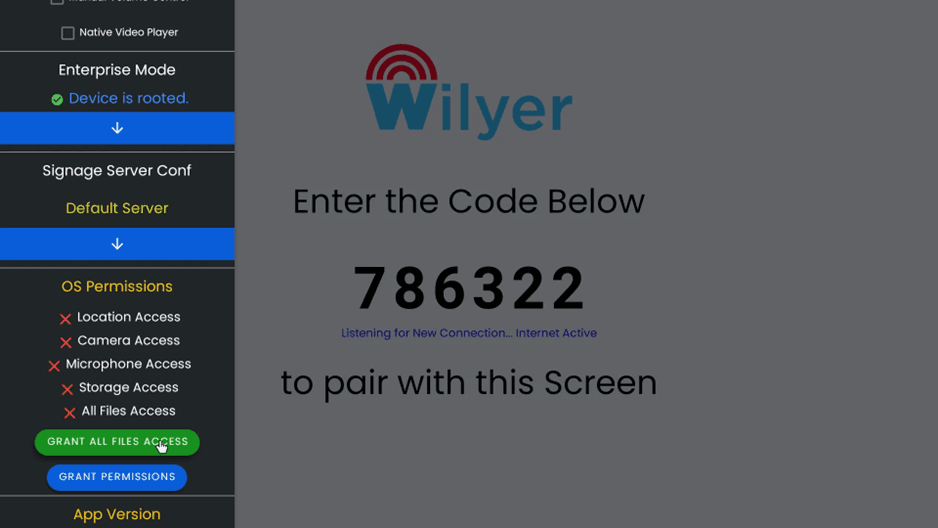
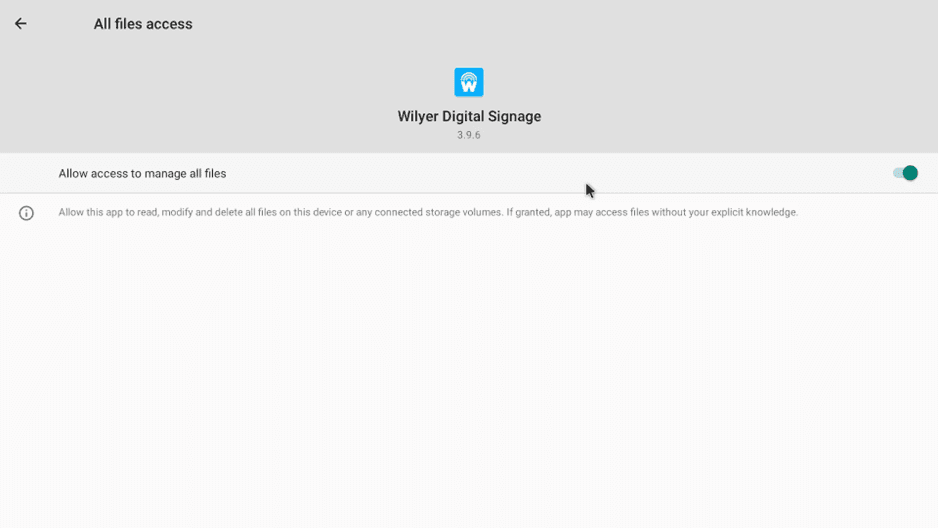
Step 20: Grant File Access Permission
Once you have clicked on GRANT ALL FILES ACCESS, You will be automatically redirected. to the android system settings page with the title of All files access. This is where you will find the Wilyer Digital Signage app (version 3.9.6) that has a toggle switch.
Step 21: Grant Additional System Permissions
The system will request access device location authorization. In this dialog, there is Allow Wilyer Digital Signage to access the location of this device? and there are various choices.
When using the application (location-based content is advisable)
Only this time
Deny
Deny and don't ask again
Choose the one that suits you as to whether you intend to take advantage of locational features in your digital signage.

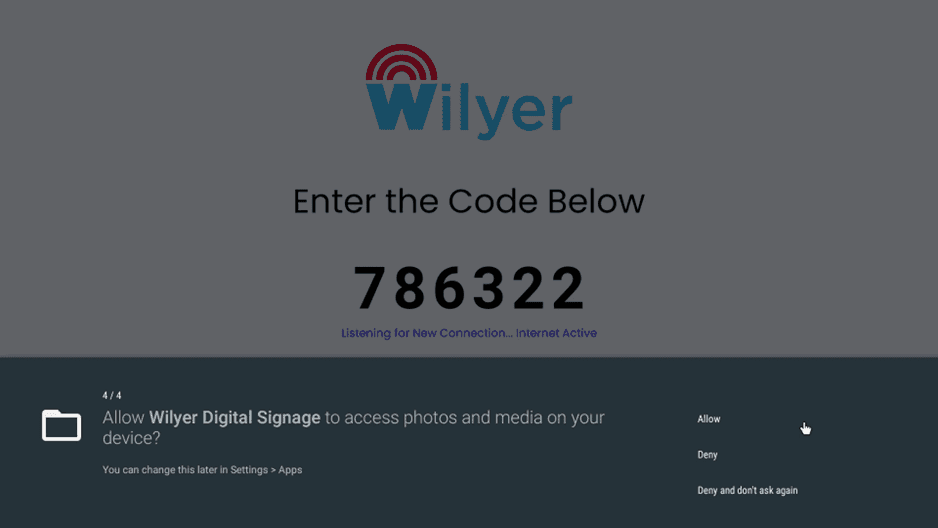
Step 22: Allow Photos and Media Access.
It will be followed by a permission request that would request you to give Wilyer Digital Signage permission to access photos and media on your device. The permission is essential to the app to show images and videos on your local storage or USB drive. Grant this by clicking on the Allow button.
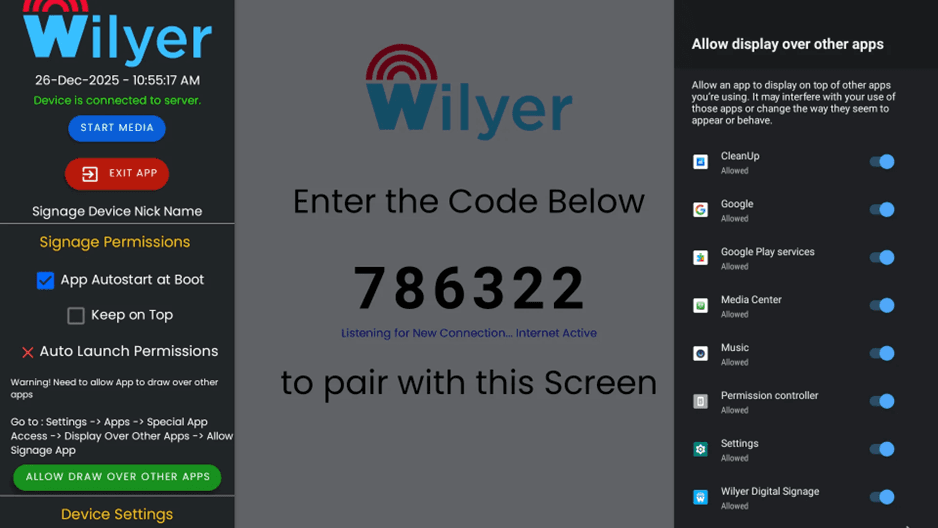
Step 25: Review Display Over Other Apps Settings
Once you have pressured the button, the system settings page of 'Allow display over other apps' will appear. On this page, one can see a list of apps, either with (or without) permission to overlay other apps. You will find such apps as CleanUp, Google, Google Play services, Media center, Music, Permission controller, Settings, and Wilyer Digital Signage.
It is important to note that the majority of apps have the status of Allowed. Find Wilyer Digital Signage in the list - when it is marked as Not allowed, touch it to allow the permission.
Step 26: Enable the Wilyer Display permission to allow the app to function correctly on the device.
Once you have tapped Wilyer Digital Signage in the list, the toggle switch will now be turned on (it is blue). The position must be changed to an 'Allowed' one. This authorization enables the Wilyer application to overlay its contents over other applications which is necessary in maintaining a continuous digital signage.
Step 27: Check Auto Launch Permissions.
Get back to the Wilyer app configuration screen. At this point you ought to observe that the Auto Launch Permissions shows a green checkmark () rather than the red X which means that the display overlay permission has been granted. The application has been updated with all the permissions to be used as digital signage.
The status of permission will change to a green checkmark beside Auto Launch Permissions which will indicate that the app will be able to show the contents above the other apps.
Step 28: Perform Final App Restart.
At this point, all permissions have been set, and it is time to start the app once again so that all settings would be in place. Go to the device settings and in the section, there is a green button labeled as RESTART APP, which you need to click.
This last Re-boot will boot the app to all the permissions granted and be able to display a pairing and content ready.
Step 29: Ready for Pairing
Once the last restart, the Wilyer Digital Signage pairing screen will appear with a new 6-digit code (in this case: 141737). The screen displays:
The Wilyer logo at the top
Introduction of the Code Below command.
Your special 6-digit pairing code (changes upon each restart)
Listening to Find New Connections. Status message in Internet Active
'to pair with this screen' instruction
Congratulations, The device is also fully setup and is ready to be paired with the Wilyer cloud platform. Record the 6-digit code that you see on your screen - you will require this code to enter the pairing process in the following section.
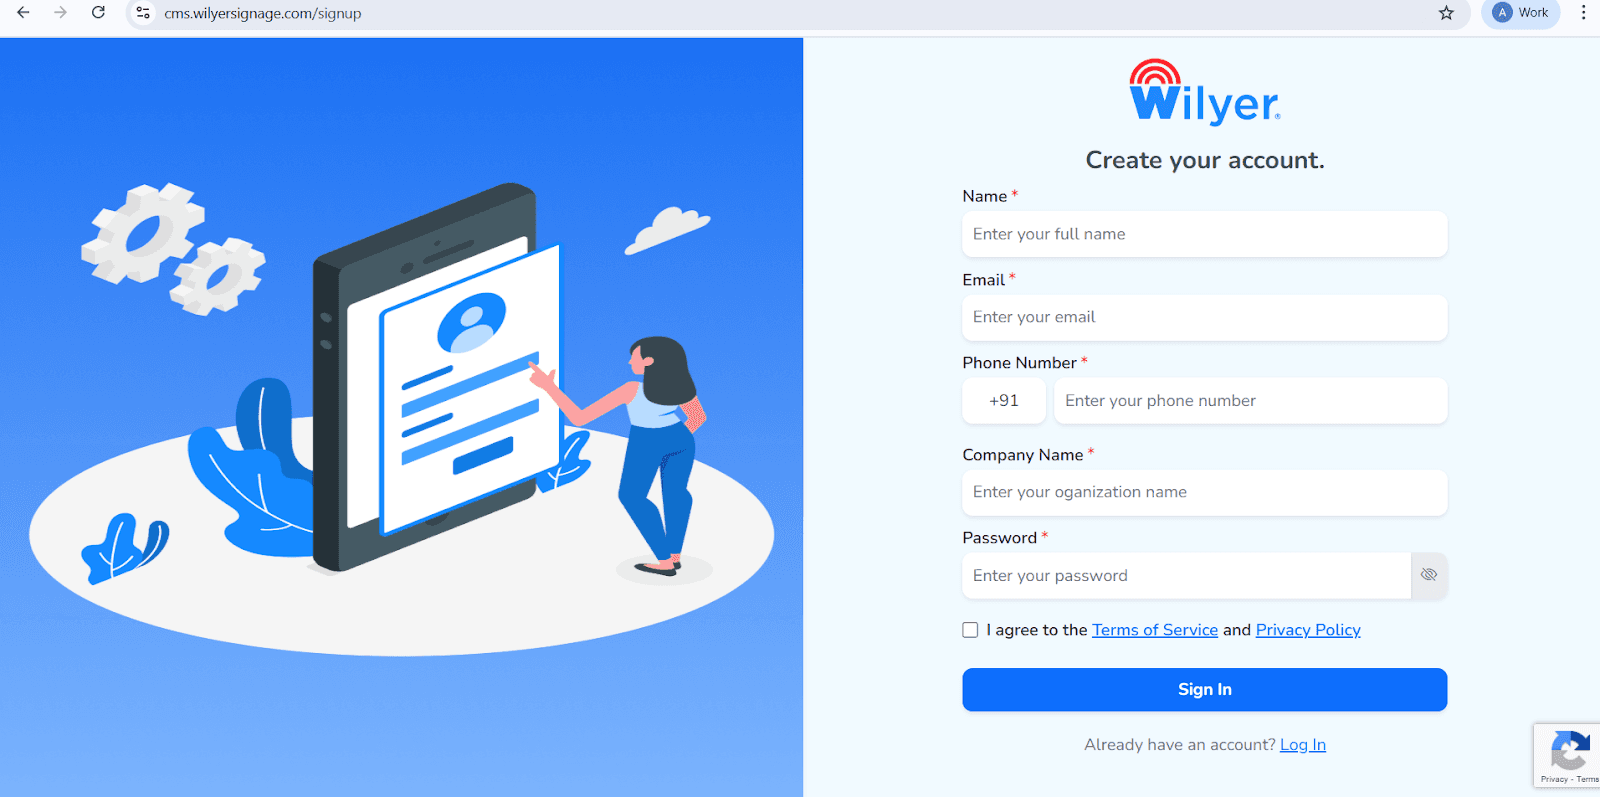
Open the Wilyer Sign-Up Page
Visit the official Wilyer Cloud CMS registration page to start creating your digital signage account.
Enter Your Full Name
Provide your complete name, which will be used as the main administrator for managing the signage dashboard.
Add Your Email Address
Enter a valid email address. This will be used for login, account verification, and important notifications.
Provide Your Phone Number
Enter your mobile number along with the correct international country code.
Enter Your Company Name
Add your business or organization name to create a professional identity within the Wilyer platform.
Create a Secure Password
Set a strong password to keep your Wilyer account secure.
Accept the Terms and Privacy Policy
Review and agree to the Wilyer Terms of Service and Privacy Policy by checking the confirmation box.
Complete Registration
Click the Sign In button to finish the registration and access the Wilyer dashboard.
The use of Android Media Players to ease the implementation of digital signage.
By using an external Android media player, any non-smart TV can be converted into a fully managed digital signage display. The media player connects to the internet and runs the Wilyer Digital Signage app, allowing all content to be controlled from one central dashboard without USB playback or manual updates. This ensures stable performance, remote access, and long-term reliability.
Quick Set-up and Bulk Deployments with USB APK Installation.
The Wilyer Android APK can be preloaded on various media players through USB hence this mode would be best suited in big deployment. IT teams or installers can be ready to prepare dozens or even 100+ dozens of media players within a short time without having to log-in to Google Play on every one. This also saves a lot of set up work and makes sure that all screens are set up in a consistent manner.
The best method is the use of Android Media Player-Based Signage.
Android media players are specifically designed to have uninterrupted play and be administered over the network. Android devices support: unlike USB only solutions or even low-end TV media players.
App auto-launch on reboot
Remote troubleshooting
Playlist and video playback In real time.
One screen to hundreds of scalability.
This makes them much more dependable to use as professional signage.
Android Media Players vs. Other Digital Signage Methods.
USB Playback on TV
USB drives are capable of playing only the static media and have to be updated manually on each screen. It lacks a remote control, scheduling, or monitoring, and is therefore not scalable or professional.
Smart TV Built-in Apps
Smart TVs depend on branding and operating systems, and in many cases, they lack support for apps over a long period, and are challenging to scale. Models are not consistent in compatibility with apps and updates to the operating system.
Business Signage Hardware.
Players with commercial-grade are much more costly yet high quality performers. Android media players are also equally functional but at a significantly lower price to most businesses.
Optimal Solution to Scalable, Low-Cost Digital Signage.
Android media players are at the right balance between performance, cost, and Evaluable.They enable companies to reuse old TVs, set up in a short period through USB based APKs and centrally control all screens. It is why they can be used by retail chains, restaurants, corporate offices, educational institutions and any organization that intends to expand digital signage in an efficient way.
Conclusion
Making your non-smart TV a professional digital signage is not as difficult and expensive as you thought. It only takes an android television box, a USB drive, and the Wilyer digital signage software to develop dynamic, interactive displays of your content that will promote better communication, customer experience, and modernization of your space all at a low price of commercial digital signage software.
All the steps of the installation and configuration procedure have been taught to you, starting with the insertion of the USB drive, up to the permission and pairing with the cloud platform. No matter the size of your business, or the scale and complexity of your office, or the importance of your school, or the administration of a healthcare facility, this digital signage solution will provide the flexibility, scalability, and cost-effectiveness necessary to effectively communicate to your audience.
The cloud-based management solution implies that you can edit content regardless of where you are or the time of day without having the technical skills or the physical ability to access each display. Plan various content to be shown at various times, explain to particular audiences, make professional presentations using templates and effects, and track engagement - all in the same, easy-to-use dashboard available on any device with internet access.
You have not only saved thousands of dollars by doing things this way versus spending money on commercial digital signage solutions, you also have full control of the content of your message and visual communication. It is now time to inform, engage and impress your audience with your professional, dynamic content that captures attention and achieves results with your digital signage display.

توافق منصة متعددة لكل شاشة عرض رقمية
قم بتشغيل برنامج الإشارات الرقمية الخاص بـ Wilyer على نظام التشغيل المفضل لديك دون أي عناء.
