
LG webOS
Cómo instalar software de señalización digital en LG webOS
Guía paso a paso para configurar señalización digital en pantallas LG webOS
9 ene 2026
Introducción
La señalización digital de LG WebOS es capaz de convertir su LG Smart TV en una plataforma de exhibición comercial efectiva. Puede crear un menú o un quiosco de información, o una exhibición corporativa, pero en cualquier caso, encontrará que esta guía es la manera más fácil de pasar por el proceso de configuración de señalización basado en LG WebOS. Una vez que tenga el primer arranque, la conexión a la red y esté listo para usar su señalización comercial de LG de manera profesional, entonces sabrá cómo configurar su señalización.
¿Por qué elegir LG WebOS para señalización digital?
LG WebOS ofrece varias ventajas para aplicaciones de señalización digital:
El software de señalización incorporado de WebOS no requiere reproductores externos.
La señalización digital en LG WebOS tiene la libertad de ser gestionada de forma remota.
Escalabilidad del sistema de gestión de pantallas de LG WebOS, de nivel empresarial.
Sistema de gestión de señalización profesional con programación de tiempo en LG WebOS.
Firma digital en LG WebOS con características de modo quiosco.
Requisitos previos
Nota antes de comenzar la instalación de su aplicación de señalización LG WebOS, tiene:
Un televisor grande o una pantalla comercial con LG WebOS.
Acceso a la contraseña de la red inalámbrica.
Control remoto de LG
Conocimientos simples sobre el entorno de red.
¿Qué es LG WebOS?
El LG webOS (Sistema Operativo Web) es un sistema operativo Linux dirigido a dispositivos integrados e inteligentes, y su prioridad principal es la facilidad de uso. WebOS es una interfaz muy popular en la televisión inteligente LG y en la señalización digital, con un diseño limpio centrado en el contenido y un menú de aplicaciones simplificado que se puede navegar fácilmente. Es compatible con tecnologías web modernas (JavaScript y HTML5) y permite un desarrollo de aplicaciones flexible y escalable, por lo que es muy adecuado para plataformas de señalización digital, como Wilyer.
Guía de instalación: Paso a paso.
Estos son los procedimientos específicos que necesita seguir para instalar la señalización digital en su televisión LG WebOS. Cada paso tiene una captura de pantalla para instruirle sobre cómo hacerlo.
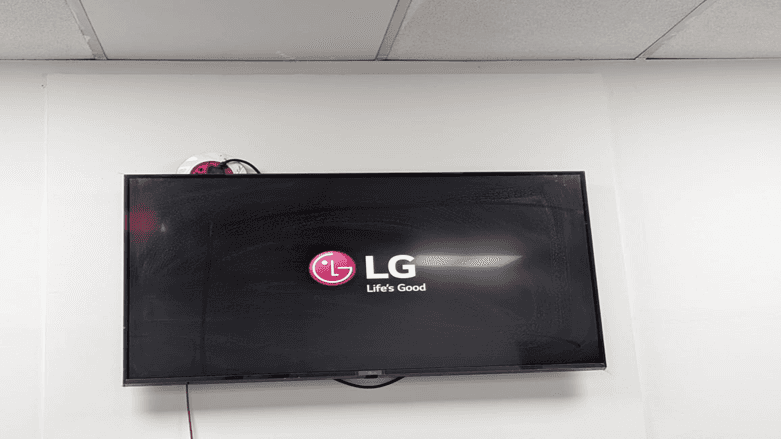
Paso 1: Encienda su televisor LG
Comience configurando su señalización LG WebOS encendiendo primero su televisor LG. El sistema se iniciará con el conocido logo de LG y el lema “Life is Good”. Esta es la pantalla de inicio al usar WebOS en el proceso de configuración de un reproductor de señalización digital.
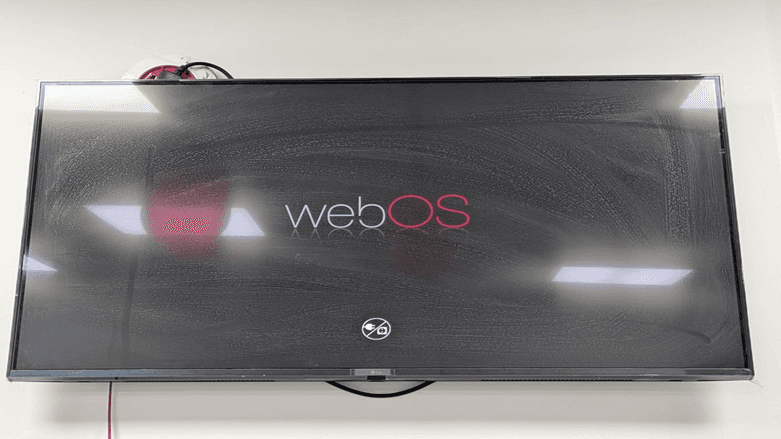
Paso 2: Pantalla de carga de WebOS
El sistema LG WebOS se cargará. En la parte inferior de la pantalla, habrá el logo de WebOS y un indicador de carga. Este proceso de carga se realiza para configurar la señalización LG WebOS.
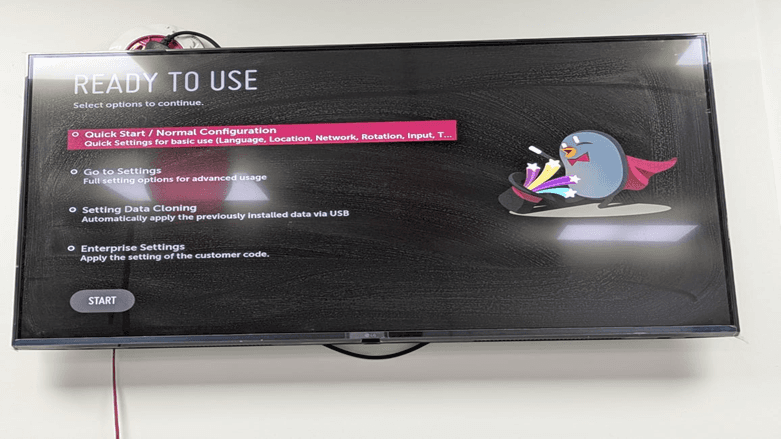
Paso 3: Elegir un modo de configuración.
Listo para usar. El software de señalización en la LG Smart TV tiene cuatro configuraciones que pueden ser seleccionadas bajo la opción Listo para usar:
Inicio rápido / configuración normal: Configuración simple con ajustes de idioma, ubicación, red y entrada (la mayoría de los usuarios deberían seleccionar esta)
Haga clic en ajustes: Para opciones de configuración avanzadas.
Configuración de clonación de datos: Para restaurar datos que se hayan instalado anteriormente a través de USB.
Ajustes de empresa: Para implementar configuraciones específicas del cliente.
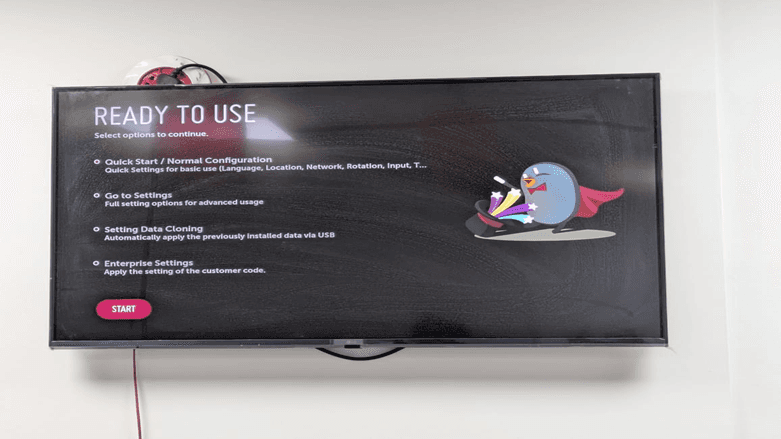
Paso 4: Confirmar selección de configuración
Seleccione la opción de Inicio rápido / Configuración normal y luego presione el botón de inicio en la parte inferior de la pantalla para continuar con la configuración de su sistema de gestión de contenido LG WebOS y haga clic en el botón “INICIAR”.
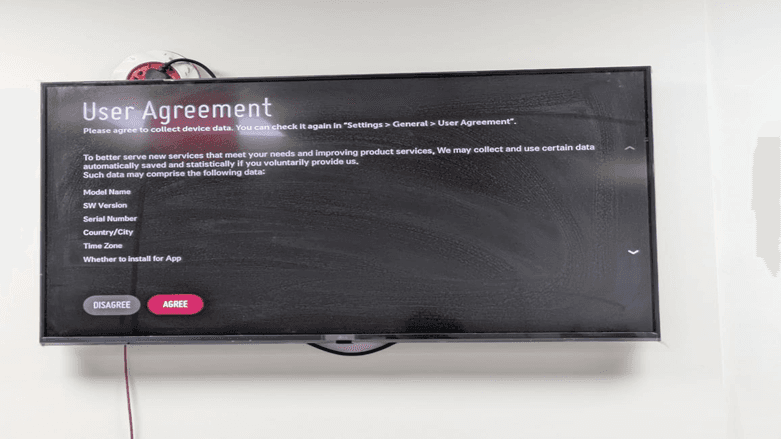
Paso 5: Revisar el Acuerdo de usuario
La política de recolección de datos de LG se muestra en la pantalla del Acuerdo de usuario. Es un requisito predeterminado de la instalación de la aplicación de señalización LG WebOS. Vea los términos y continúe haciendo clic en ACEPTAR. El acuerdo especifica el tipo de datos del dispositivo (nombre del modelo, versión de SW, número de serie, país/ciudad, zona horaria y preferencias de instalación de aplicaciones) que podrían ser obtenidos para mejorar servicios.
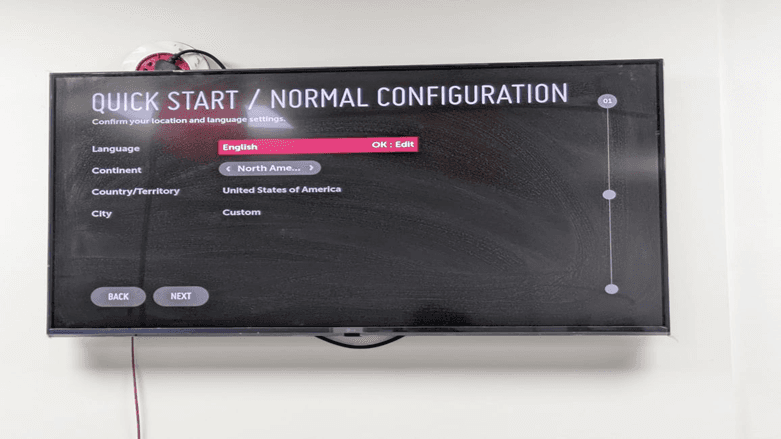
Paso 6: Configuración de idioma y ubicación.
Change el idioma, continente, país/territorio y ciudad de su pantalla. Esto es importante para establecer correctamente su zona horaria en su tablero de menú digital LG WebOS. Las selecciones predeterminadas son:
Idioma: Inglés
Continente: América del Norte
País/Territorio: Estados Unidos de América.
Ciudad: Personalizado
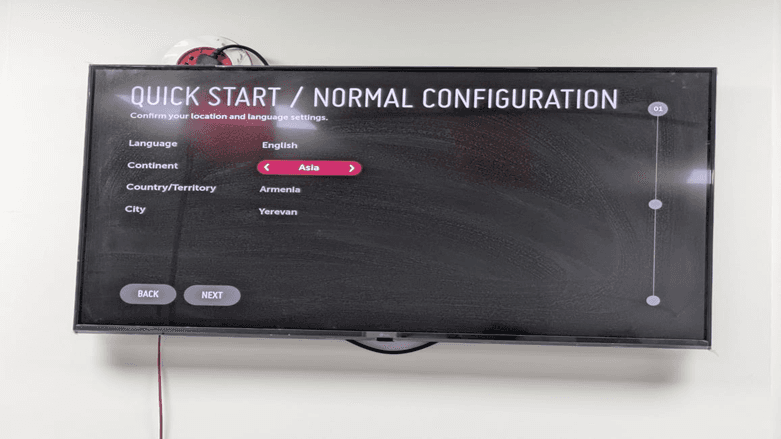
Paso 7: Verificar ajustes de ubicación.
Una vez que haya elegido su país, el sistema cambiará para mostrar Asia como continente y a India como país. Ereván será la ubicación predeterminada de la ciudad. Esta configuración es significativa en el control de contenidos remotos en LG WebOS.
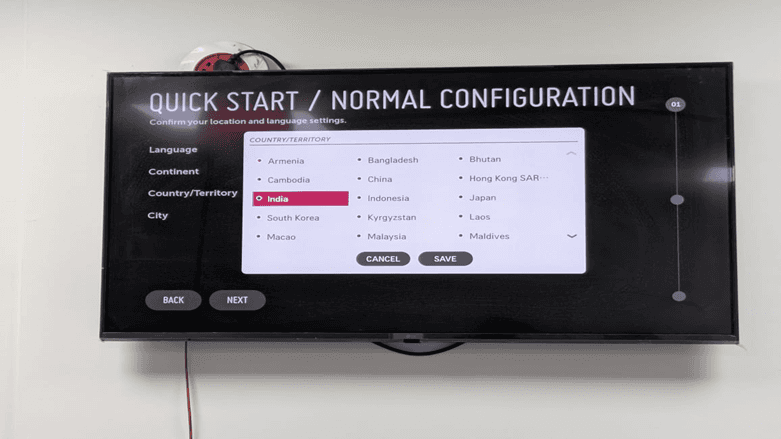
Paso 8: Selecciona tu país
Habrá un menú desplegable de países disponibles. En este caso, elegiremos India como la solución de señalización profesional de LG WebOS. Su control remoto tiene las teclas de flecha que puede utilizar para navegar y elegir el país.
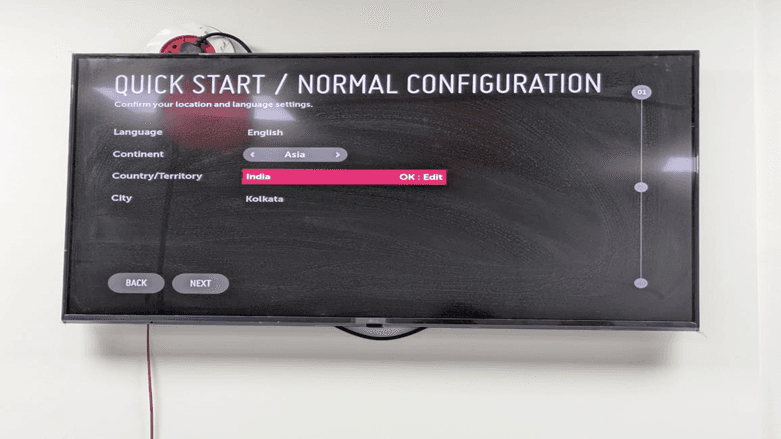
Paso 9: Ajustar configuración de ciudad
Haga clic en el botón OK: Editar junto al campo de País/Territorio para elegir el menú desplegable de ciudades. Elija su ciudad particular para asegurarse de que su publicidad digital en la televisión LG WebOS sea oportuna. Hemos elegido Kolkata en este ejemplo.
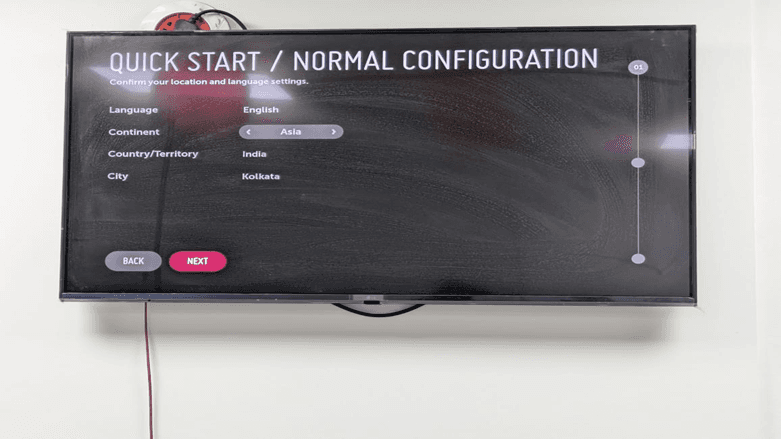
Paso 10: Finalización de la configuración de ubicación.
Su configuración completa de ubicación se presenta ahora en la pantalla:
Idioma: Inglés
Continente: Asia
País/Territorio: India
Ciudad: Kolkata
Haga clic en “SIGUIENTE” que luego pasa al paso de configuración de red.

Paso 11: Verificar ubicación y continuar.
Verifique nuevamente sus ajustes de ubicación una vez más. La barra de progreso en la derecha indica que está en el paso 01 del proceso de configuración. Haga clic en siguiente para navegar a la configuración de red.
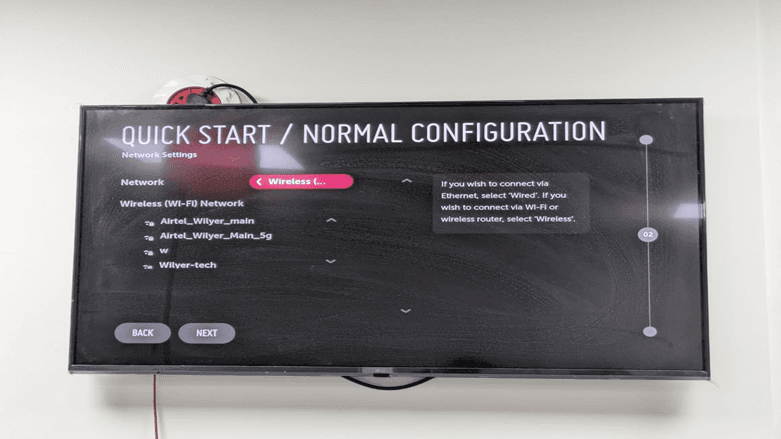
Paso 12: Resumen del sistema de red.
La conexión se proporciona a través de la pantalla de Configuración de red (paso 02). Puede elegir entre:
Inalámbrico: A través de Wi-Fi (debería usarse en la mayoría de las instalaciones)
Por cable: Use cable Ethernet (mejor en instalaciones permanentes)
Bajo la opción del tipo de red, habrá redes inalámbricas disponibles. Este es un requisito para la conectividad del reproductor de señalización digital WebOS.
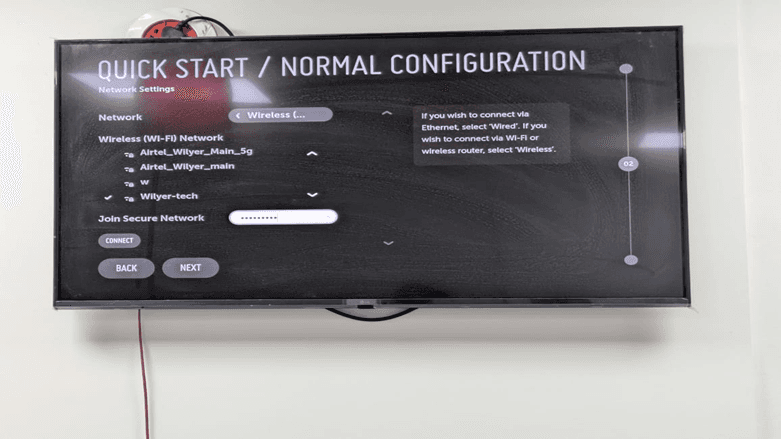
Paso 13: Elige tu red Wi-Fi.
Seleccione su red inalámbrica entre la lista de redes WIFI disponibles. En este caso, se elige el nombre Wilyer-tech. El escritorio muestra un cuadro de entrada de contraseña para acceder a una red segura, lo cual es esencial en la señalización digital segura de LG WebOS.
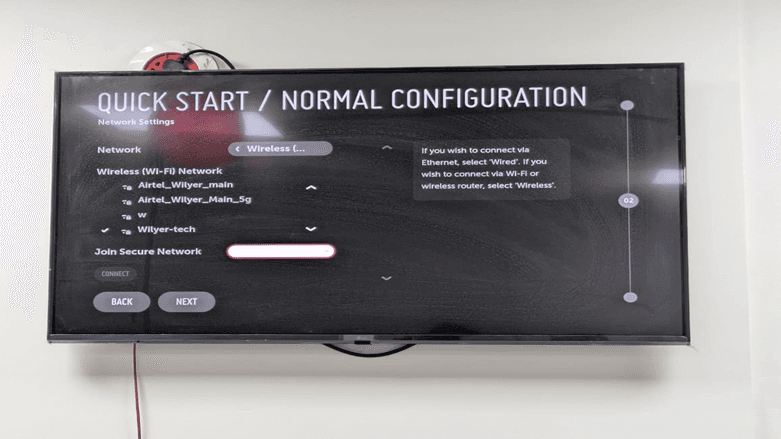
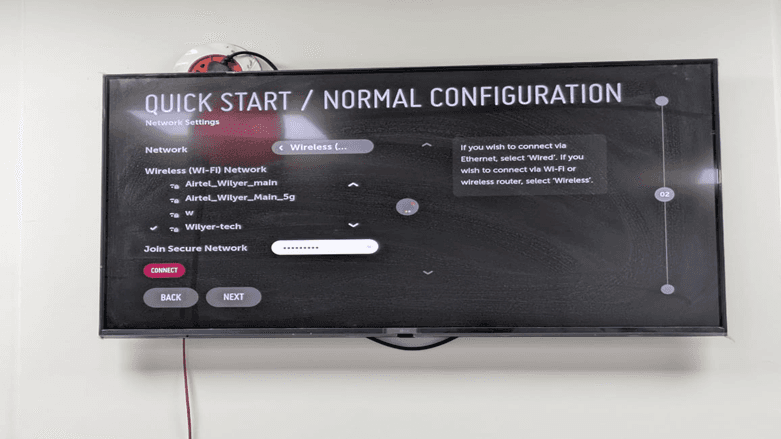
Paso 14: Ingrese la contraseña de la red
Ingrese la contraseña de Wi-Fi en el campo de Unirse a la red segura. Para asegurar la seguridad, la contraseña estará en forma de puntos. Use su control remoto y trabaje a través del teclado en pantalla e ingrese la contraseña. Haga clic en "CONECTAR" cuando termine.
Paso 15: Iniciar conexión
Una vez que ingrese su contraseña, el botón de CONECTAR se resaltará. Se puede hacer clic para establecer la conexión de red de su señalización en modo quiosco de LG WebOS. Se mostrará una opción de carga mientras el sistema se conecta a su red.
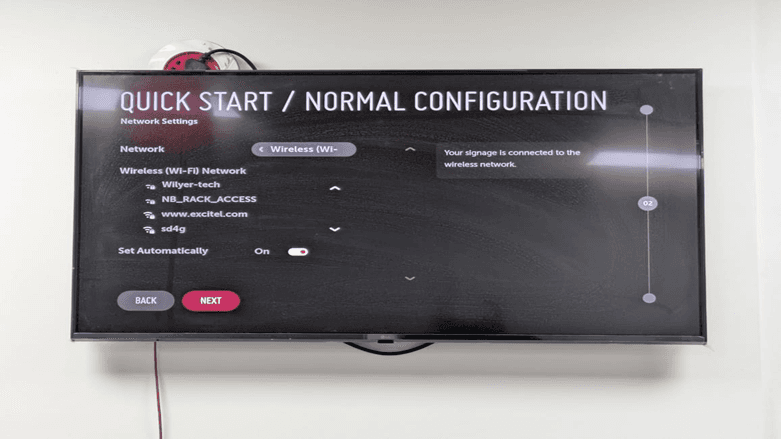
Paso 16: Verificar conexión de red.
Una conexión exitosa se confirmará con un mensaje: Su señalización está conectada a la red inalámbrica. Está configurada para automático y la pantalla recibirá automáticamente los ajustes de red. Esto es relevante para la solución de problemas de señalización de LG WebOS. Haga clic en "SIGUIENTE" para continuar.
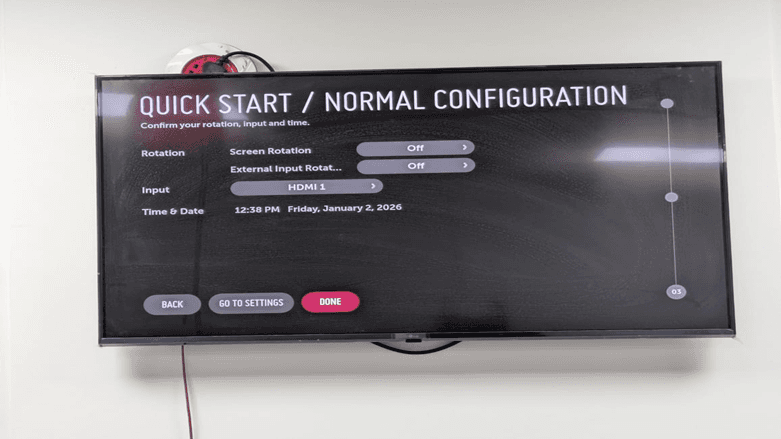
Paso 17: Configuración de entrada y hora.
La última pantalla de configuración (paso 03) le permite configurar:
Rotación: Rotación de pantalla (apagada)
Rotación de entrada externa (desactivada por defecto): Rotación de entradas externas.
Entrada: Fuente de entrada predeterminada HDMI 1 en este caso.
Hora y fecha: Hora y fecha del sistema (se actualiza automáticamente dependiendo de la ubicación)
Estos entornos también son esenciales para el correcto funcionamiento de la configuración de su reproductor de medios LG WebOS. Junto a Hora y fecha, proceda a hacer clic en el botón ok: editar en caso de que tenga que hacer algunos ajustes manuales.
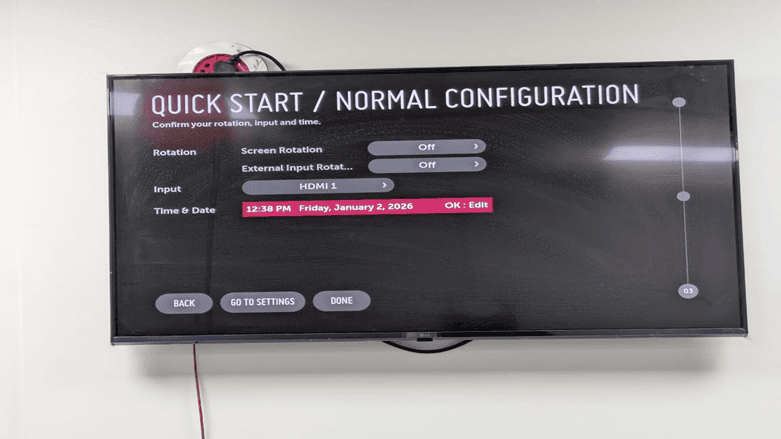
Paso 18: Completar la configuración inicial
Revise por última vez todos sus ajustes de configuración:
Rotación de pantalla: Apagada
Rotación de entrada externa: Apagada
Entrada: HDMI 1
Hora y fecha: 12:38 PM viernes, 2 de enero de 2026
Cuando esté satisfecho con todos los ajustes, haga clic en HECHO para finalizar la configuración básica de señalización de LG WebOS. También le permite ir a la configuración haciendo clic en IR A CONFIGURACIÓN o regresar a las pantallas anteriores haciendo clic en Atrás.
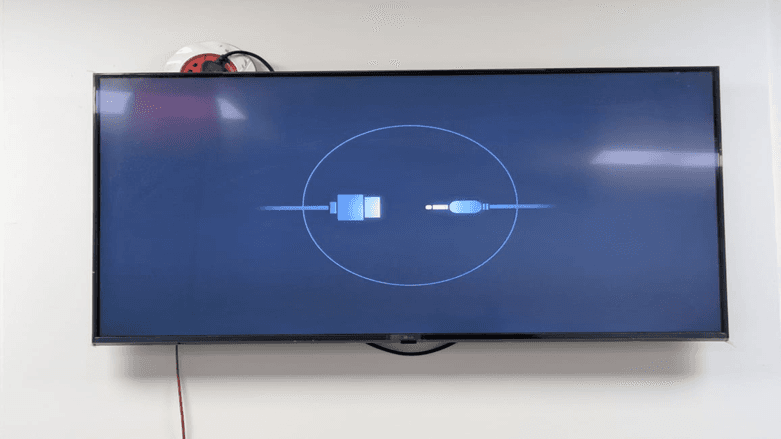
Paso 19: Sincronización del sistema.
Una vez que haga clic en REALIZADO, el sistema mostrará una pantalla de sincronización. Esto hace que su pantalla esté lista para aceptar la interfaz de gestión de contenidos de señalización digital. La animación de sincronización representa un cable USB y la conexión del dispositivo, lo que significa que el sistema está a punto de entregar contenido.
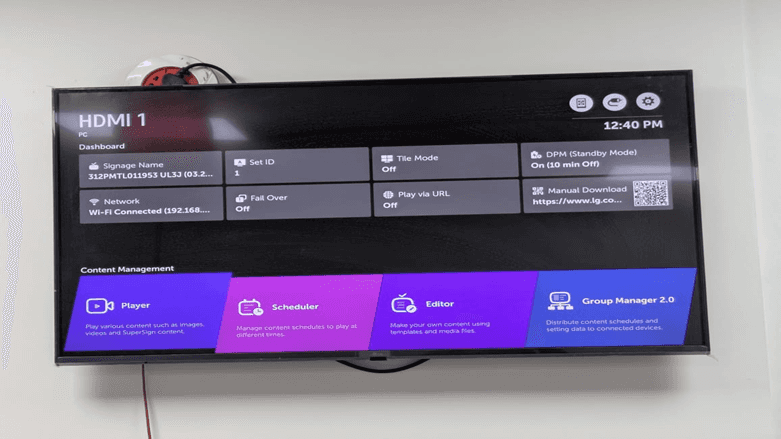
Paso 20: Acceder al tablero
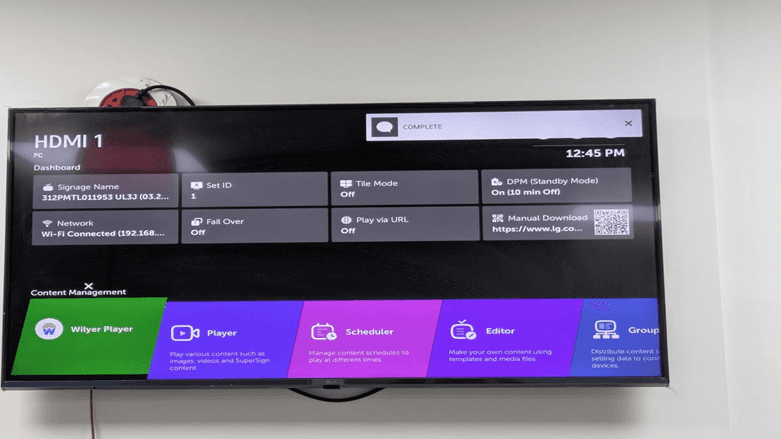
Felicidades, su señalización digital LG WebOS ahora está en línea. El tablero muestra:
La siguiente pantalla muestra el tablero de señalización de LG webOS, el lugar donde se gestionan los ajustes de dispositivo y contenido importantes. Muestra la fuente de entrada actual (HDMI 1), el estado de conexión de red, el nombre de señalización y la configuración del sistema, incluyendo Modo de mosaico, Fail Over y Modo de espera. La parte inferior tiene acceso a herramientas de gestión de contenido, como Reproductor, Programador, Editor y Administrador de grupos que permitan reproducir contenido, organizar listas de reproducción, diseñar y administrar múltiples pantallas. Este tablero sirve como un panel de control para el uso y gestión de pantallas de señalización digital LG webOS.
Parte 2: Configuración avanzada de servidor SI.
Una vez que se complete la configuración inicial, lo segundo y más importante es conectar su monitor LG WebOS a un servidor SI (Integración de Señalización). Esto permite gestionar los contenidos en la nube, actualizarlos de forma remota y controlarlos de manera centralizada en más de una pantalla. Esta parte demuestra el proceso de configuración de la plataforma de señalización digital Wilyer como un caso de CMS.
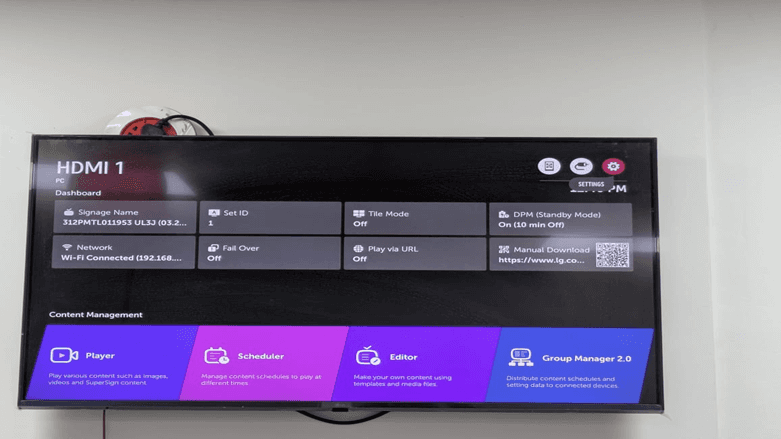
Paso 21: Acceder al tablero
Basado en el tablero principal, todos los detalles principales sobre su pantalla, como el nombre de la señalización, ID de configuración, estado de la red y las opciones de gestión de contenido están disponibles. Tres íconos en la esquina superior derecha se utilizan para acceder a otras configuraciones. Cuando tenga el ícono de configuración (ícono de engranaje), tendrá un menú de configuración avanzada.
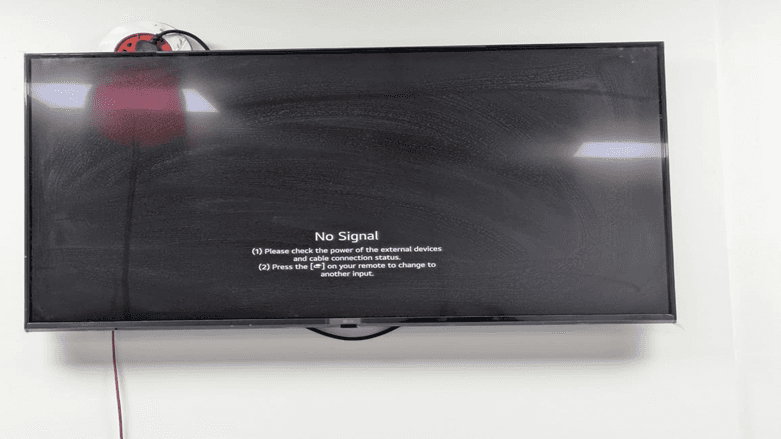
Paso 22: Pantalla sin señal
La pantalla Sin Señal se muestra cuando nada externo está conectado a HDMI. Esto es común en el proceso de establecer la pantalla para ser utilizada con señalización digital. La pantalla le da el mensaje de verificar la conexión de poder y cable en los dispositivos externos o presionar el botón de entrada en el control remoto para cambiar de fuentes. Vamos a configurarlo para tener señalización digital integrada; por lo tanto, iremos a acceder al menú de configuración.
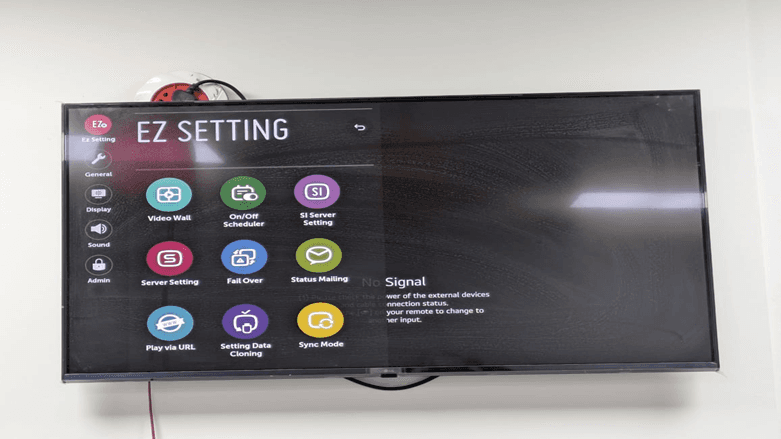
Paso 23: Abrir menú de configuración EZ
Ingrese al menú de configuración EZ presionando el botón de configuración en su control remoto. Este menú permite un acceso rápido y fácil a la configuración vital de señalización. La interfaz de configuración EZ se subdivide en algunas categorías que aparecen en la barra lateral izquierda:
General: Preferencias principales de visualización.
Pantalla: Diseño de pared y pantalla de visualización.
Sonido: Configuraciones de audio
Administración: Autorización administrativa superior.
El panel principal tiene 9 mosaicos de configuración, como Muro de Video, Programador Encender/Apagar, Configuración de servidor SI, Configuración de servidor, Fail Over, Correo de estado, Reproducir a través de URL, Configuración de clonación de datos y Modo de sincronización. Para conectarse a un CMS basado en la nube, nos concentraremos en la opción de Configuración de servidor SI.
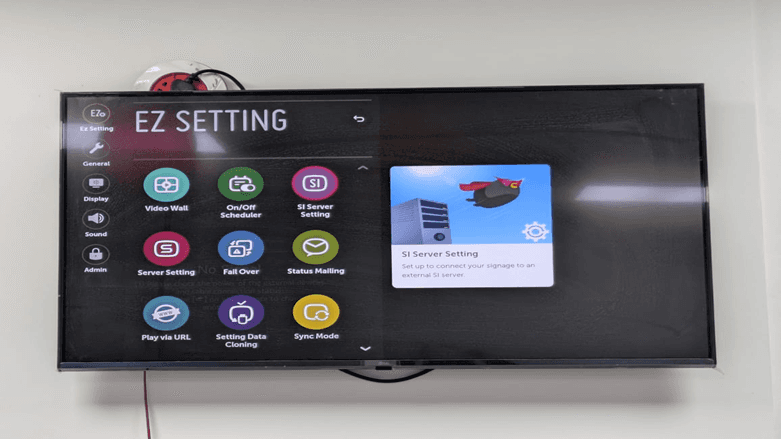
Paso 24: Elección de configuración de servidor SI.
Puede comenzar haciendo clic en el mosaico de Configuración de servidor SI y comenzar a ajustar la conexión a su plataforma de señalización digital en la nube. Hay un mensaje emergente que indica: "configure para que su señalización apunte hacia otro servidor SI. Esto es obligatorio para las implementaciones de señalización digital de LG WebOS que deben tener gestión centralizada.
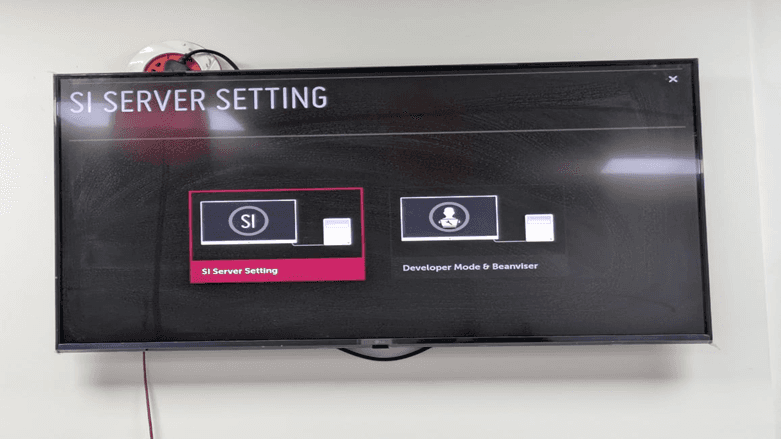
Paso 25: Seleccionar método de configuración.
Dos opciones de configuración están presentes en la pantalla de Configuración de servidor SI:
Configuración de servidor SI: Para usar servidores SI estándar, ya sea con nombres de dominio o direcciones IP.
Método de desarrollo y Beanviser: Para desarrollar y probar el producto.
Elija Configuración de servidor SI (marcado en rosa) para continuar con la configuración del servidor tradicional que se utilizará en producción.
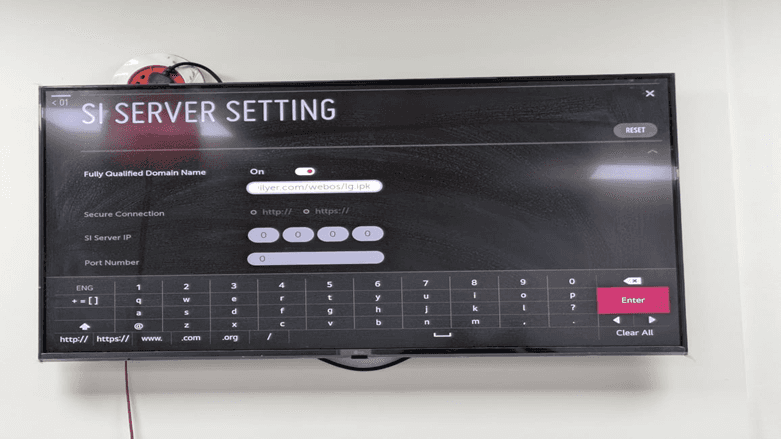
Paso 26: Ingresar el nombre de dominio del servidor.
Hay varios campos notables que se muestran en la pantalla de configuración de Configuración de servidor SI:
Nombre de dominio completamente calificado: Configúrelo en ACTIVADO e ingrese su propio dominio CMS (por ejemplo, wilyer.com/webos/lg.ipk)
Conexión segura: Seleccione ya sea protocolo http o protocolo https.
IP del servidor SI: Debe escribirse la dirección IP del servidor (formato: 0.0.0.0)
Número de puerto: Ingrese el puerto de comunicación.
El teclado en pantalla permite ingresar los detalles de su servidor. En el caso proporcionado, estamos configurando la plataforma de señalización digital Wilyer.
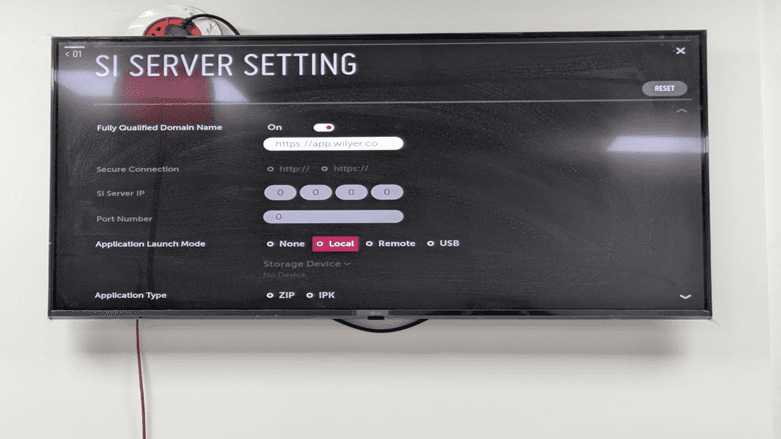
Paso 27: Configurar URL del servidor
Complete la configuración de URL del servidor escribiendo la ruta completa del dominio. La URL, en este caso, será "https://app.wilyer.co...". Esta es la dirección del sitio (la URL completa es (https://app.wilyer.com/webos/lg.ipk). Ahora, hay más opciones de configuración que incluyen debajo del campo de dominio:
Modo de inicio de aplicación: Seleccione entre ninguno, local, remoto o USB.
Dispositivo de almacenamiento: Elija la ubicación de almacenamiento (Sin dispositivo predeterminado)
Tipo de aplicación: Elija formato ZIP o IPK.
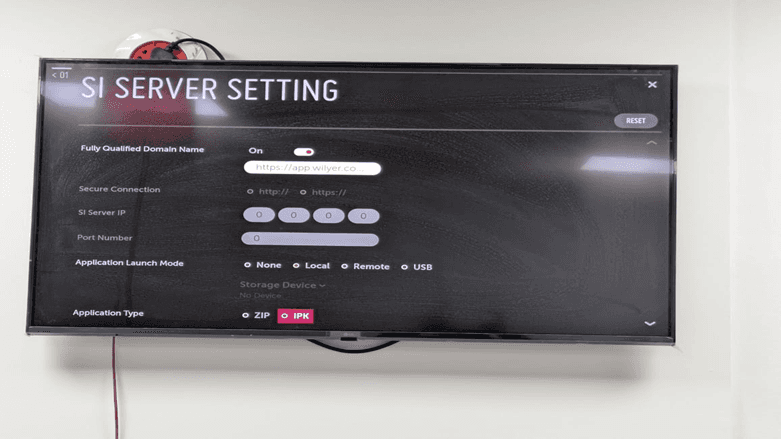
Paso 28: Seleccionar tipo de aplicación
Seleccione el tipo de aplicación de su software de señalización digital. Las dos opciones son:
ZIP: Aplicaciones web que se distribuyen como archivos ZIP.
IPK: Aplicaciones nativas de WebOS móviles (mejor rendimiento)
El mejor rendimiento con la mayoría de las plataformas de señalización digital basadas en la nube es seleccionar IPK, según se indica en la captura de pantalla.
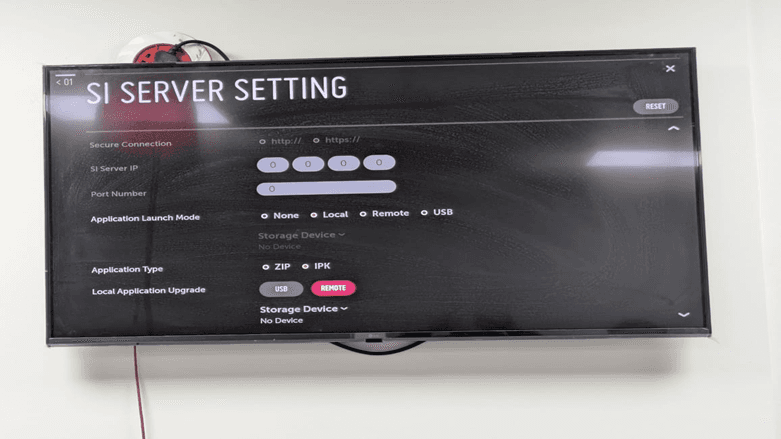
Paso 29: Configurar ajustes de actualización de aplicaciones
Siga desplazándose hacia abajo para ver algunas opciones de configuración más. La sección de Actualización de Aplicación Local le brinda la oportunidad de seleccionar qué aplicacion de señalización se actualizará:
USB: Actualización por USB (no se usa en ubicaciones en línea, pero útil en ubicaciones fuera de línea)
REMOTO: Actualización del servidor en la nube (no recomendado al tener un administrador remoto)
Haga clic en la opción REMOTO (marcada en rosa) que le permite tener su CMS basado en la nube actualizándose automáticamente. La lista de dispositivos de almacenamiento muestra Sin dispositivo, ya que estamos utilizando actualizaciones remotas.
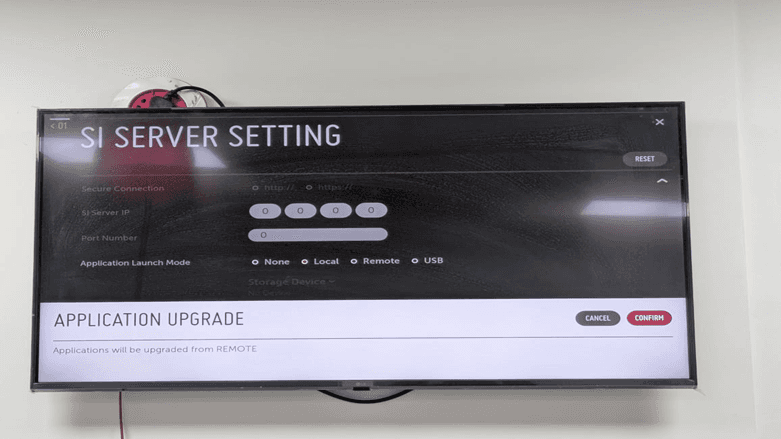
Paso 30: Confirmar actualización de la aplicación.
Un cuadro de confirmación aparece diciendo que las aplicaciones se actualizarán, como REMOTO. Este mensaje prueba que su pantalla descargará e instalará aplicaciones de señalización utilizando el servidor en la nube dado. Tiene dos opciones:
CANCELAR: Regresar a la configuración anterior.
CONFIRMAR: Instalar aplicación remota.
Entrando: Haga clic en el botón “CONFIRMAR” (resaltado en rosa oscuro) para continuar con la configuración de actualización remota.
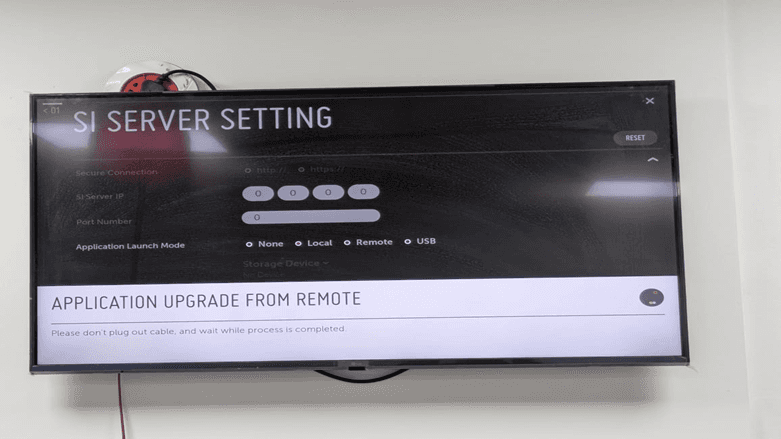
Paso 31: Actualización de aplicación en progreso.
El sistema muestra un mensaje: ACTUALIZACIÓN DE APLICACIONES REMOTAS con el mensaje: Por favor, no desconecte el cable y espere hasta que el proceso se complete. Esto significa que la pantalla LG WebOS está actualmente descargando e instalando la aplicación de señalización en su servidor en la nube.
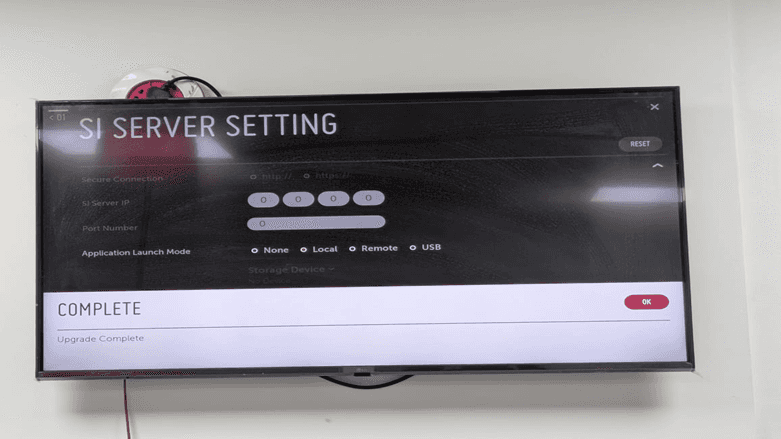
Paso 32: Actualización completa
Se muestra un mensaje de éxito que indica COMPLETO con el mensaje de Actualización completa. La aplicación de señalización digital ahora está instalada y se ha descargado correctamente en su pantalla LG con WebOS. Para cerrar la notificación, haga clic en OK y proceda al siguiente paso.
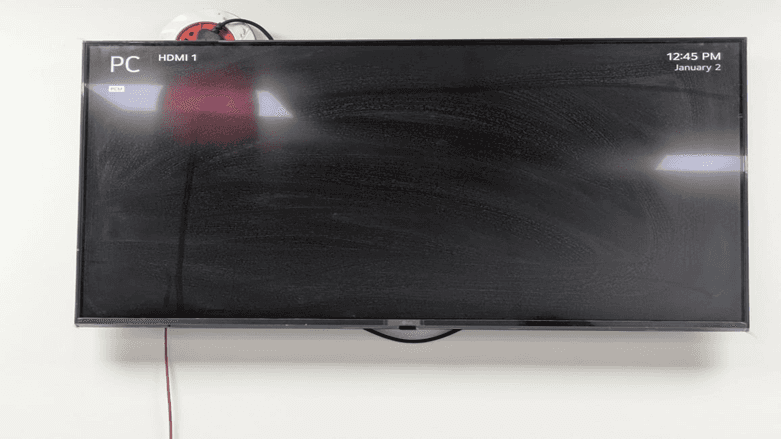
Paso 33: Reiniciar el televisor
Una vez que la actualización de la aplicación haya finalizado, la pantalla mostrará la pantalla de fuente de entrada (PC HDMI 1 en este caso) y la hora actual estará presente en la esquina superior derecha (12:45 PM 2 de enero). Tendrá que reiniciar su televisor LG para usar la aplicación de señalización recién instalada. Esto se puede hacer de las siguientes maneras:
Intente usar el botón de encendido en su control remoto para encender y apagar el televisor.
Ir al menú de configuración y hacer clic en Reiniciar.
Desconectar y volver a conectar el cable de alimentación (cuando no haya otras opciones).
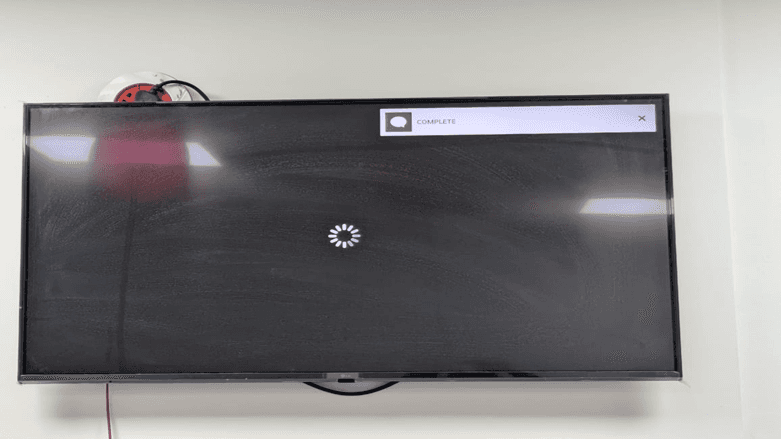
Paso 34: Carga de la aplicación
Al encender la televisión nuevamente, aparece brevemente una notificación de COMPLETO en la parte superior de la pantalla, después de lo cual aparece un icono de carga en el medio. Esto significa que la nueva aplicación de señalización digital acaba de comenzar. El sistema se está preparando para introducir la interfaz de gestión de contenidos basada en la nube.
Paso 35: Aplicación lanzada - Wilyer Player añadido.
Éxito, la aplicación de señalización se implementó y un nuevo mosaico en forma de Wilyer Player se introduce en la sección de Gestión de Contenidos del tablero. El tablero ahora muestra:
Wilyer Player: El nuevo reproductor conectado a la nube (marcado en verde).
Reproductor: Reproductor de medios integrado
Programación: Programación de contenidos.
Editor: Creación de contenido.
Administrador de grupos: Gestión de múltiples pantallas.
El Wilyer Player se define como: "Mirar diferentes tipos de contenido, como imágenes, videos y contenido de SuperSign. Este es un reproductor conectado a la nube que proporciona administración remota de contenido utilizando la plataforma Wilyer CMS.
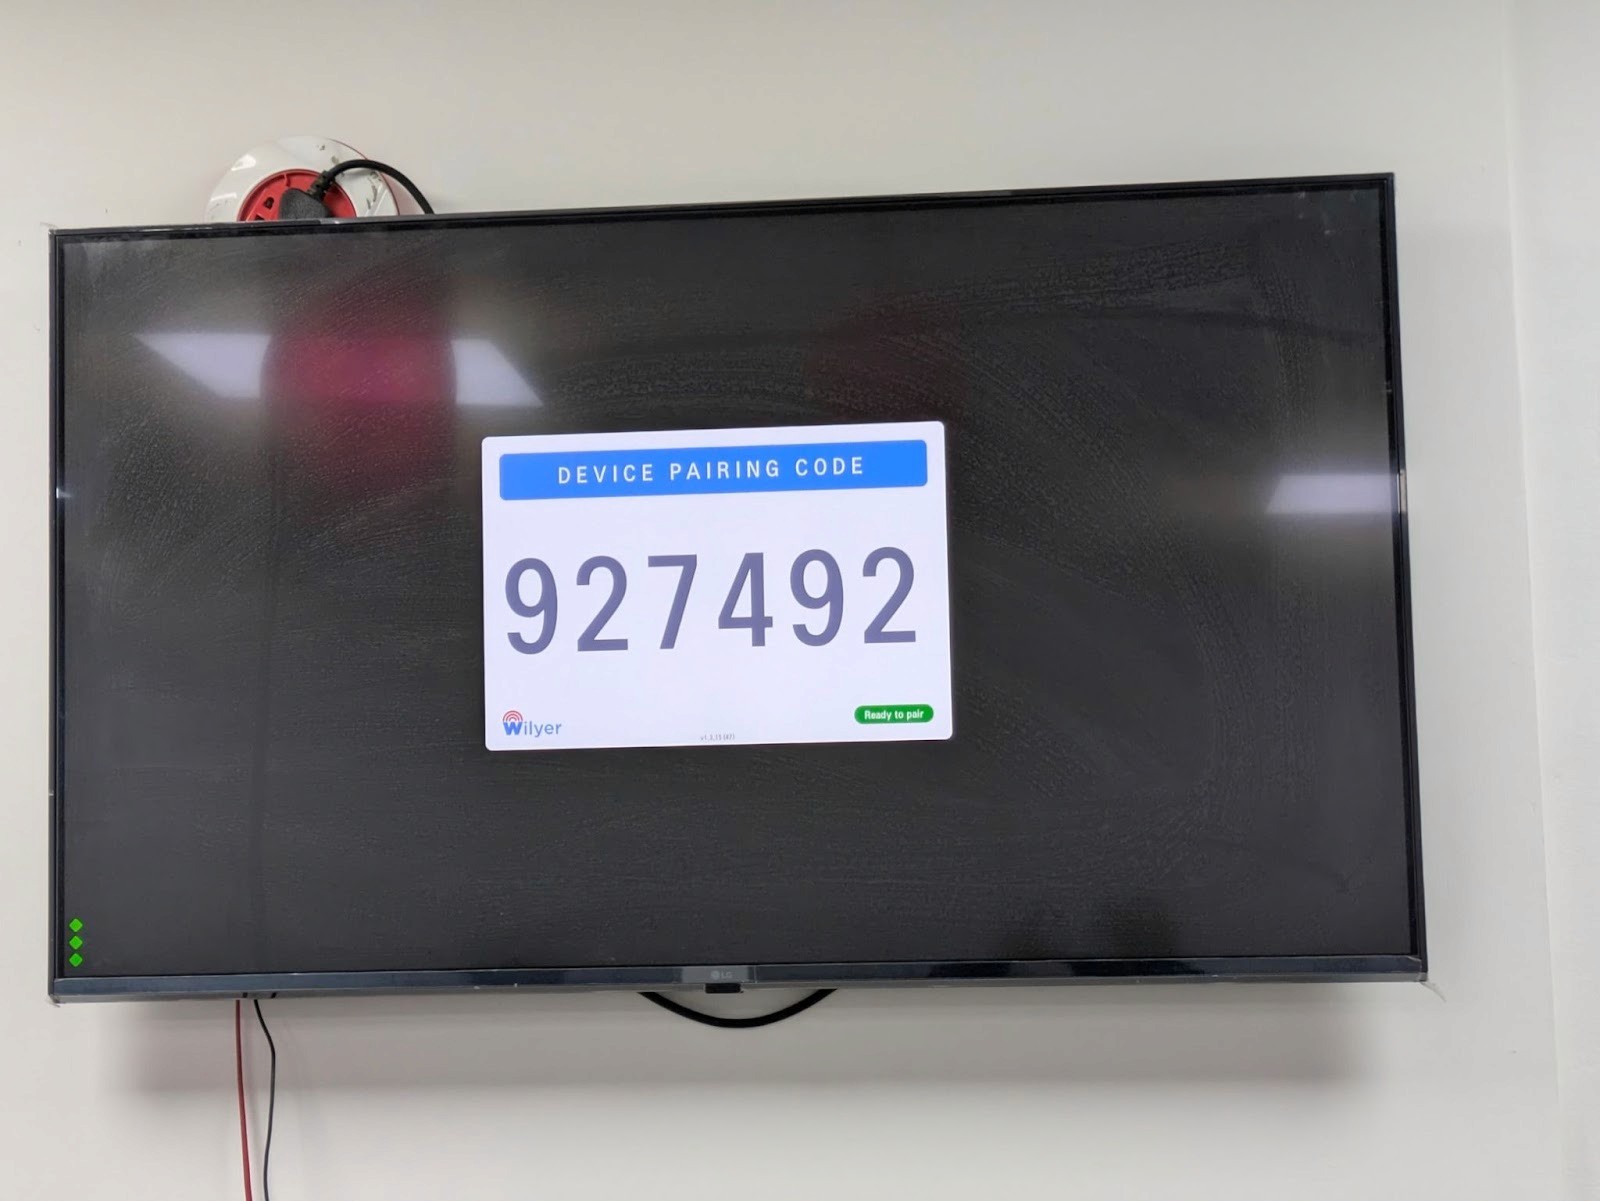
Paso 36: Código de emparejamiento del dispositivo
Haga clic en el mosaico de Wilyer Player para iniciarlo. Un código de 6 dígitos (927492 en este caso) aparece en la pantalla de la aplicación como una pantalla de "CÓDIGO DE EMPAREJAMIENTO DE DISPOSITIVOS". Este código de emparejamiento se utiliza para conectar su pantalla LG física a su cuenta CMS basada en la nube. La pantalla muestra:
Código de emparejamiento de un dispositivo: Número grande de 6 dígitos (927492)
Compañía de marca: Logotipo de Wilyer.
Indicador de estado: “Listo para emparejar” en verde
Registre los tres puntos verdes en la esquina inferior izquierda que muestran que la aplicación está en ejecución y está esperando ser emparejada. Este código deberá proporcionarse a su plataforma CMS en la nube (pasos posteriores) para completar el proceso de emparejamiento y permitir el control remoto.
Parte 5: Agregar y gestionar varios dispositivos
Una de las principales ventajas de la señalización digital basada en la nube es la capacidad de gestionar múltiples pantallas desde una única interfaz. Esta sección demuestra cómo agregar un segundo dispositivo LG WebOS a su red y publicar diferentes contenidos en diferentes pantallas.
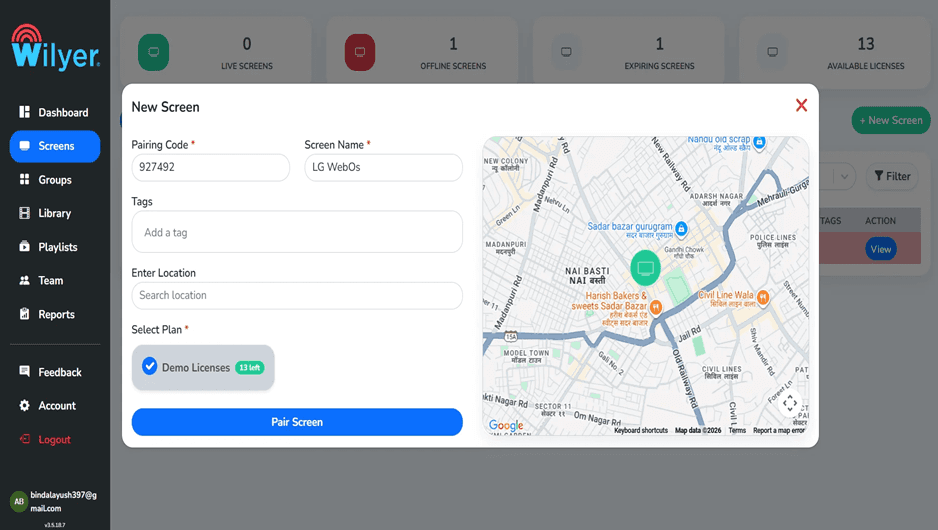
Paso 37: Agregar una segunda pantalla
Repita el botón + Nueva Pantalla para agregar otro dispositivo a su sistema. Esta vez, estaremos agregando una segunda pantalla LG WebOS con un código de emparejamiento de 927492. Ingrese los detalles de la pantalla:
Código de emparejamiento: 927492
Nombre de pantalla: LG WebOS
Etiquetas: (opcional)
Ubicación: Interfaz de mapa similar al seguimiento físico.
Haga clic en las "Licencias de demostración" (13 a la izquierda) y luego haga clic en Emparejar pantalla.
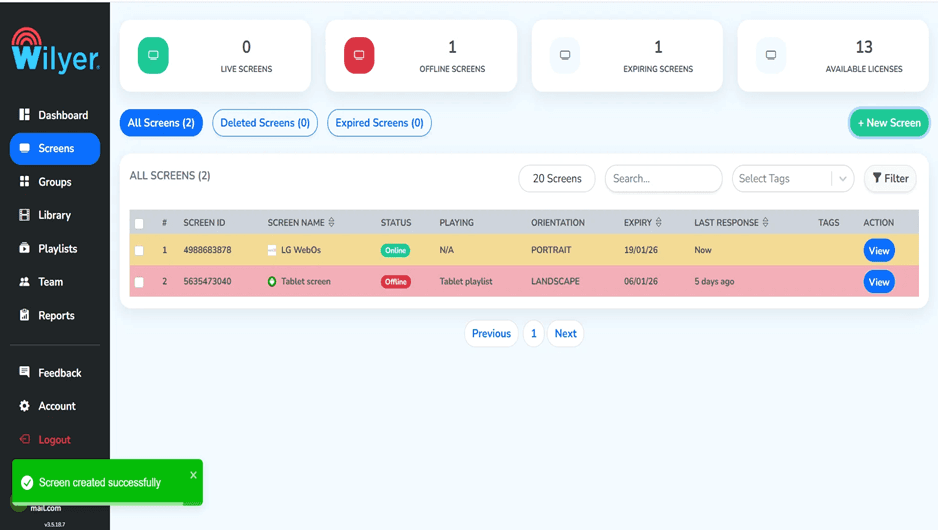
Paso 38: Tablero de múltiples pantallas.
Una vez que el segundo dispositivo haya sido emparejado, su tablero de Pantallas se ha actualizado para mostrar el nombre Todas las pantallas (2) y muestra ambas pantallas:
Pantalla 1 - LG WebOS:
ID de la pantalla: 4988683878
Estado: En línea (indicador verde)
Reproduciendo: N/A
Orientación: RETRATO
Expiración: 19/01/26
Última respuesta: Ahora
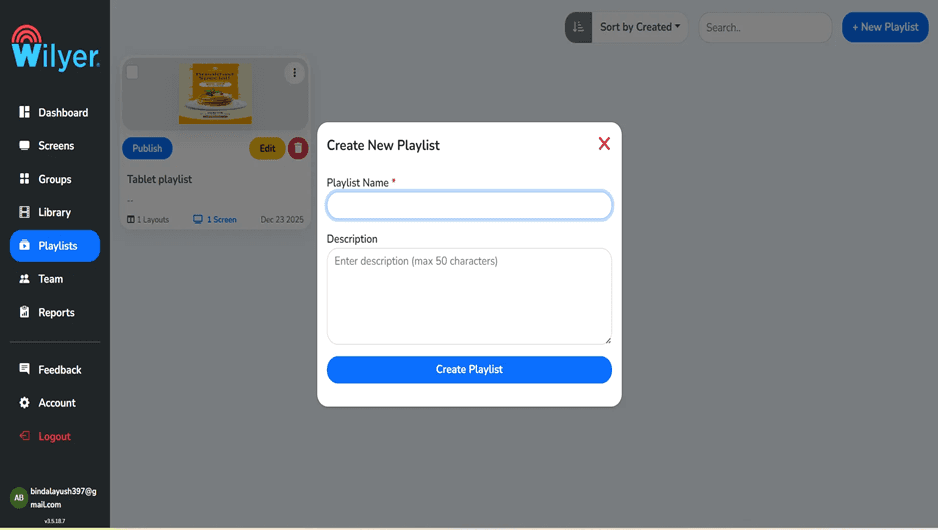
Paso 39: Crear una nueva lista de reproducción.
Para ilustrar la gestión de contenido de múltiples pantallas, diseñaremos una segunda lista de reproducción de pantalla. Haga clic en + Nueva Lista de Reproducción y se mostrará el cuadro de diálogo con el que está familiarizado. En esta ocasión, deje el campo Nombre de Lista de Reproducción en blanco al inicio del formulario para mostrar la validación del formulario.
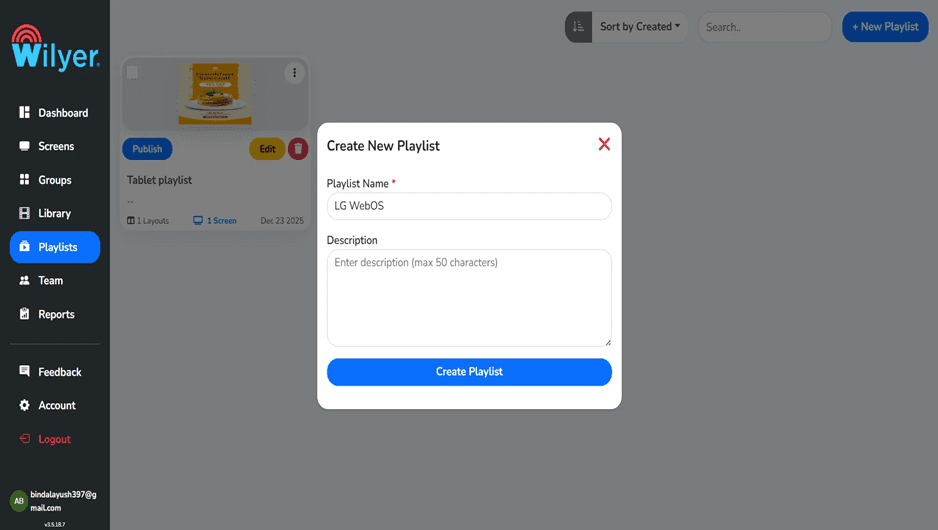
Paso 40: Nombrar la nueva lista de reproducción
Nombrar la lista de reproducción como LG WebOS para mostrar en la pantalla y asegurarse de que sea fácil de reconocer qué contenido se transfiere a qué pantalla. Es una buena convención de nombres usar al tratar con contenido diferente en múltiples pantallas. Haga clic en el botón Crear lista de reproducción y vaya al editor.
Paso 41: Construir el contenido de la lista de reproducción.
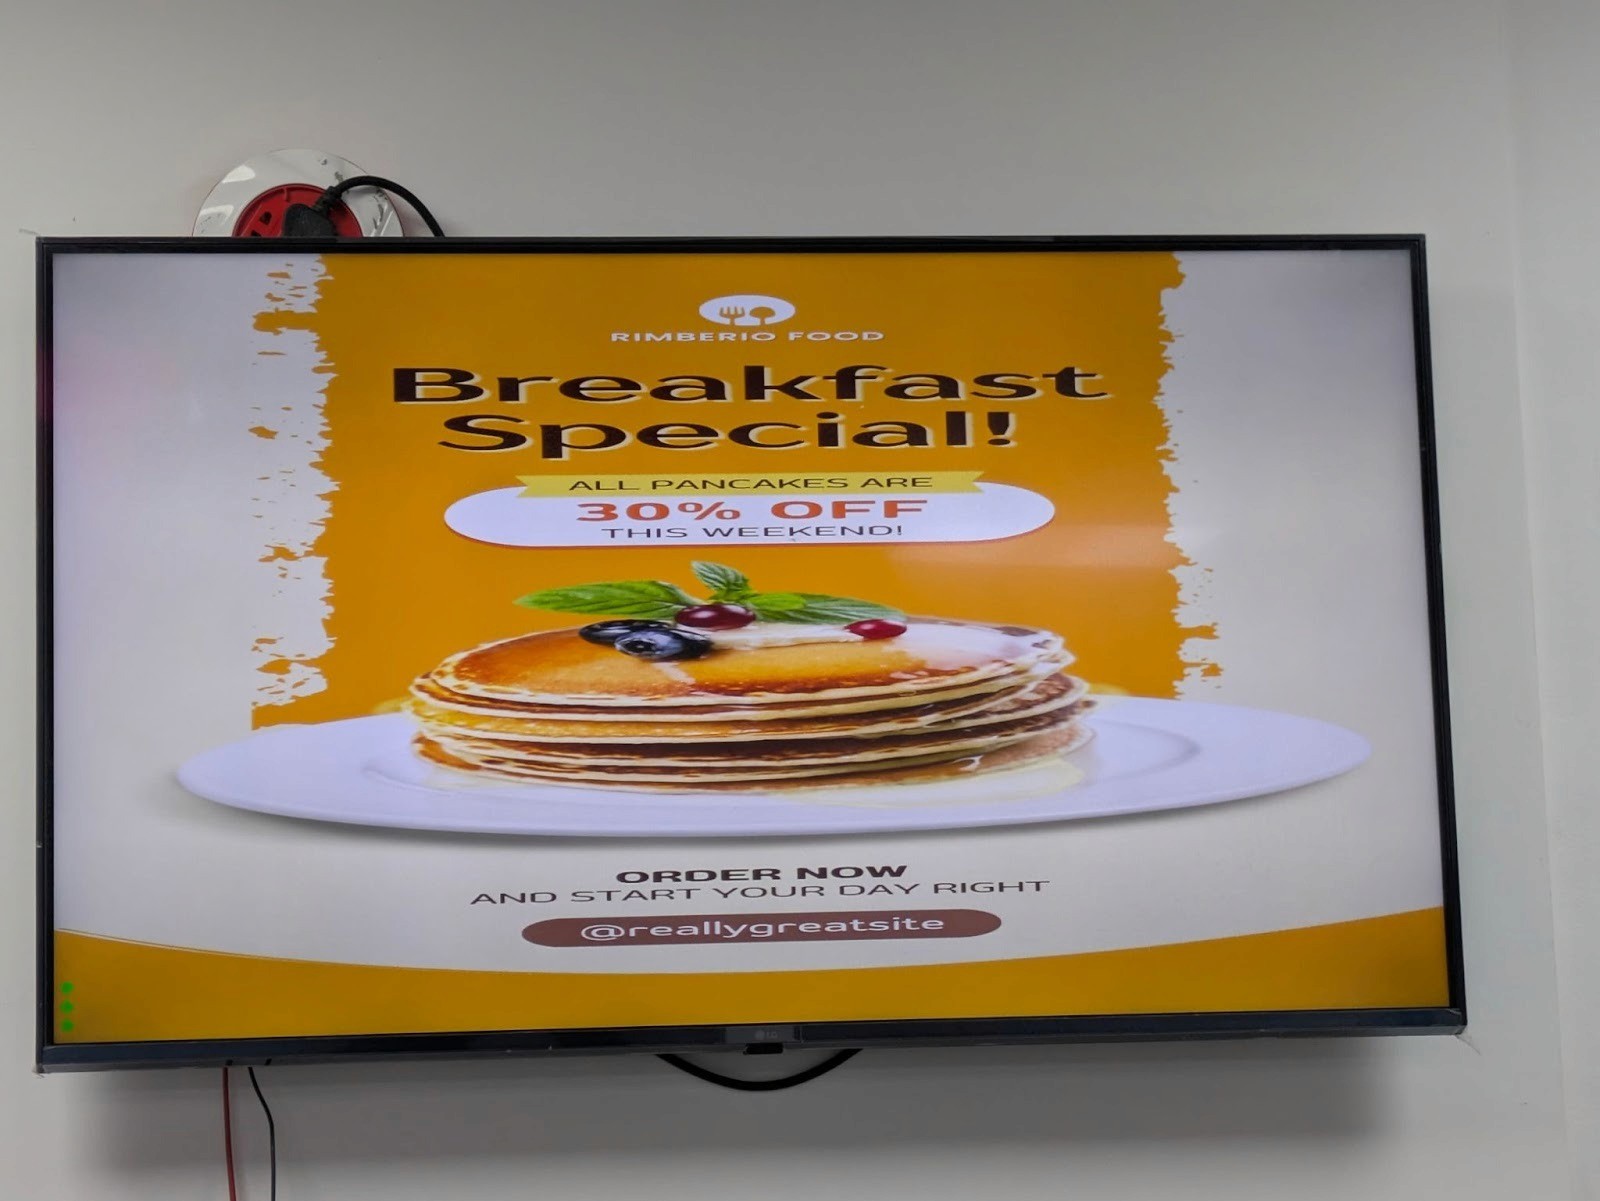
El lienzo de cuadrícula es el primer lienzo del editor de listas de reproducción. Encontrará un especial de desayuno en la biblioteca de medios a la izquierda, que se utilizará en esta lista de reproducción. Este no es el mismo contenido que el cartel de Jazz Music en la primera lista de reproducción, mostrando que varias pantallas pueden usarse para mostrar diferentes materiales promocionales. La imagen es un anuncio para un especial de desayuno de RIMBERIO FOOD con un 30 por ciento de descuento en todos los panqueques este fin de semana. El mensaje de éxito verde verifica la creación de la lista de reproducción.
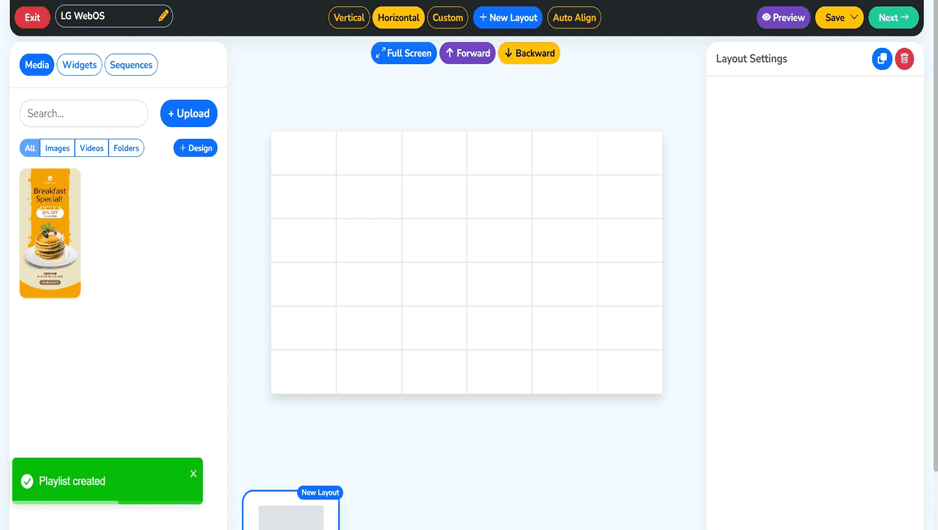
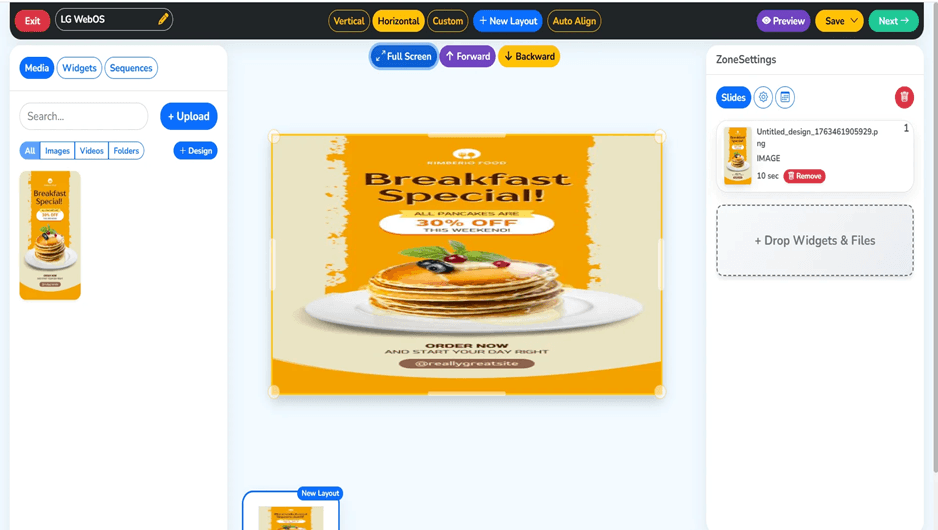
Paso 42: Agregar contenido de desayuno
Esta pantalla muestra la interfaz del editor de diseño de una pantalla de señalización digital LG webOS. En el lienzo central, hay un cartel de una promoción de desayuno que se ha puesto como un slide de imagen con un marco de tiempo de 10 segundos. El panel izquierdo permite al usuario navegar y buscar, así como cargar su contenido, incluyendo imágenes y videos, o crear nuevos diseños. La barra de herramientas en la parte superior da acceso para cambiar a diseños Vertical, Horizontal o Personalizado, así como control de alineación y vista previa. El panel de Configuración de Zonas que se encuentra a la derecha ayuda a los usuarios a controlar las diapositivas, establecer configuraciones o eliminar contenido. Con esta interfaz, los usuarios pueden diseñar, organizar y probar fácilmente contenido profesional de señalización digital antes de la publicación.
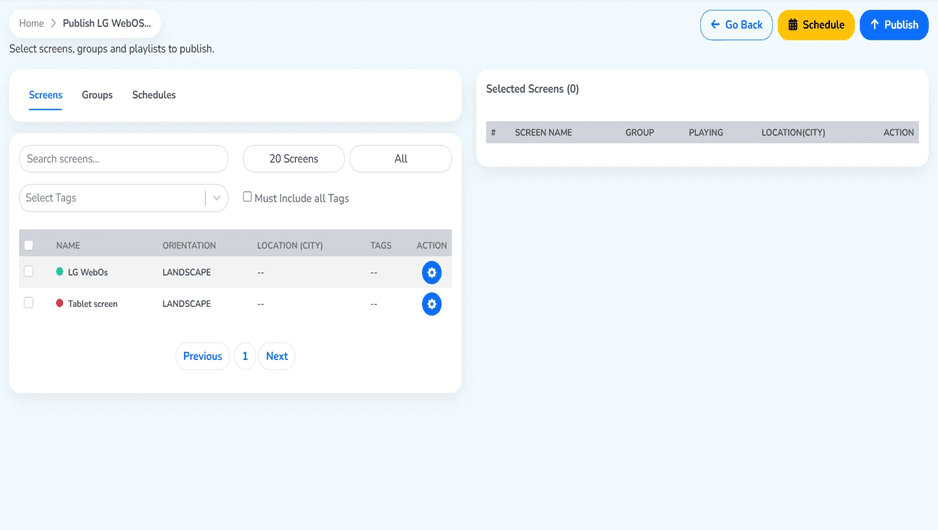
Paso 43: Seleccionar pantalla objetivo para publicar
Vaya al botón verde "Siguiente" para continuar con la publicación. La pantalla de selección de pantalla ahora refleja las pantallas disponibles (20 pantallas en total):
LG WebOS - orientación PAISAJE, En línea.
A la derecha está el panel llamado Pantallas seleccionadas (0) que no tiene contenido. Marque la casilla de verificación de LG WebOS para publicar el contenido de este desayuno en esa pantalla.
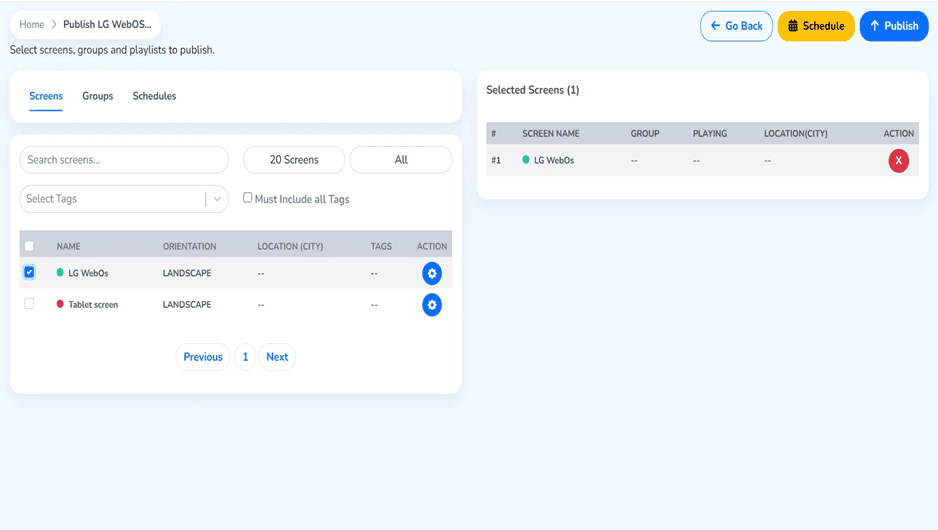
Paso 44: Asegúrese de haber seleccionado la pantalla.
Habiendo elegido la pantalla LG WebOS, esta pantalla se muestra en el panel de pantalla seleccionada (1) como:
Posición #1
Nombre de pantalla: LG WebOS (indicador verde en línea).
Grupo:
Reproduciendo:
Ubicación (Ciudad):
Acción: X (botón de deselección cuando lo desee)
Y la pantalla objetivo está elegida, ahora está listo para publicar. Es importante tener en cuenta que podría seleccionar ambas pantallas en caso de que desee mostrar el mismo contenido en una pantalla o una publicación más avanzada utilizando las pestañas Grupos y Horarios.
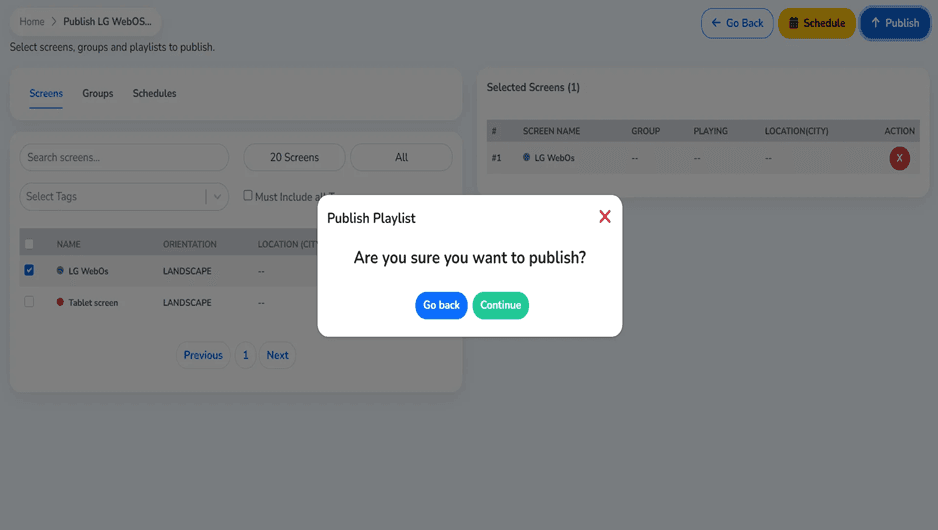
Paso 46: Verificación final de publicación.
Haga clic en el botón Publicar y se mostrará el cuadro de confirmación: ¿Está seguro de que quiere publicar? Esto asegurará que no publique en las pantallas incorrectas. Seleccione ya sea el botón verde Continuar para publicar el especial de desayuno en la pantalla LG WebOS o el botón azul Regresar para hacer modificaciones.
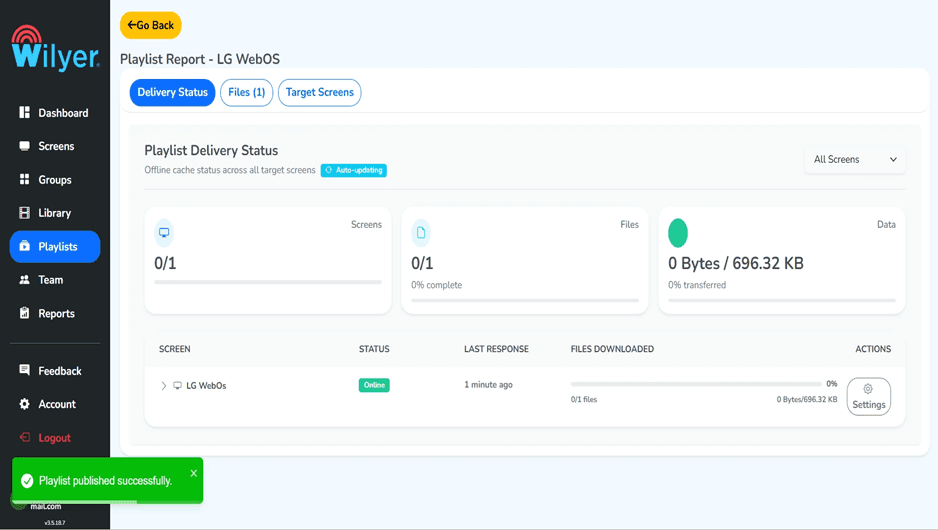
Paso 47: Seguimiento de la reproducción de la lista de reproducción en LG webOS
Monitorice la implementación de la lista de reproducción a través del Informe de lista de reproducción. Un estatus Exitoso confirma que todo el contenido ha sido entregado correctamente y la pantalla LG webOS está en línea y lista para la reproducción.
Paso final: Lista de reproducción en vivo en la pantalla de LG webOS
La lista de reproducción ahora está en vivo y reproduciéndose en la pantalla LG webOS conectada. El contenido se muestra de acuerdo con el diseño seleccionado, la secuencia de reproducción y las configuraciones de tiempo. Revise los visuales, alineación y transiciones para asegurar una experiencia de visualización fluida, consistente y profesional.
Características avanzadas de LG TV Web OS en señalización digital
Arquitectura SoC (System-on-Chip)
Las pantallas comerciales de LG webOS tienen un reproductor de medios incorporado (SoC) y no requieren hardware adicional.
Beneficios:
Menos fallos de hardware
Instalaciones más limpias
Reducción de costes de implementación y mantenimiento.
Arranque rápido y reproducción estable.
Soporte nativo de aplicaciones de señalización digital
Las aplicaciones de reproductores de señalización (incluido Wilyer) en el ecosistema de señalización de LG se pueden instalar directamente en webOS.
Beneficios:
Implementación de aplicaciones optimizadas y seguras.
Integración CMS sin obstáculos.
Rendimiento similar dentro de las pantallas.
Gestión centralizada de dispositivos remotos.
Controles sofisticados a nivel de dispositivo se pueden encontrar con el CMS:
Reinicio y reinicio remoto
Programación de encendido/apagado
Control de volumen y entrada
Rotación de pantalla en modo retrato/paisaje.
Gestión de firmware y actualización de aplicaciones.
Programación de contenido inteligente y automatización.
El webOS admite automatización basada en tiempo y reglas como:
Listas de reproducción por hora y día.
Contenido específico de ubicación
Programación basada en campañas
Cambio automático de contenido.
Diseños de múltiples zonas y múltiples medios.
Características de diseño más avanzadas permiten que una pantalla se subdivida en varias áreas:
Zona de video
Zona de imagen o promoción
Ticker de texto o anuncios.
Widgets de datos en vivo (clima, noticias, menús).
Almacenamiento en caché de contenido para reproducción sin conexión.
Después de descargar contenido, la señalización de LG webOS puede:
Reproducir sin internet.
Auto-sincronización al recuperar conectividad.
Integración de CMS sin problemas (ejemplo: Wilyer)
Combinado con plataformas como Wilyer, LG webOS puede hacer:
Control de contenido basado en la nube
Monitoreo en tiempo real de la pantalla
Informes de entregas y reproducciones.
Gestión de múltiples ubicaciones que es escalable.
¿Por qué LG webOS es considerado avanzado para señalización digital?
Construido como un producto comercial y empresarial.
Sistema operativo altamente estable y seguro
Completamente gestionado en la nube
Fácilmente escalable entre 1 pantalla y 10,000+ pantallas.
Identificación de problemas y solución de problemas
Problemas de conexión a la red.
Problema: Problema para conectarse a Wi-Fi.
Soluciones:
Asegúrese de que la contraseña de Wi-Fi sea correcta.
Asegúrese de que tiene una red de 2.4GHz o 5GHz (dependiendo del modelo de su televisor)
Asegúrese de que el enrutador esté dentro del rango y esté operativo.
En su lugar, pueden usar una conexión Ethernet por cable.
Problemas de visualización de contenido
Problema: Información no visible normalmente.
Soluciones:
Formatos de archivo compatibles Verifique que sean compatibles (JPEG, PNG, MP4, etc.).
Verifique que la resolución del archivo sea igual a las capacidades de visualización.
Asegúrese de tener suficiente almacenamiento en el dispositivo.
Reinicie la pantalla e intente nuevamente cargar el contenido.
Problemas de sincronización de tiempo.
Problema: Mostrando hora incorrecta.
Soluciones:
Verifique que la ubicación (continente, país, ciudad) sea precisa.
Asegúrese de que la conexión a la red esté activa para tener la sincronización de la hora.
La hora puede establecerse manualmente en caso de que falle la sincronización automática.
Determine si el firewall está bloqueando las solicitudes NTP (Protocolo de tiempo de red).
Mejores prácticas de señalización digital LG WebOS.
Optimización de contenido
Utilizar la resolución nativa: Coincidir la resolución del contenido con la resolución nativa de su pantalla para maximizar la calidad.
Comprimir archivos de la manera adecuada: Encontrar un equilibrio entre la calidad y el tamaño del archivo para reproducirlo sin problemas.
Compatibilidad de archivos multimedia Previsualizar todos los archivos multimedia antes de la implementación.
Mantener la biblioteca de contenido: Actualizar constantemente y eliminar contenido difícil de seguir.
Configuración de red
Conexiones Ethernet: Ethernet es más confiable que Wi-Fi.
Cablear direcciones IP: Reasignar direcciones IP estáticas: Gestión remota más sencilla.
Conexiones de respaldo: Configurar las instalaciones de respaldo de pantallas vitales.
Verificar el ancho de banda: El ancho de banda debe ser adecuado para tener varias pantallas.
Mantenimiento regular
Instalar software: Mantener WebOS: la versión de WebOS se mantiene actualizada.
Limpieza de pantallas: Tener herramientas de limpieza apropiadas para las pantallas.
Verificar la salud de visualización del monitor: Comprobación de quemaduras o otros problemas.
Apagar las pantallas durante períodos de no uso: Esto aumentará la vida útil de las pantallas de potencia.
Medidas de seguridad
Alterar contraseñas predeterminadas: Esto siempre debe hacerse para cambiar las contraseñas predeterminadas.
Permitir una conexión autenticada: Entregar contenido con HTTPS donde sea factible.
Restringir el acceso físico: Bloquear pantallas y conexiones.
Auditorías de seguridad periódicas: Los registros de acceso y la configuración deben revisarse regularmente.
Conclusión
El proceso de instalación de la señalización digital en LG WebOS es fácil y abre grandes oportunidades para gestionar el contenido y controlar la pantalla. Con esta guía completa, ha logrado configurar su señalización digital LG WebOS desde el primer arranque, hasta la conexión a la red y el inicio de sesión en el tablero.
La plataforma WebOS tiene características de nivel empresarial, como gestión basada en la nube, programación flexible, sincronización de múltiples pantallas y potentes provisiones de entrega de contenido. LG WebOS ofrece las características y la estabilidad necesarias para trabajar con miles de pantallas en una red o desplegar una sola pantalla para lograr soluciones de señalización digital profesionales.
Cuanto más desarrolle su sistema de señalización LG WebOS, más podrá descubrir capacidades sofisticadas como el Administrador de grupos 2.0 para controlar muchas pantallas a la vez, el Editor para crear su propio contenido y el Programador para programar contenido. Estos le ayudarán a desarrollar exhibiciones mediáticas atractivas que puedan atraer la atención y transmitir su mensaje.
Es importante recordar mantener su sistema actualizado, realizar copias de seguridad periódicas de su contenido y configuraciones, y practicar las mejores prácticas de seguridad para tener un sistema confiable en funcionamiento. La señalización digital LG WebOS puede considerarse un producto confiable y duradero con la configuración y mantenimiento adecuados.

