
Tablet Setup
How to Convert Tablets into Digital Signage Screens via USB
Step-by-step guide to converting tablets into digital signage screens using a USB connection.
5 mar 2026
Introduction
Tablets can be easily transformed into cost-effective digital signage screens for displaying menu, promotions, announcements, and informational content. With the right digital signage software and a stable internet connection, tablets become powerful display devices that are simple to manage and update remotely. This approach is ideal for businesses, schools, retail stores, and offices looking for an affordable and flexible digital signage solution without investing in expensive commercial hardware.
Digital signage is now a necessity among the modern business as it provides the dynamic structure of the content, real-time modifications, and increased customer interaction. Using recycles of old tablets or buying affordable Android based gadgets, you can develop a great digital signage network without expensive costs of commercial displays.
Why Convert Tablets into Digital Signage Screens?
Affordable Alternative: Tablets are much more affordable compared to the conventional commercial digital signage displays. It is possible to use old tablet models or buy inexpensive Android-based devices at a section of the price.
Portability and Flexibility: Tablets are lightweight and portable and this makes them suitable for temporary display, events, trade shows or even places where they cannot be installed permanently.
Easy Content Management: The latest digital signage software enables you to manage content remotely with cloud based solutions, and thus updates are fast and easy to make at any location.
Professional Appearance: Tablet digital signage is stylish and professional with the correct setup that builds your brand image and customer experience.
Power saving: Tablets will use less energy than the traditional platform and will save on your operational cost and also the environment.
Multi-purpose: Tablets can be used in menu boards, advertising displays, wayfinding, information kiosks, event programs, etc.
Requirements for Setup
A tablet running on Android (Samsung, Lenovo, or any other Android compatible device).
Constant WiFi internet connectivity.
Digital signage program (in this tutorial, we will use Wilyer Digital Signage).
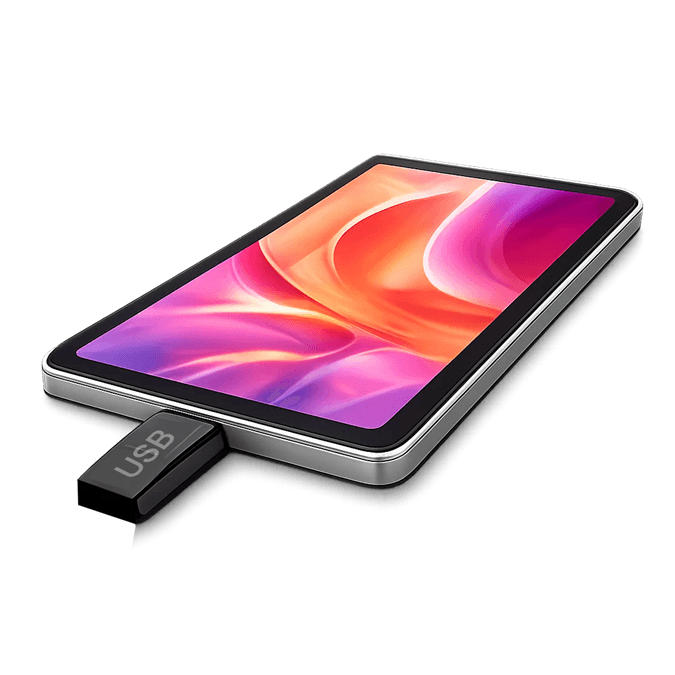
An APK installation file in a USB.
Wilyer Latest APK: https://files.wilyer.com/apks/cloud/wilyer-signage-v3.9.6-nov-3-2025-c96-official-release.apk
The Wilyer digital signage app can be downloaded to a laptop using the provided link. Once downloaded, the app file may be transferred to a pen drive, and the remaining installation steps can be completed by following the instructions in the blog post.
Step-by-Step Guide: Converting Your Tablet into Digital Signage
Step 1: Prepare Your USB Drive with the Signage App
The first thing you need to do is download the Wilyer Digital Signage APK file and save it to a USB disk. The .APK can be downloaded either on the official site or on the portal of your digital signage provider.
Plug the USB device in your computer, copy the .APK file to the USB device, and remove it safely.
Step 2: Connect the USB Drive to Your Tablet
The majority of the new Android tablets have USB OTG that makes it possible to connect USB storage devices. And in case your tablet has a USB-C port, you might have to get a USB-C to USB-A connector (also known as OTG connector).
Plug the USB to the USB port of the tablet. A notification should show that a USB device has been connected.
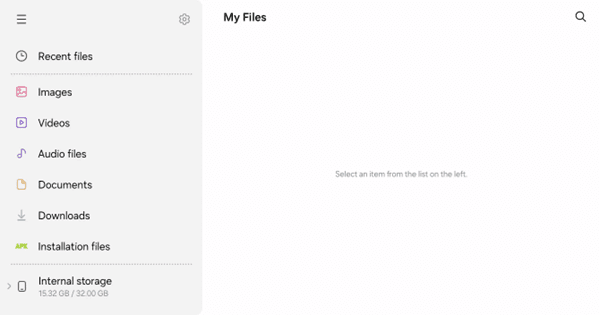
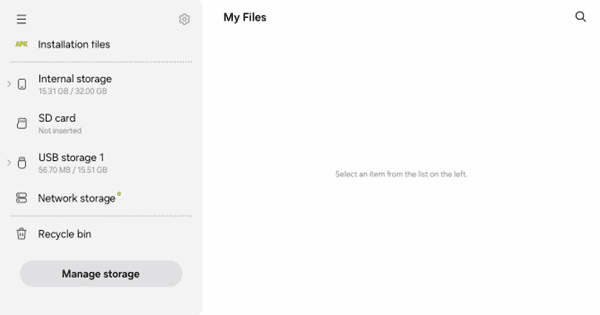
Step 3: Access the USB Drive Through File Manager
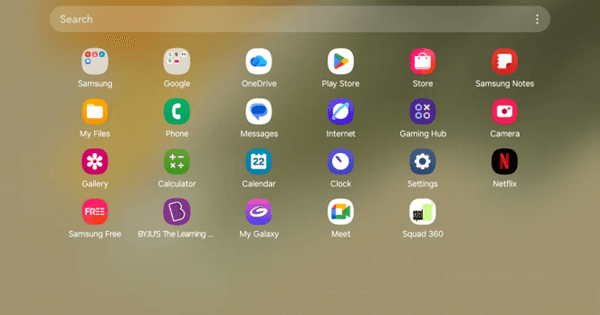
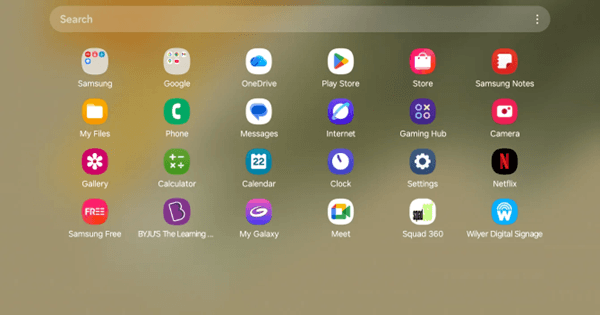
Open the file manager application of your tablet. This is normally referred to as My Files on Samsung devices. Go to the main screen and find the my files application.
Touch the My Files application to access it.
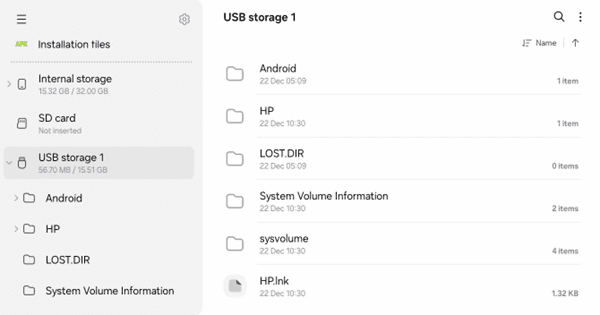
Step 4: Navigate to USB Storage
After entering the file manager, you will find different places in the store. Go to the place you find USB storage 1 or something like that that shows your USB drive.
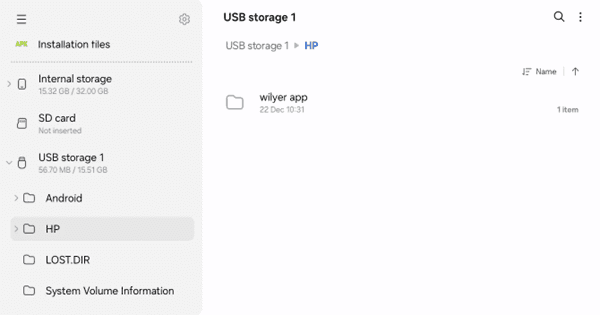
Step 5: Locate the .APK File
Go through the folders of your USB drive to locate the digital signage .APK file. The file in this case can be found in the folder of HP/wilyer app and can be called “wilyer-signage-v3.9.6-nov-3-2025-c96-official-release.apk”.
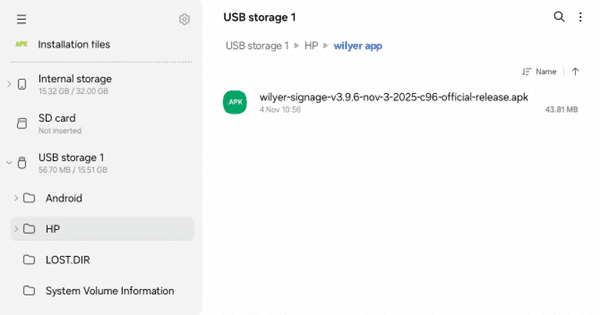
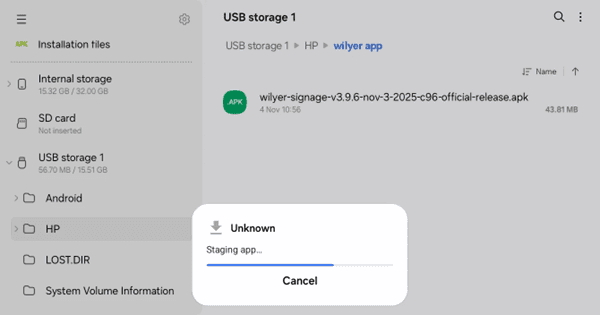
Step 6: Install the .APK File
Tap on the .APK file in order to commence installing. You can find a warning about using applications of unknown sources. It is a normal process when one is installing applications that are not found in Google Play Store.
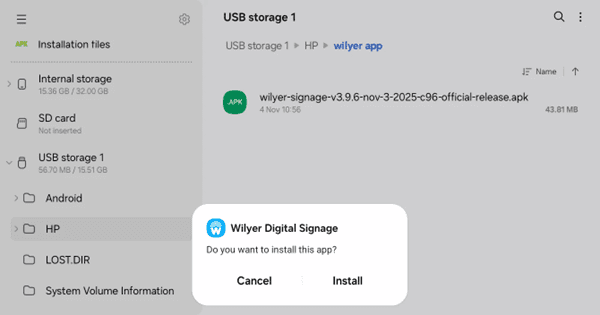
Step 7: Confirm Installation
The Package Installer will show details of the app. Read the name of the app and tap on the Install button to install the app.
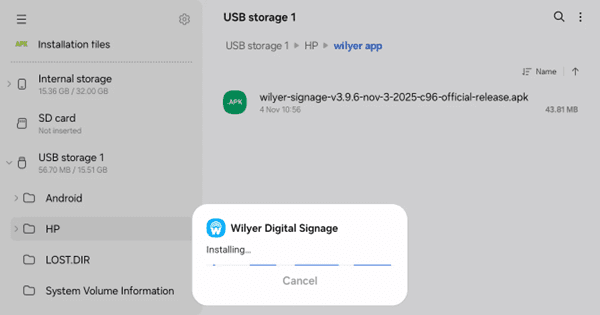
Step 8: Wait for Installation to Complete
The app is easy to install and will take 10-30 seconds based on the performance of your tablet and the size of the app. There will be a progress indicator of the status of the installation.
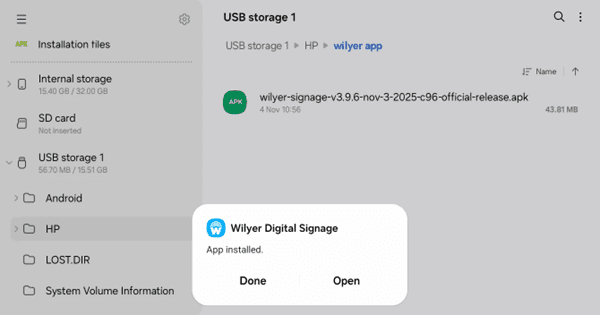
Step 9: Open the Installed App
After the installation, you will find a confirmation. You can choose to open the Wilyer Digital Signage app now by tapping Open or tap Done to close it and choose to open it in the future when you get to your app drawer.
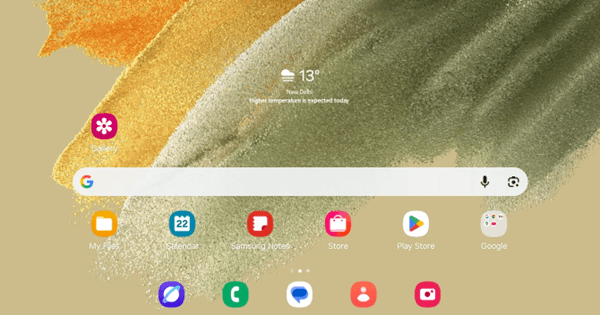
Step 10: Find the App on Your Home Screen
Get back to the home page of your tablet. The Wilyer Digital Signage app icon should now be in your app drawer or in your home screen.
Step 11: WiFi Connection set-up.
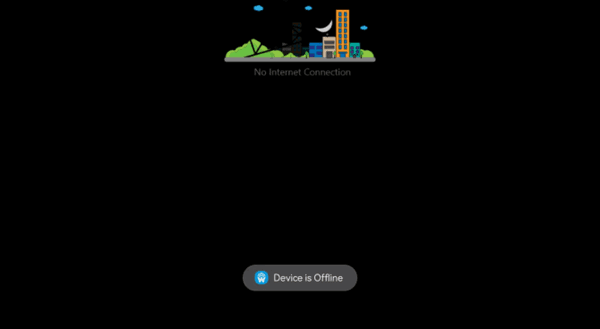
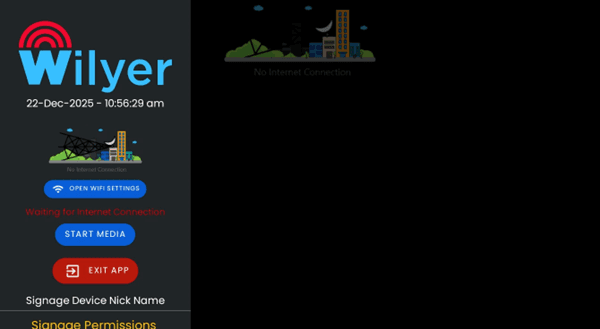
Upon opening the digital signage app, the first thing it will do is to check the internet connection. In case you are not hooked to WiFi, a No Internet Connection message will appear in the app and will make you open WiFi settings.
Click OPEN WIFI SETTINGS to reach the WiFi set up of your tablet. This is essential due to the fact that digital signage needs a stable internet connection to obtain content updates and get in touch with the cloud-based management platform.
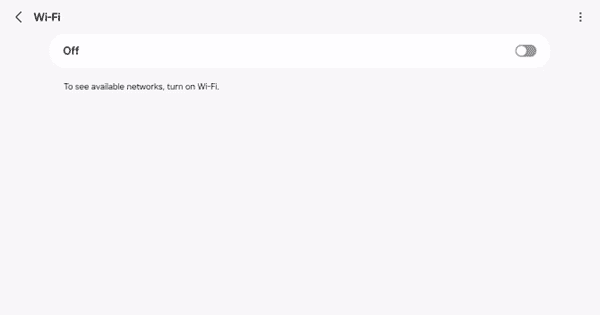
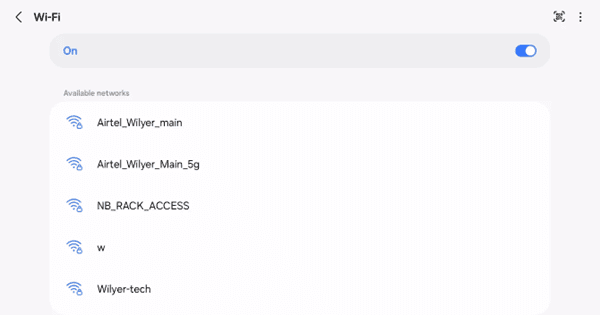
Step 12: Turn On WiFi
Go to the WiFi settings screen, and switch the WiFi to the on position. Your tablet will begin searching around your area and will find the available wireless networks.
Step 13: Select Your WiFi Network.
When WiFi is turned on a list of available networks will appear. Swipe through the list and find a network that you like. In this case we are connecting to AirtelWilyermain.
Step 14: Enter WiFi Password
You should enter your WiFi network password. The passwords are case-sensitive, and it is important to type them correctly. Turn on the option of Auto reconnect in case you wish your tablet to connect to this network automatically later.
This is especially significant when it comes to digital signage implementations when you would prefer your display to reconnect automatically in case of power outage or a computer reboot.

Step 15: Complete Setup and Start Using
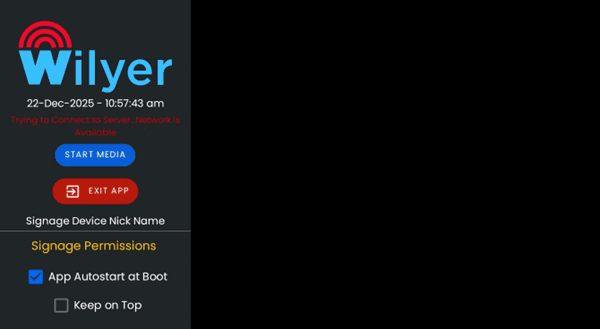
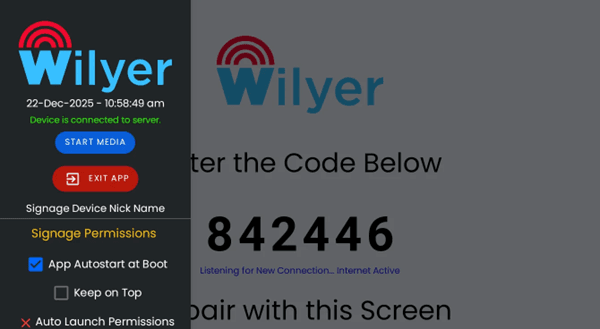
After connecting to Wi Fi, go back to the Wilyer Digital Signage app. The application will be now linked to the server and will show your content. You will have the choice to begin playing media, develop device permissions, and to set device settings.
Step 16: Configure Display Overlay Permissions
In order to be used in kiosk mode the digital signage app must be allowed to overlay other apps. This enables the signage material to be on high level and the users are not allowed to access other applications. The app will issue a warning message to enable this permission.
The app shows: ‘Warning’ Should enable the App to draw over other apps with the instructions of navigating to Settings - Apps - Special App Access - Display Over Other Apps - Allow Signage App.
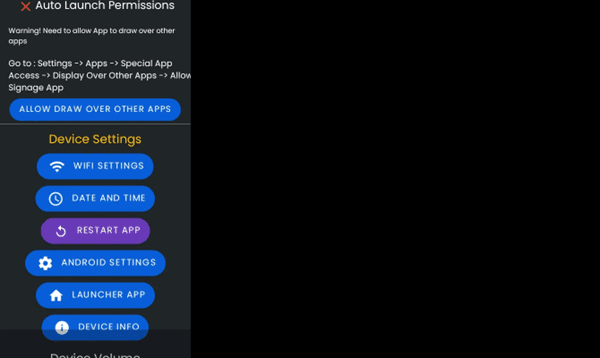
Tap on ALLOW DRAW OVER OTHER APPS where you are taken straight to the settings page where you can give this allowance.
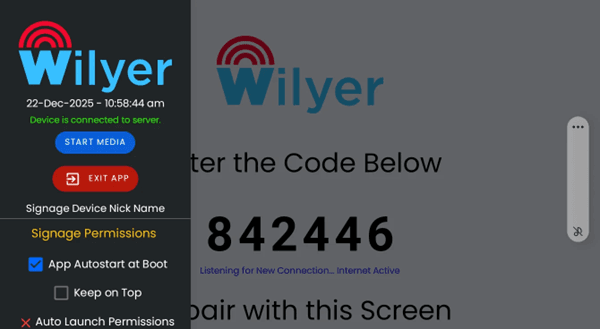
Step 17: Device Pairing with Cloud Dashboard
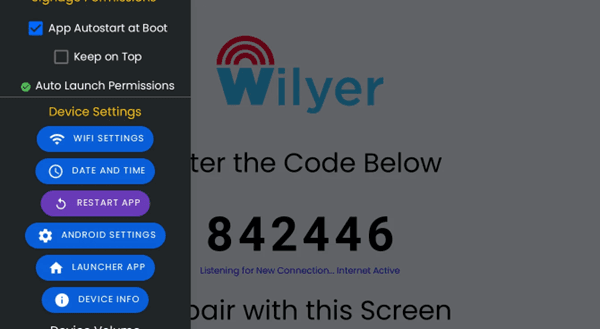
After the app is correctly set and linked to the internet, a unique pairing code will be created. Your physical tablet is connected to your account in the Wilyer cloud dashboard, and this code is used to connect them.
A 6-digit pairing code (in this case: 842446) is shown on the screen with the message Listening for New Connection. ‘Internet Active’ and to pair with this Screen.

To pair your device:
Log in to your Wilyer digital signage dashboard on a computer or another device
Go to the add device or the pair device.
Input your 6 digit code on your tablet.
Name your device something memorable (e.g. Restaurant Menu Board, lobby display 1, etc)
Confirm the pairing
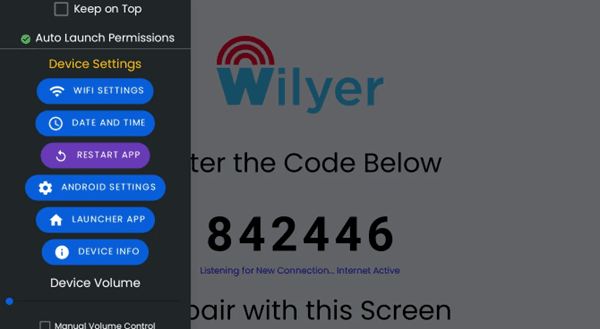
Step 18: Access the App Settings Menu
On the pairing screen, the settings menu of the app is also reachable by tapping the three-dot menu icon in the upper right corner of the screen. Several configuration options are available in this menu.
The sidebar menu offers the following options that are significant:
Signage Device Nick Name: Type in a nick name to give your display.
Signage Permissions: Adjust app permission and settings.
App Autostart at Boot: Activate automatic opening on boot up of tablet.
Keep on Top: Have the application remain on top of all the applications.
Device Settings: WiFi, date/time and other device settings.
Get device information: See my device and version of the app.
Step 19: Enable App Autostart at Boot
For a professional digital signage setup, the application should automatically launch whenever the tablet is powered on. This ensures the display is always active and eliminates the need for manual intervention, preventing the screen from remaining idle.
Open the settings menu and find the App Autostart at Boot and open the check box. When it is turned on, a checkmark will appear.
When this setting is turned on, in case of power outage or when the tablet reboots due to whatever reasons, the digital signage app would automatically be launched and will continue showing its contents without anyone having to open the app manually.
Step 20: Configure Auto Launch Permissions.
Note that at the beginning, ‘Auto Launch Permissions’ has a red X, which means that this feature should be configured. In this environment, you will need to give the app permission to draw on top of other apps which are needed to enable the kiosk mode.
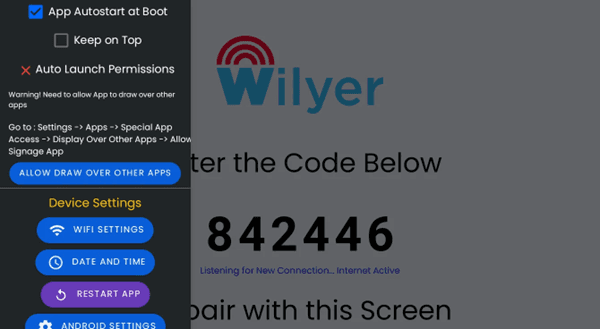
By tapping the “ALLOW DRAW OVER OTHER APPS”, open the Android settings and allow this permission.
Step 21: Enable ‘Appear on Top’ Permission
You will be brought to the Android settings page of Appear on top, here you will see all your apps and their permission to be shown on top of the other apps. Wilyer Digital Signage is found in the list as mentioned down the page.
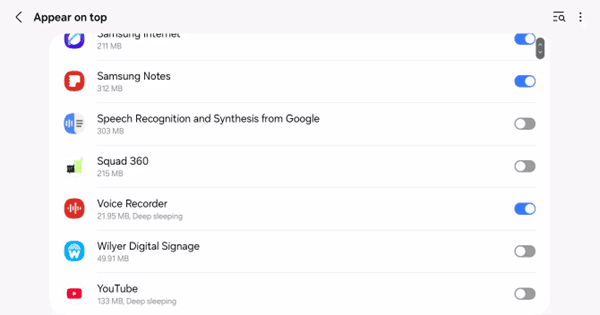
Observe that the switch beside Wilyer Digital Signage is initially in the off position (greyed). To allow this permission, tap the name of the app or the toggle.
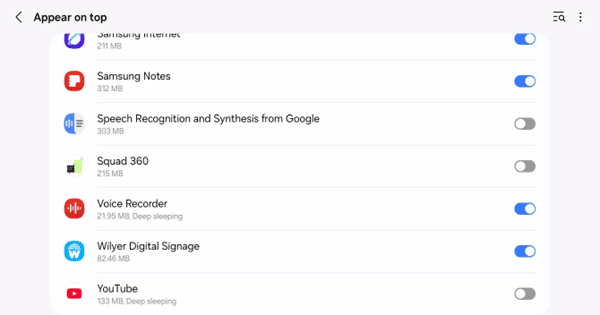
Once the toggle has been enabled, it will change to blue, meaning that now Wilyer Digital Signage can be used in order to show over other applications. This is vital in keeping the kiosk mode and preventing access of other applications on the tablet by users.
Step 22: Verify Auto Launch Permissions Are Granted
Go back to the Wilyer Digital Signage app settings menu. At this point, you will realize that the Auto Launch Permissions has a green checkmark rather than the red X and this will indicate that you have the required permissions in place.
At this point, you have the basic permissions to use your tablet as a professional digital signage.
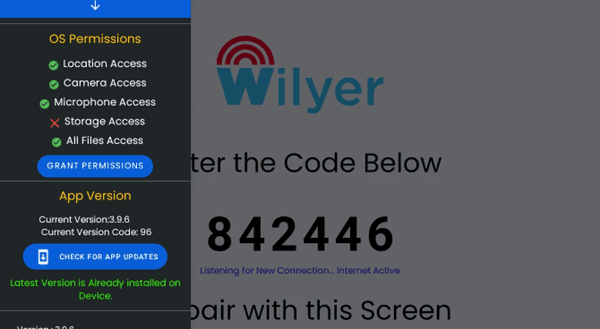
Step 23: Review OS Permissions
Go down the settings menu and check the OS Permissions. This indicates what permissions of the Android system this application needs in order to be fully functional. You might have to give more permissions depending upon your use case.
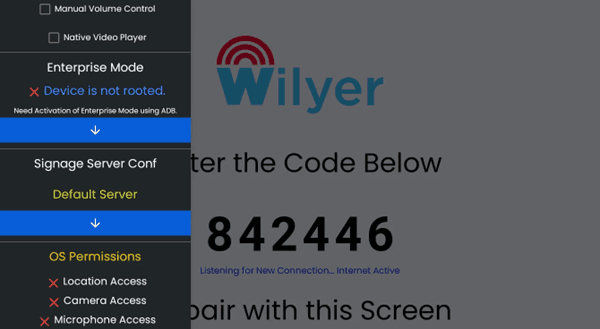
The OS Permissions normally contain:
Location Access: Presentation of location-based content or analytics is needed.
Camera Access: This is required when a QR code is to be scanned or by the interactive camera feature.
Microphone: This is needed to record an audio or voice interaction feature.
Storage Access: This feature enables the application to access and store media files in the device.
All files access: Allows content management access to the file system.
Step 24: Grant Storage and File Access Permissions
You will also have to enable storage access in case you want to play media content that is in the device or the USB drives. Go to the OS Permissions and tap on GRANT ALL files access to make the files have all the storage permissions.
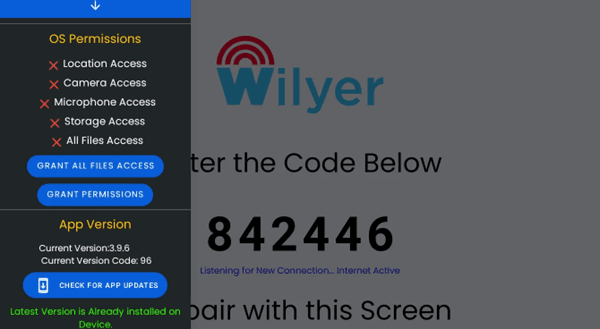
It is also possible to provide individual permissions by tapping GRANT PERMISSIONS and proceed with the approvals one at a time.
Step 25: Confirm All Files Access Permission
Tapping GRANT ALL FILES ACCESS will show an Android permission dialog outlining the permission that the application is asking. The conversation reads: This application will have the ability to read, edit and delete any files on this tablet or any other storage device that it is connected to.
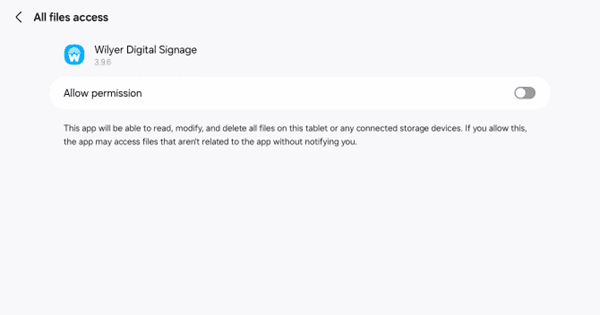
To have this access, switch on the 'Allow permission' switch. This is required to have the app read media files, access content in USB drives and manage downloaded files.
Step 26: Grant Camera Permission (Optional)
You will need to allow camera permission in case your digital signage will have an interactive component such as a QR code scan or camera-based interaction. Android offers permission dialogs since each permission required is displayed when you tap GRANT PERMISSIONS in the OS Permissions section.

They ask: “Allow Wilyer Digital Signage to take pictures and record video?” with three options:
While using the app - Grants camera access only when the app is active
Only this time - One-time permission that expires after use
Don't allow - Denies camera access
For digital signage purposes, select “While using the app” if you need camera functionality.
Step 27: Verify All Permissions Are Granted
Go back to the app settings menu and make sure that all the necessary permissions have green check marks. You should see:
App Autostart at Boot
Auto Launch Permissions
Location Access
Camera Access
Microphone Access
Storage Access
All Files Access
Step 28: Access Additional Device Settings
The app also offers to fast track vital device settings in the section of device settings. This contains shortcuts to WiFi settings, date and time settings and the option to restart the app or simply open Android settings.
Step 29: Complete Device Pairing
When all the permissions are activated, your tablet will show a new pairing code (when the old one has expired) and it will show Connecting to Server. Network Available which means that it is ready to work with your cloud dashboard.
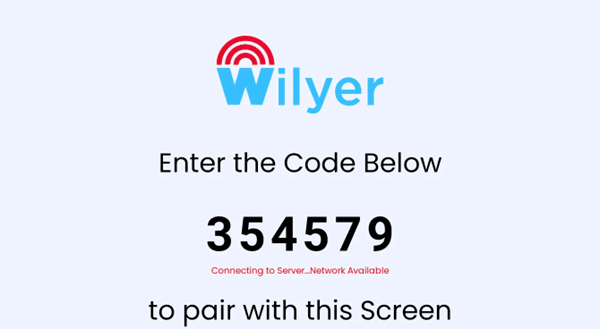
Insert this code (in this case: 354579) in your Wilyer dashboard in order to complete the pairing process. After matching, you are able to start uploading and control remotely what will be shown on your digital signage.
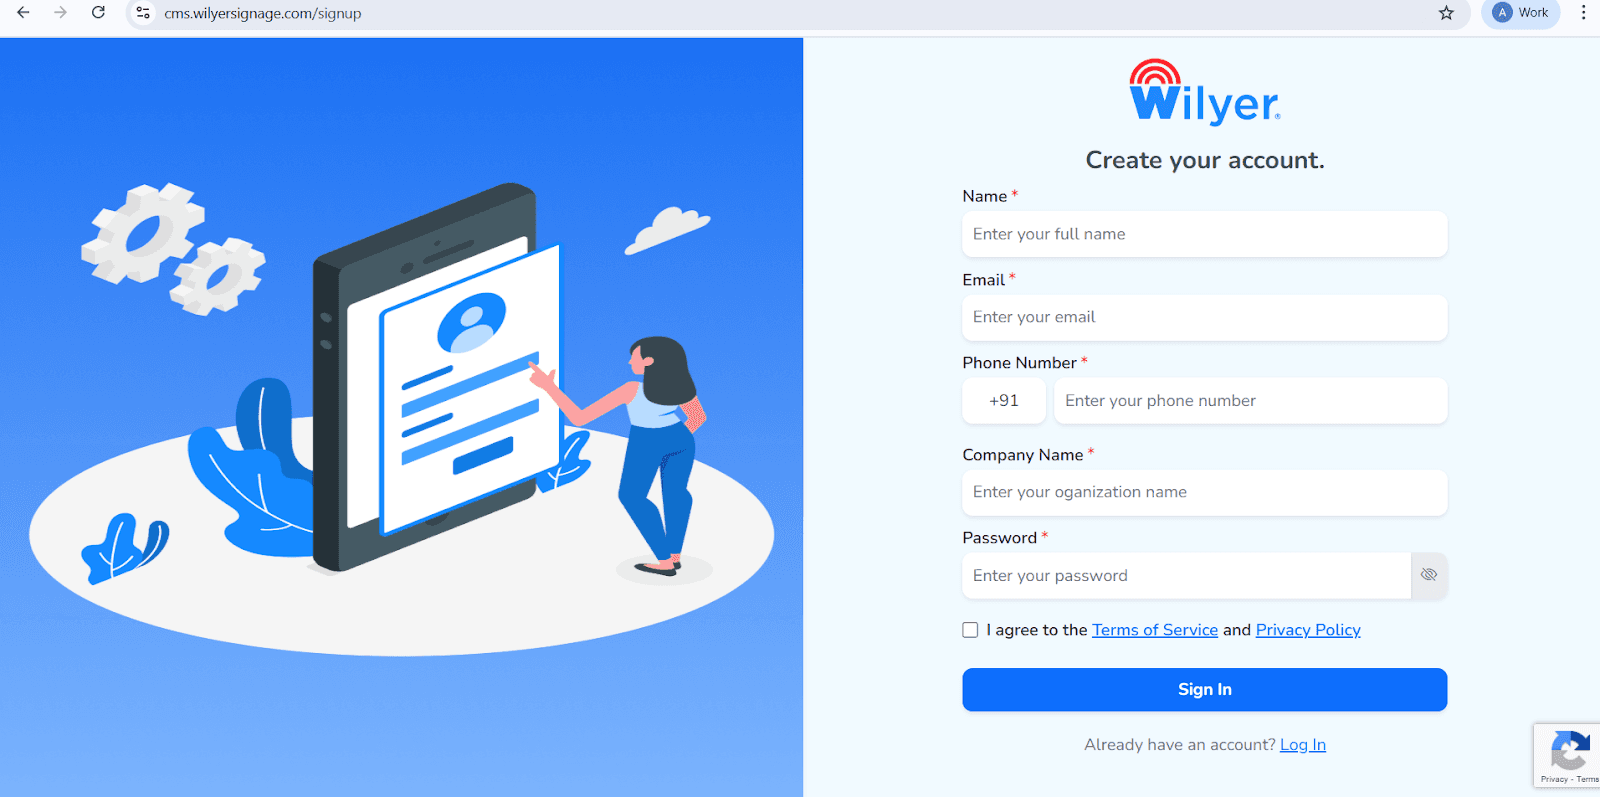
Access the Wilyer Sign-Up Page
Navigate to the official Wilyer Cloud CMS registration page to start creating your digital signage account.
Enter Your Full Name
Provide your complete legal name. This will be used as the primary administrator name for managing the Wilyer dashboard.
Provide Your Email Address
Enter a valid and active email address. This email will be required for login, account verification, and receiving important system notifications.
Add Your Phone Number
Enter your mobile number along with the correct international country code to associate it with your account.
Enter Your Company Name
Specify your business or organization name to create a professional identity within the Wilyer digital signage network.
Create a Secure Password
Set a strong and secure password to protect your Wilyer account and ensure data security.
Accept the Terms and Privacy Policy
Review the Wilyer Terms of Service and Privacy Policy, then confirm your acceptance by selecting the checkbox.
Complete Registration
Click the “Sign In” button to submit the form, create your account, and access the Wilyer dashboard.
Step 30: Log-in into the Wilyer Dashboard.
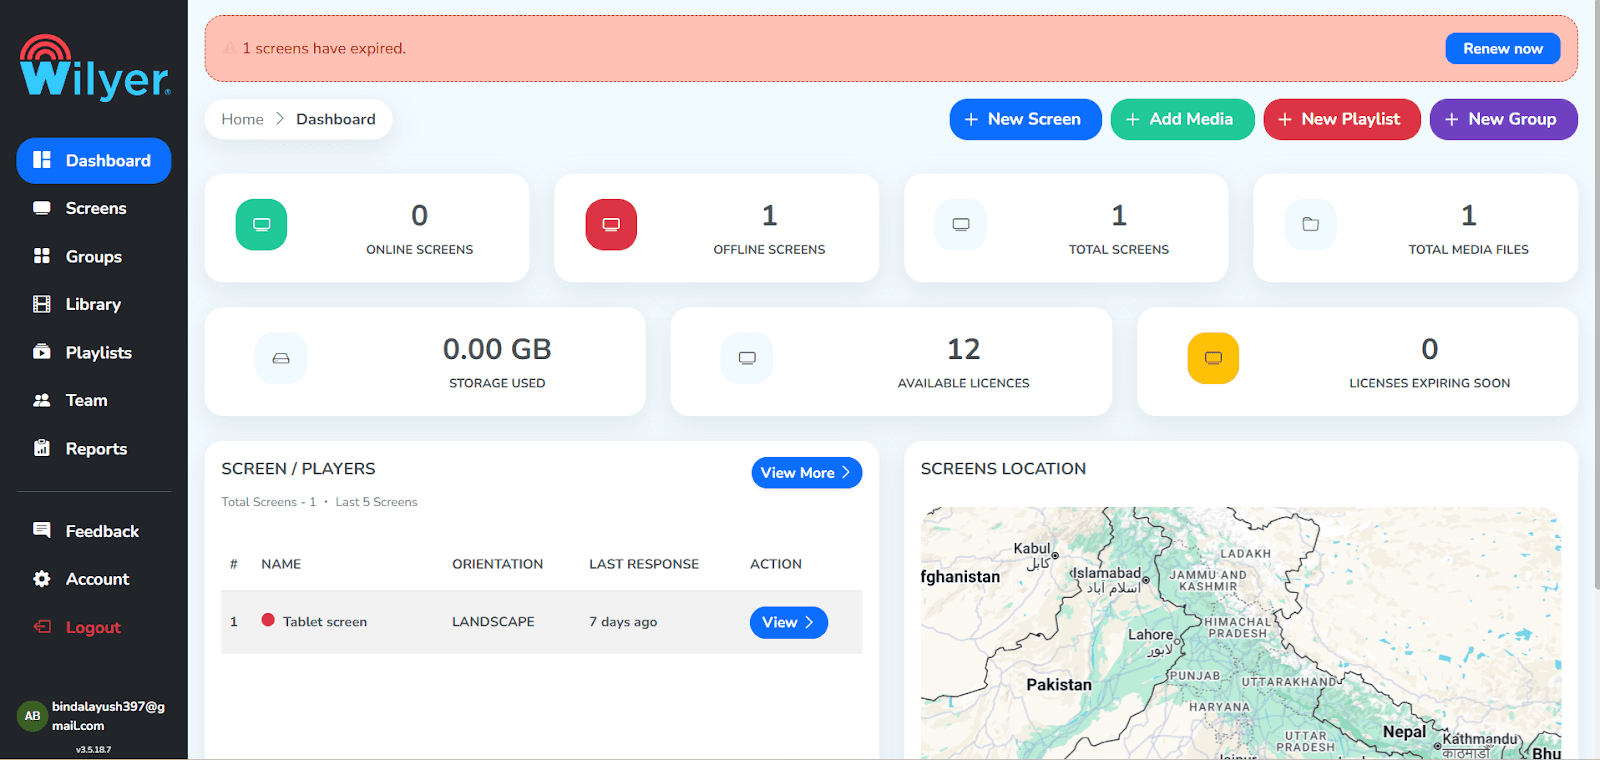
Once you have signed in, you will see the Wilyer Dashboard, which is the control panel of the main panel of your digital signage network. It gives an overall picture of all the related displays, both online and offline, registered screens, uploaded media, storage utilization, and the available licenses. Through this, you are able to monitor and manage your entire signage environment well.
Step 31: Pair Your Android Tablet
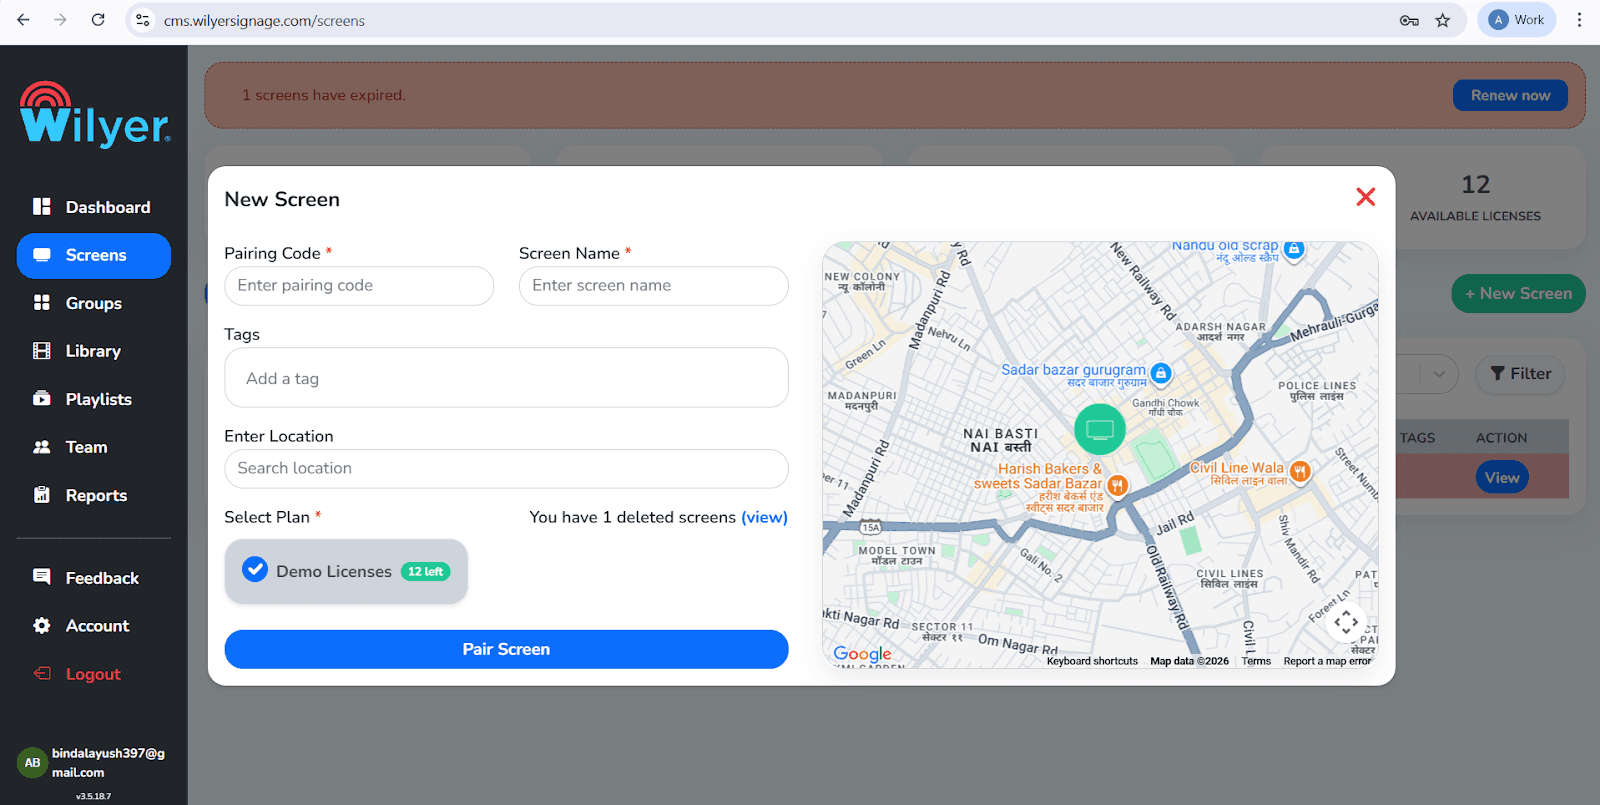
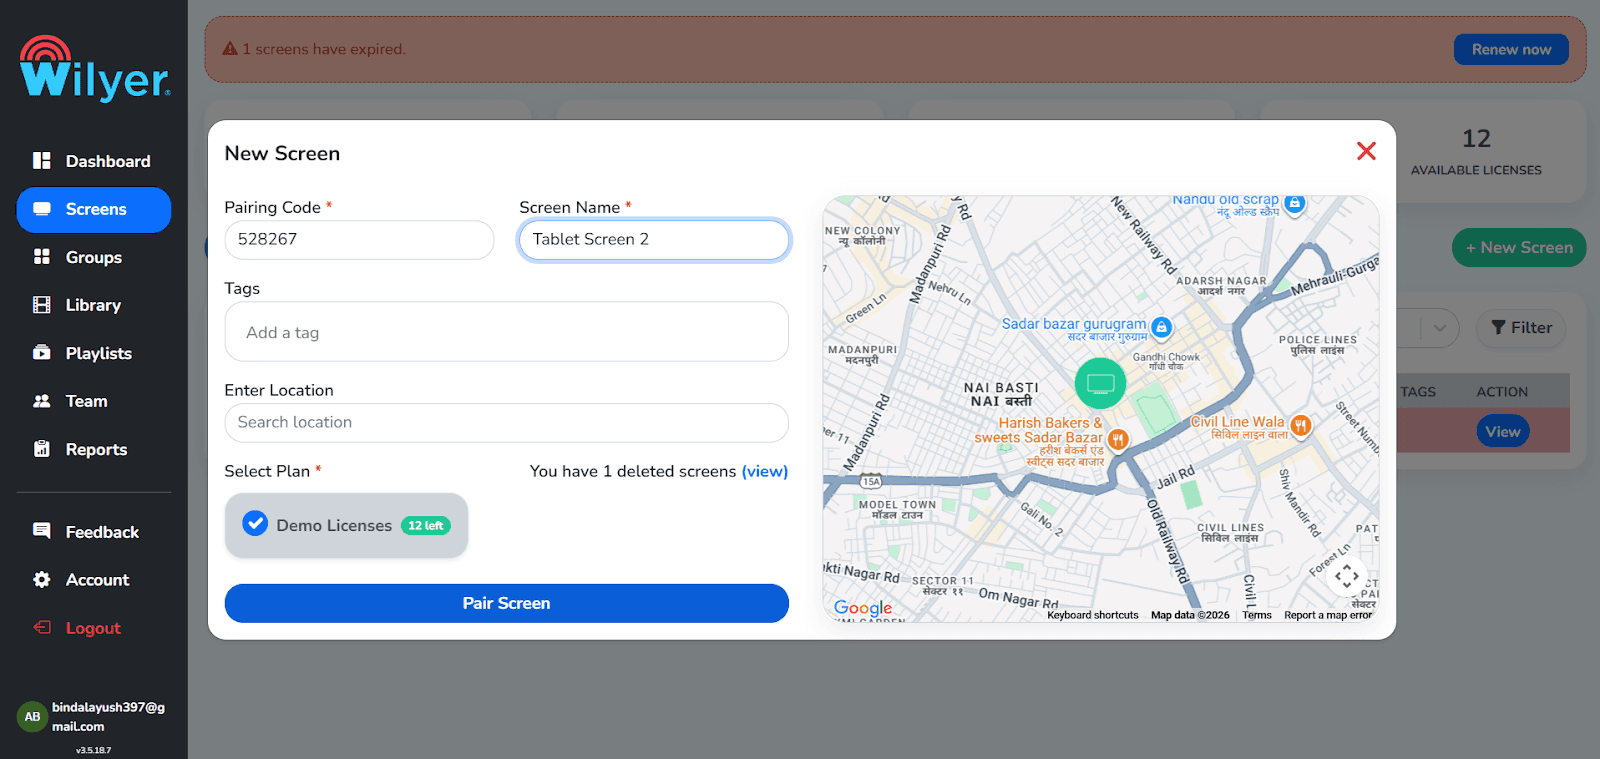
In order to add a new display, one can choose + New Screen or Add Screen via the dashboard. Key in the 6 digit pairing code on your Android tablet. Enter a definite screen name, add some relevant tags, choose the location where the installation should be done, and select an appropriate license plan. Click Pair Screen to complete the connection.
Step 32: Pairing with another screen through Dashboard.
Go to the Screens and then select Pair Screen. pairing code The pairing code will be shown on the screen, select it to verify the screen name, tags and location. Choose any license plan available and then pair the screen, and the connection starts.
Step 33:Successful Pairing Screen in Wilyer Digital Signage.
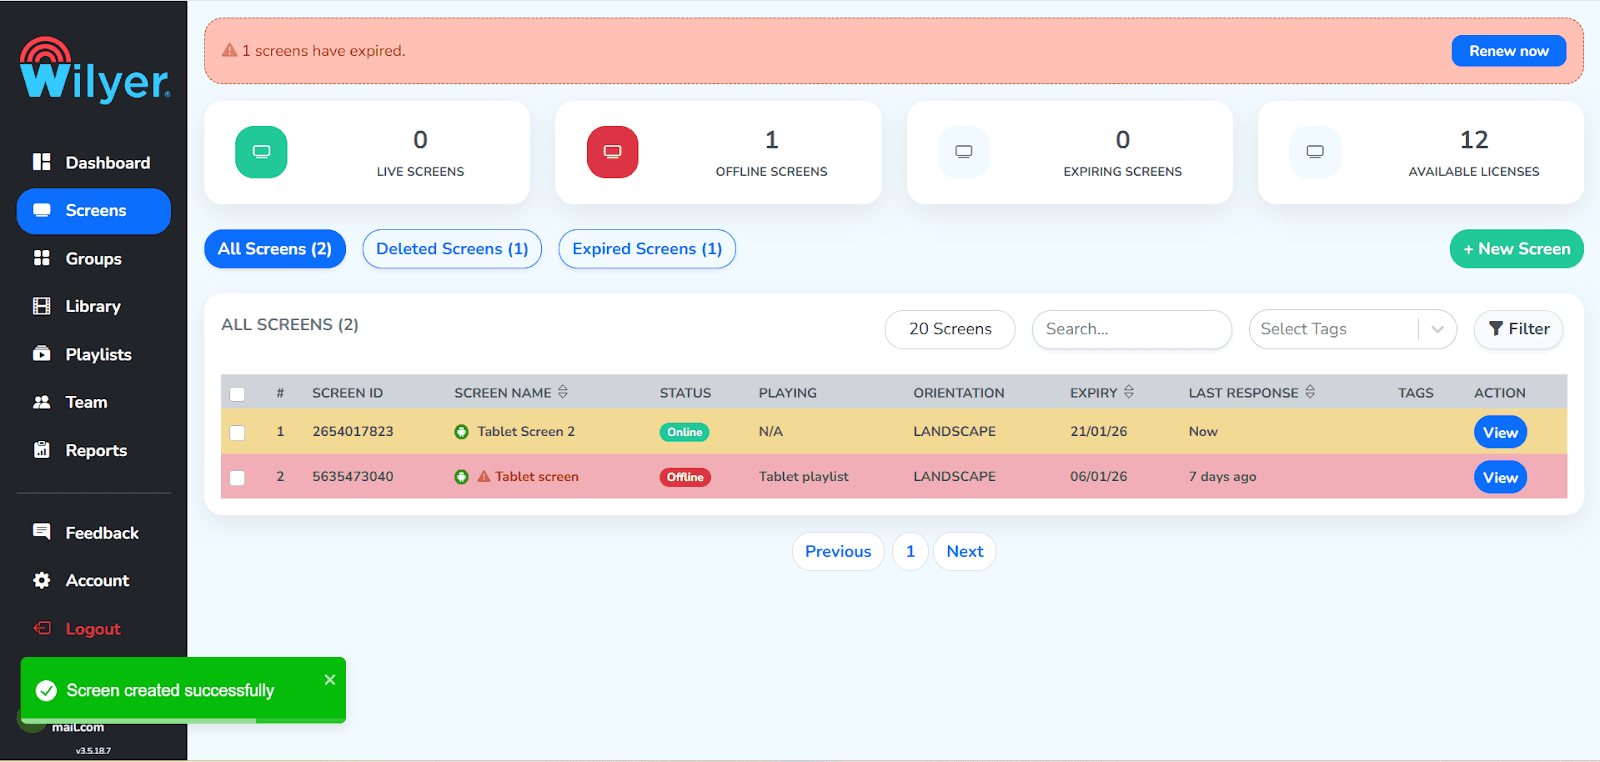
After matching, a display is shown in the Screens section and has an Online status which indicates that a successful connection is established. You are able to see important information that includes Screen ID, orientation, license expiry, and the last response time. Playlist assignment, configuration, and real-time performance monitoring now may be performed on the screen.
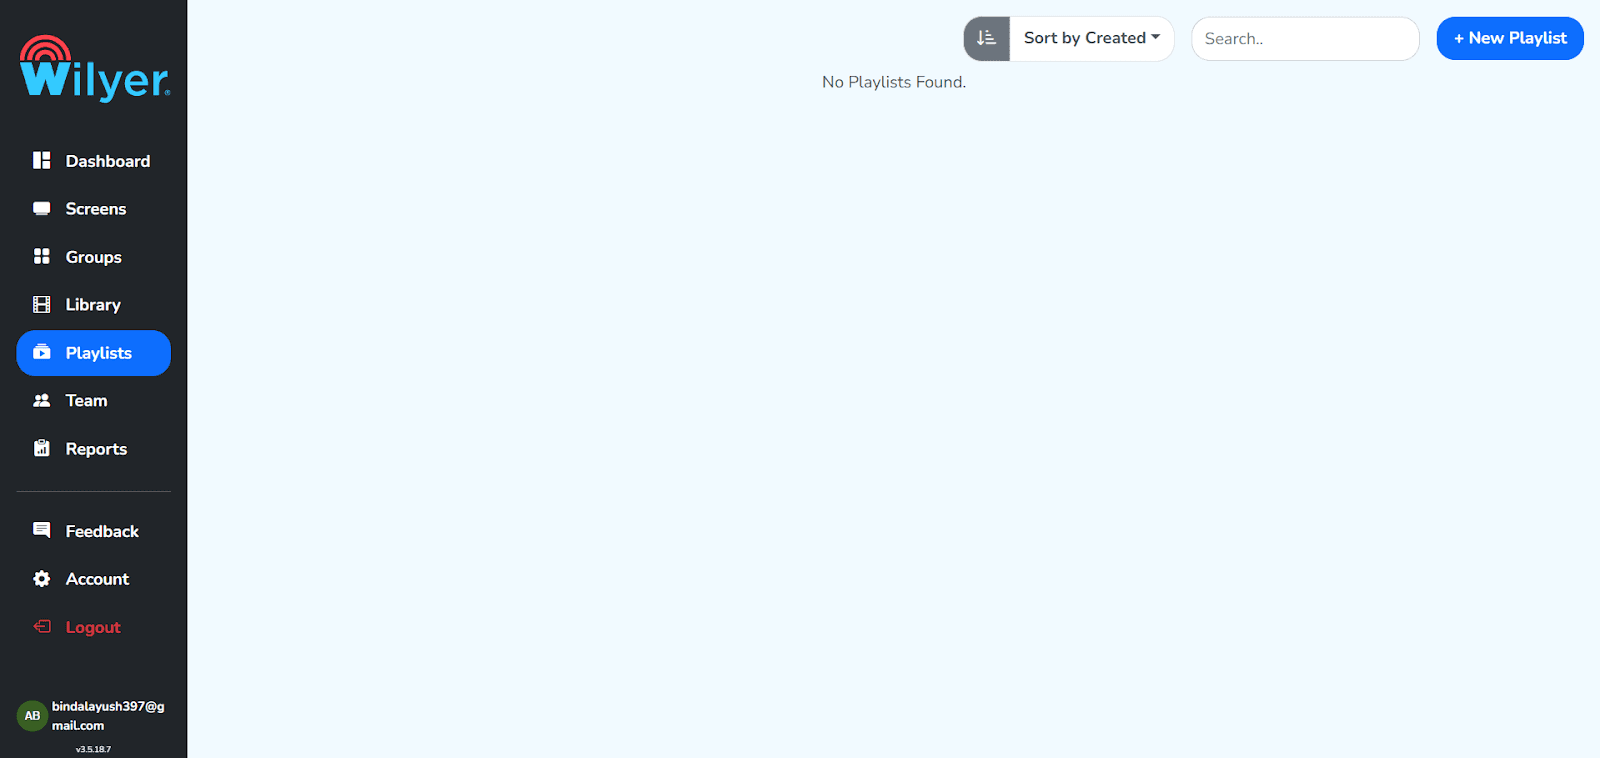
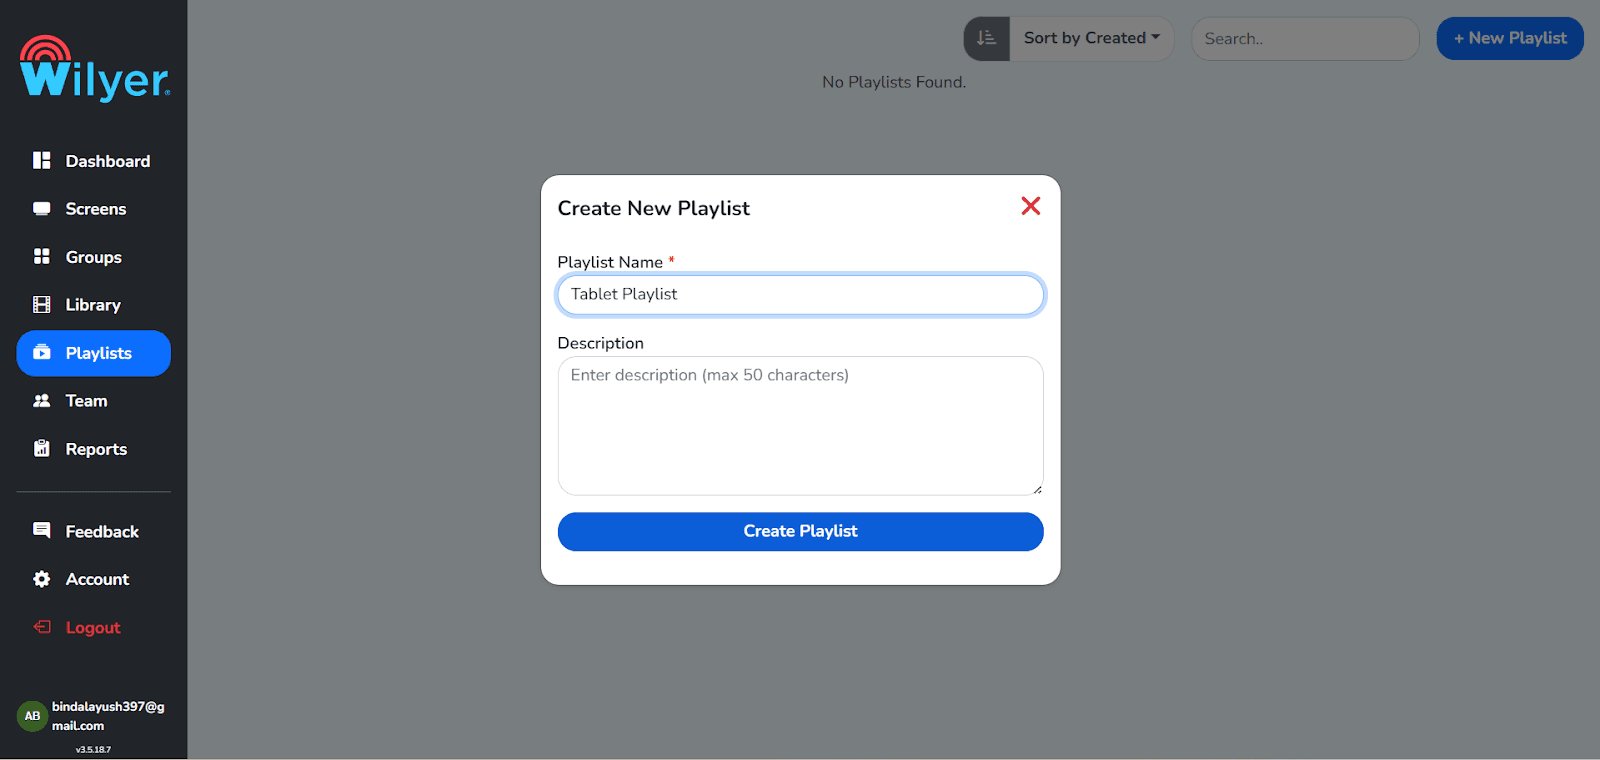
Step 34: Make Your First Playlist.
In the Playlists section, go and either click + New Playlist or Create Playlist. Name and description should be given clearly. This playlist will arrange the content and present it on the screens connected to each other.
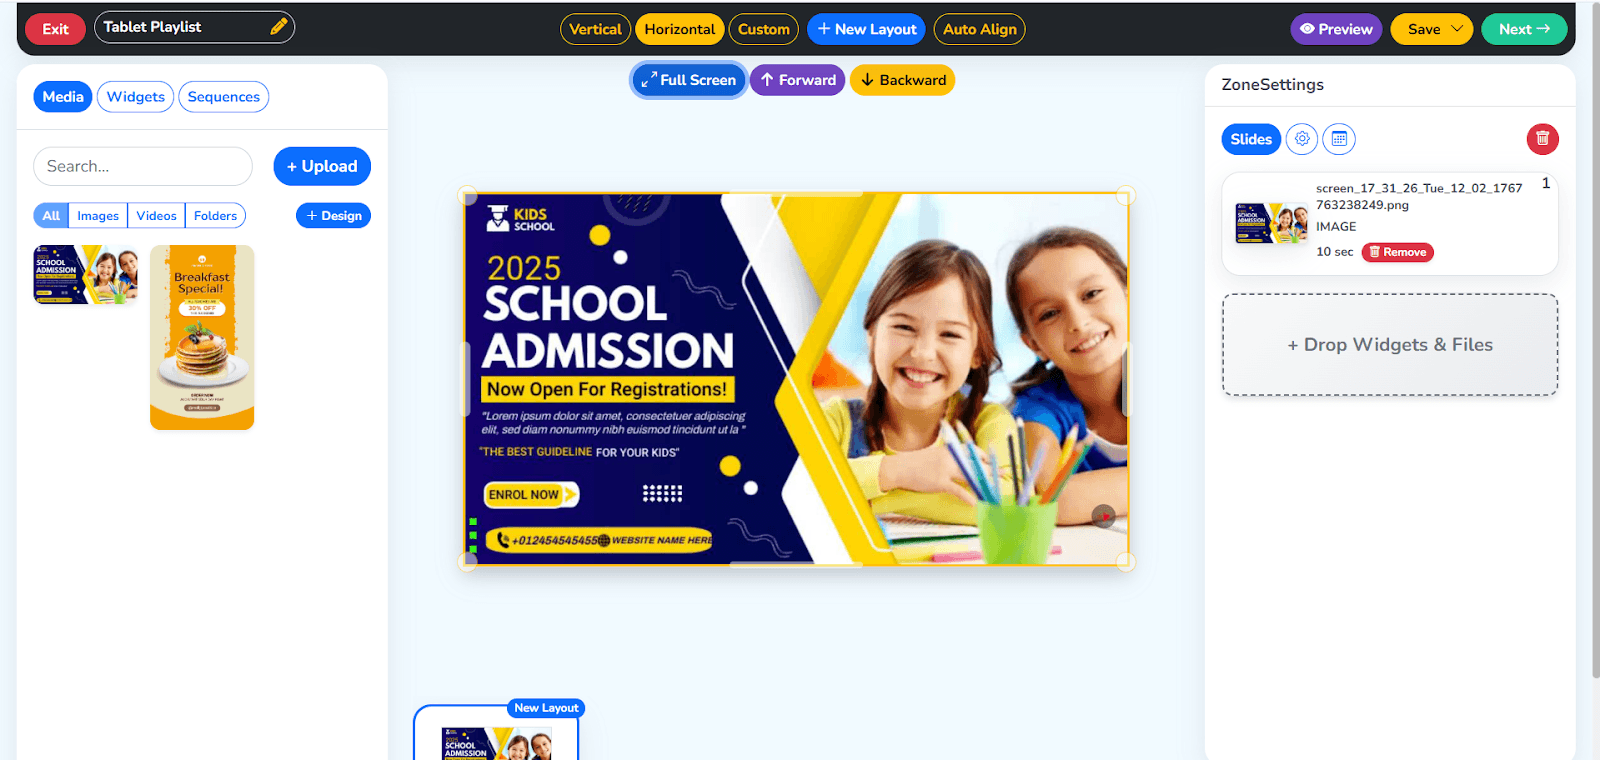
Step 35: Select and create the design of the playlist.
Choose either Vertical, Horizontal or Custom playlist layouts. Place media, and set durations of a slide and use transition effects on the canvas. View the end product using the real time preview.
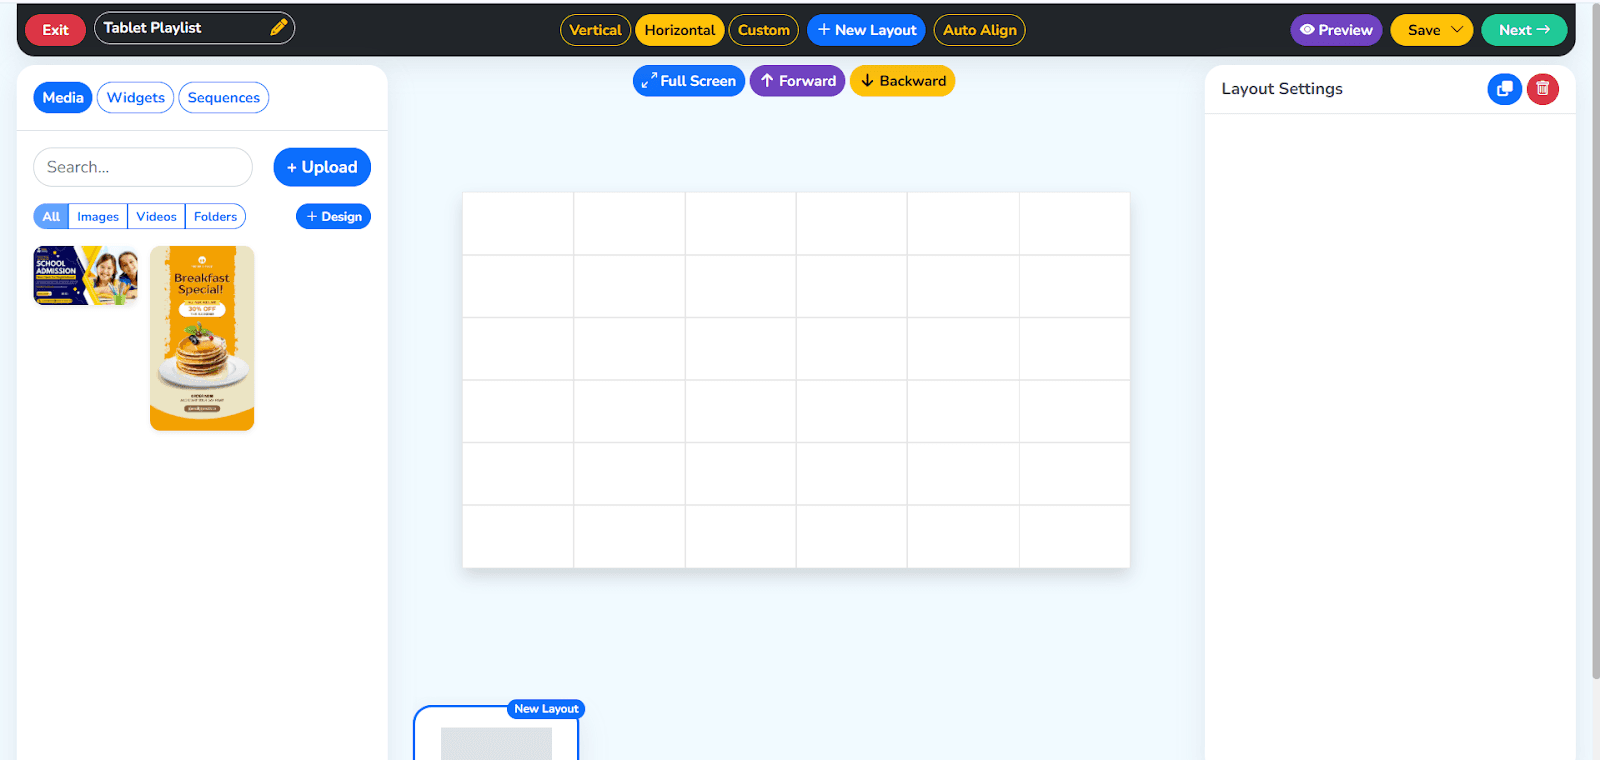
Step 36: Drag-and-Drop Playlist Builder by Wilyer
Wilyer’s drag-and-drop playlist builder makes content creation simple and efficient. Easily add images, videos, and templates by placing them directly onto the layout, enabling quick arrangement, seamless editing, and faster digital signage creation.
You can also rearrange content and adjust playback timings as needed. To preview the playlist in full view, simply click the Full Screen button.
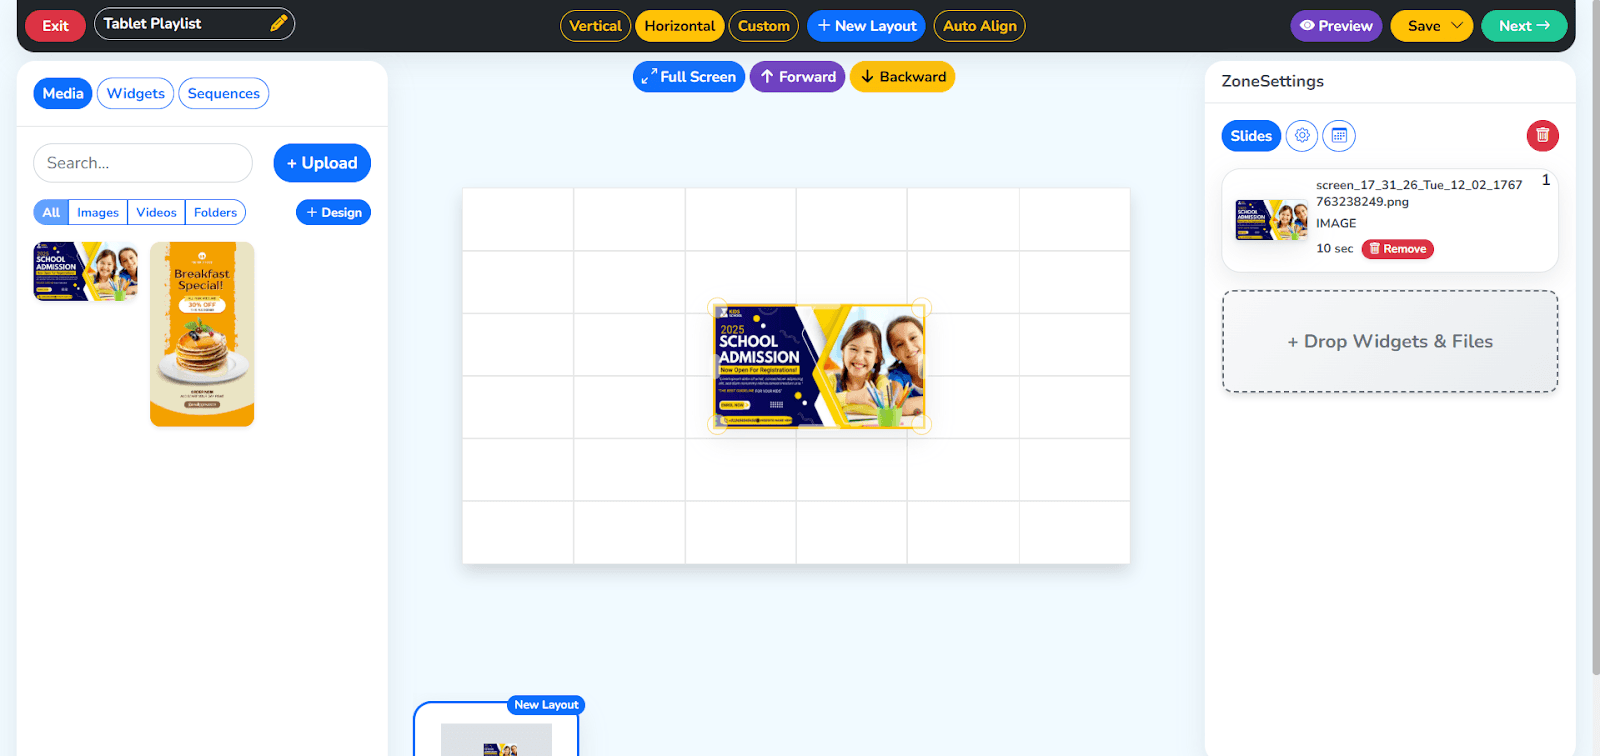
Step 37: Media and Playback Settings.
Insert images or videos to the specified areas of layouts. All media objects are turned into slides, and it is possible to control the sequence of playback and changeovers. The overall playlist time will automatically change with the addition or deletion of content.
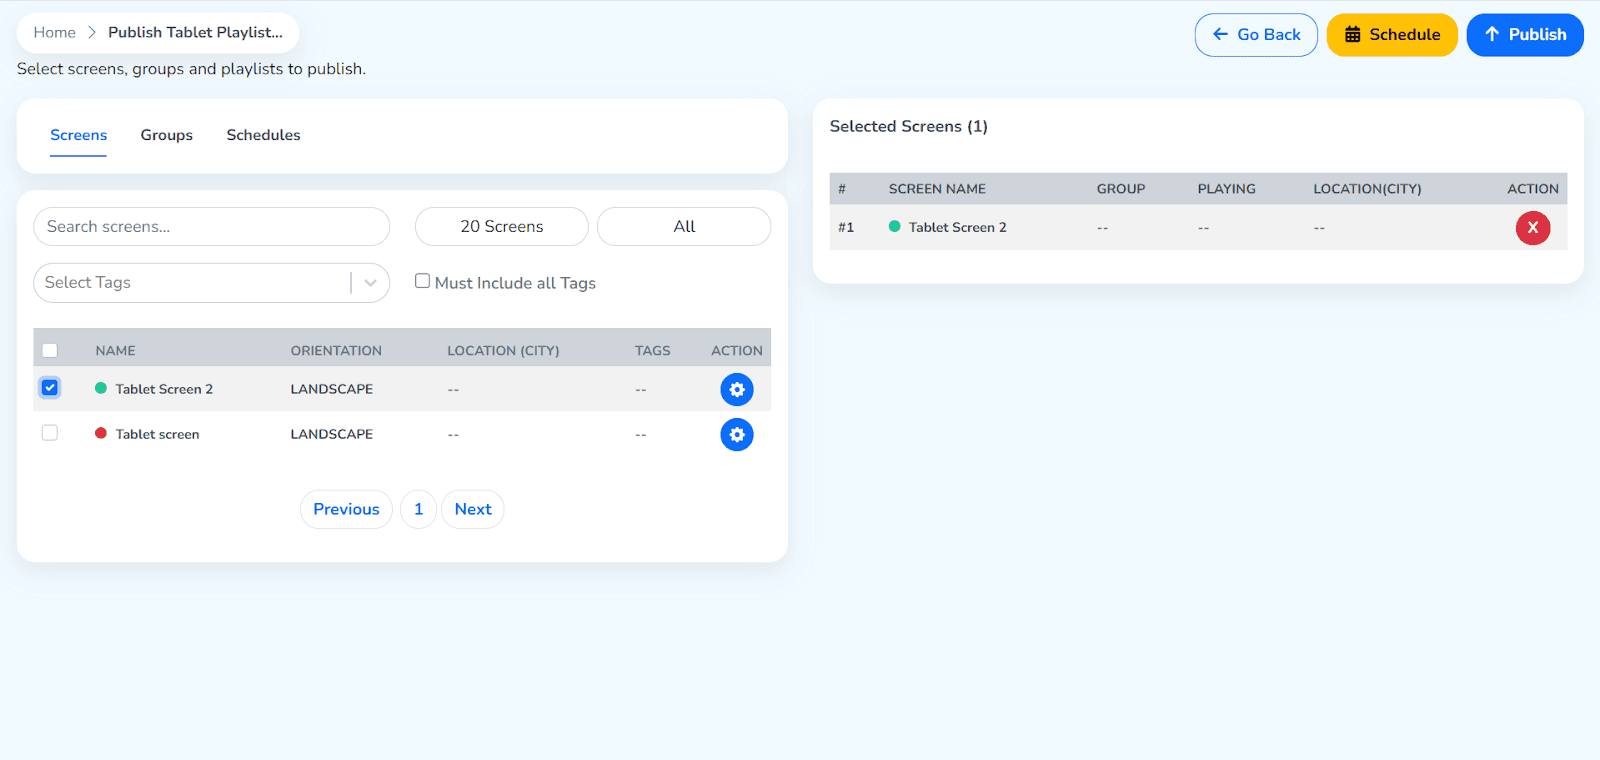
Step 38: Promote Content to Displays.
Once the playlist is ready, proceed to the next button, and select Publish. Some screens or groups of screens where the content is to be shown are chosen, and this is the next step.
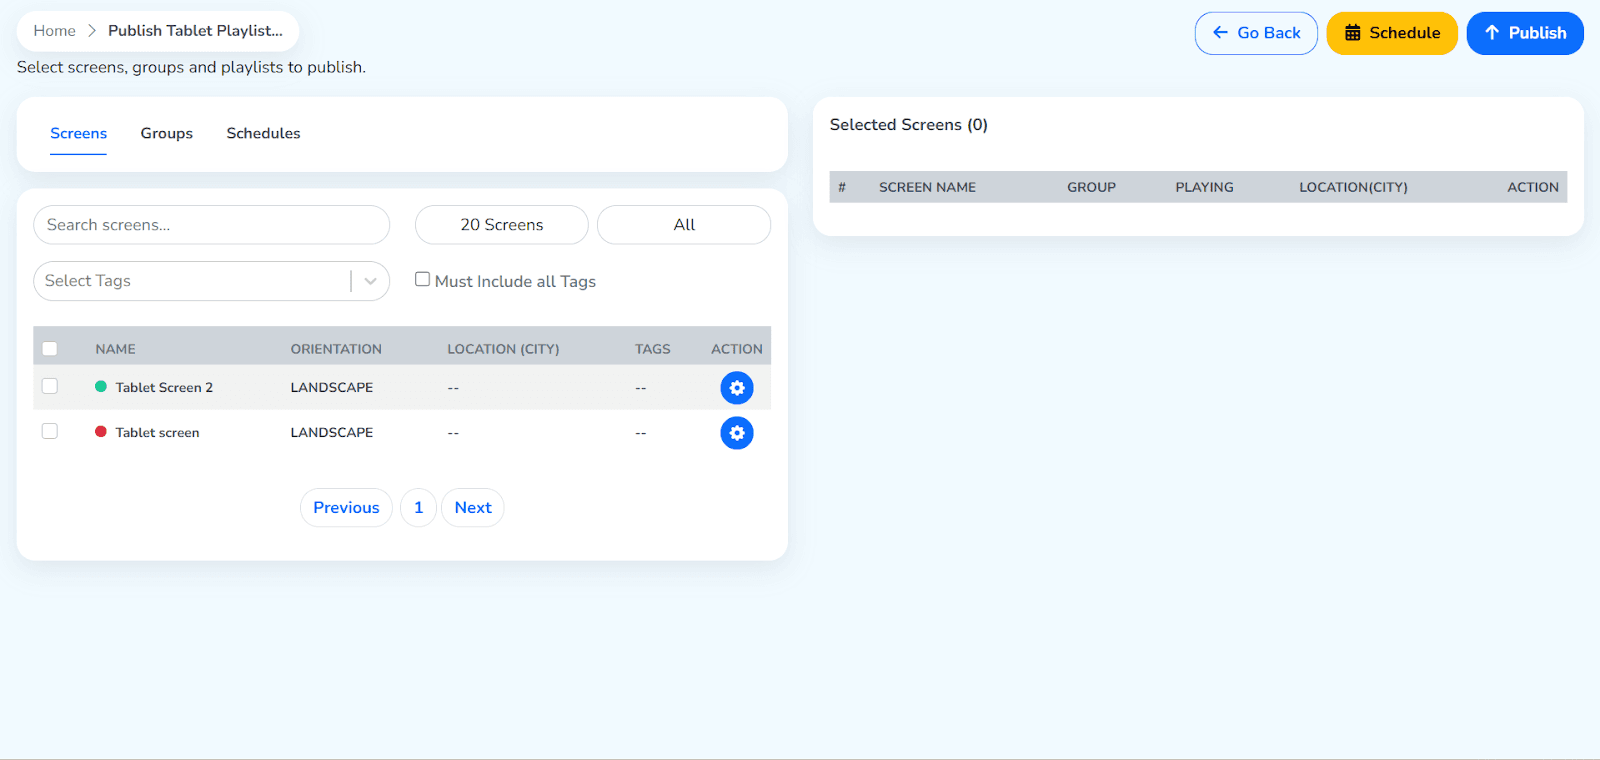
Step 39: Publication or Scheduling of the Playlist.
You have a choice on whether you can publish or set up playback to a certain date and time on the Publish TV Playlist page. Choose Publish or Schedule depending on your needs of deployment.
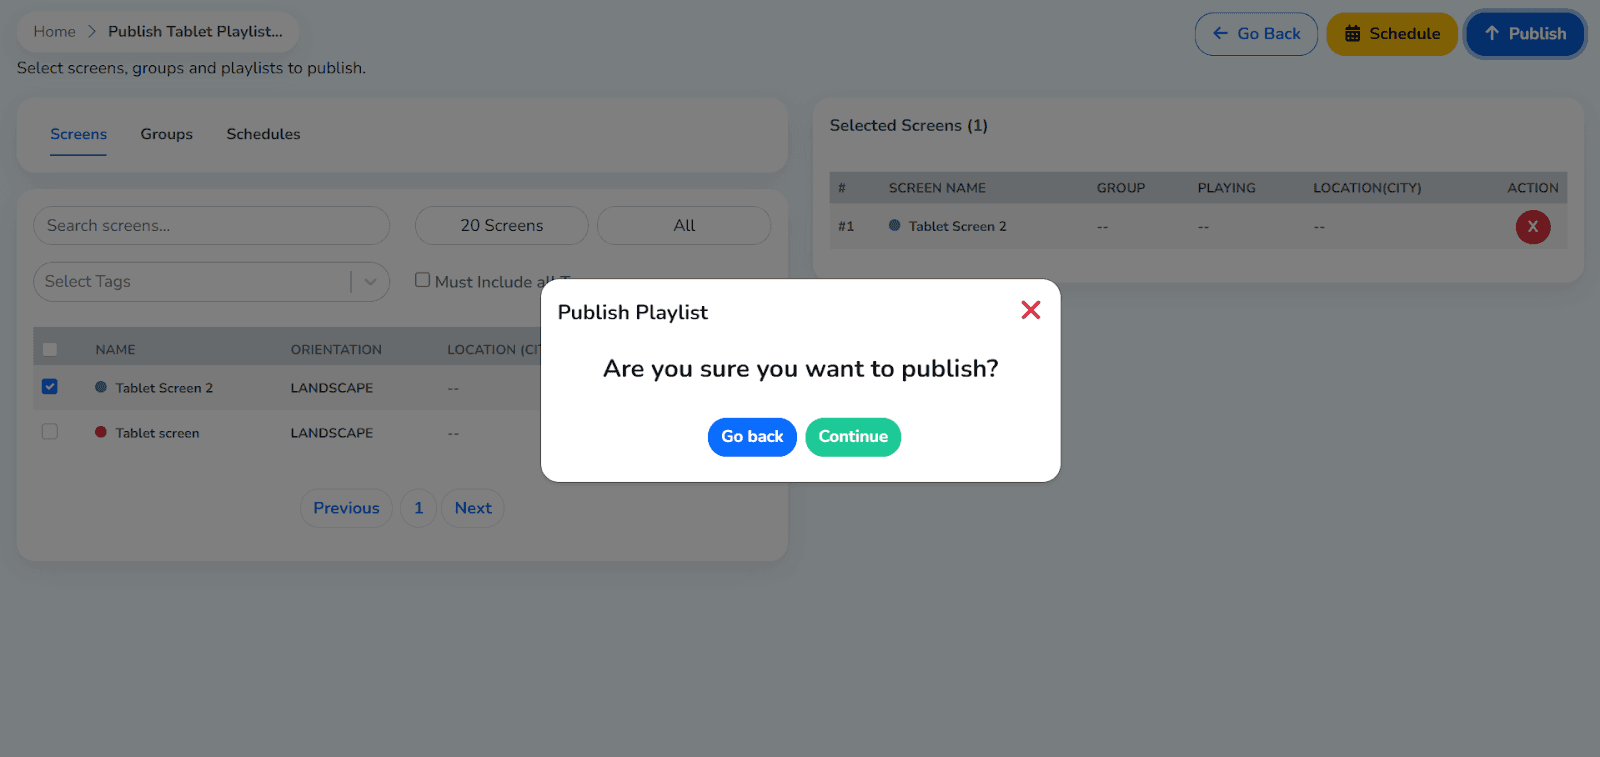
Step 40: Confirm Publishing
There is a confirmation dialog that comes up before deployment. Look over all the information and go on to continue. In case any alteration is needed, choose Go Back to customize the playlist or screen presentation.
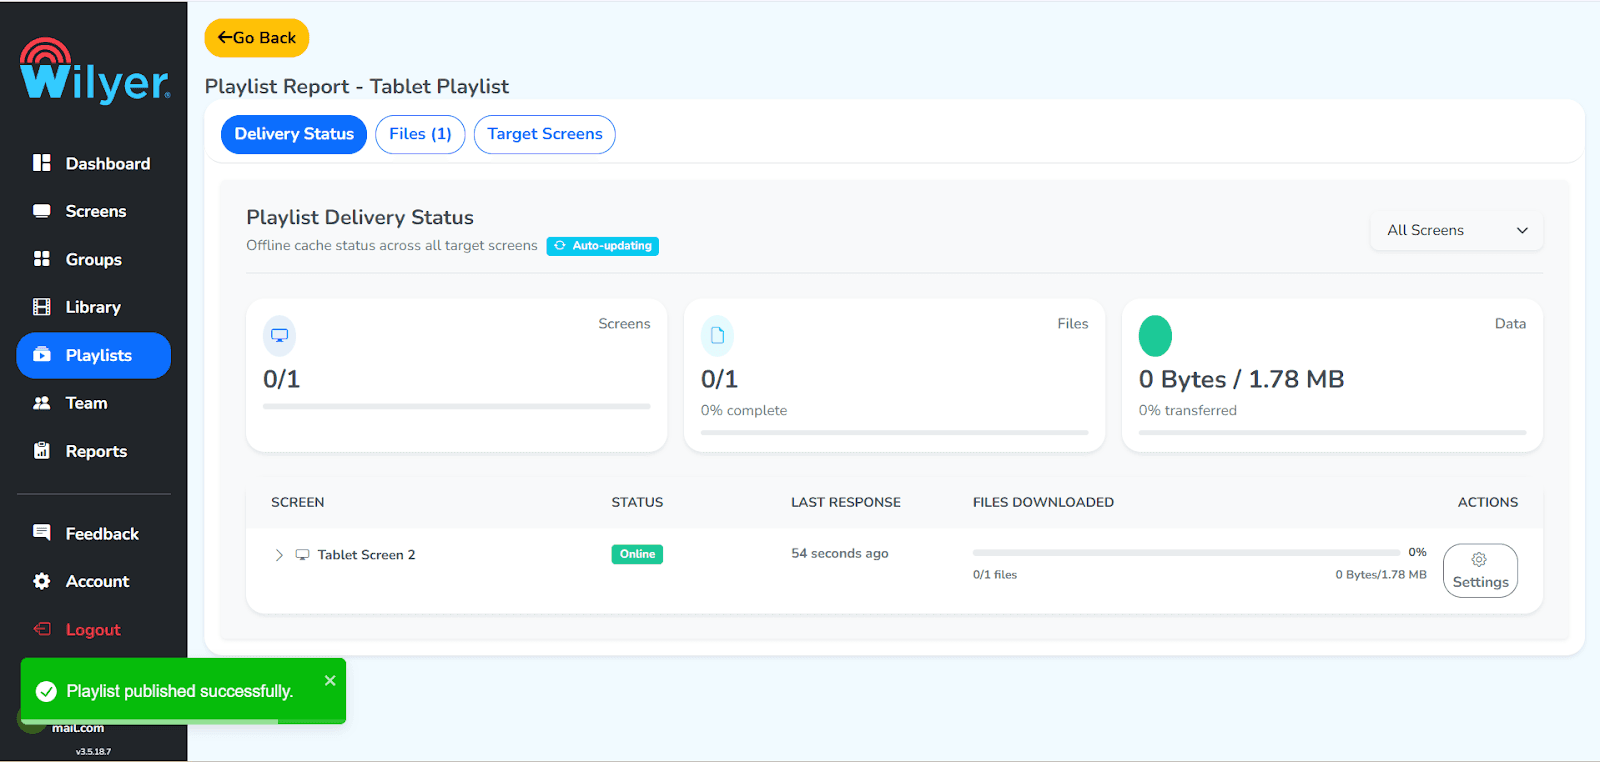
Step 41: Track Playlist Delivery Progress.
Show status of delivery with Playlist Report. The report shows Target screens, data transfer status and percentage completion. Status Successful is used to confirm that all files have been transferred and the screen is online. It does not start playing until all the requirements are satisfied.
Final Step: Content on the Live Screen.
Playlists are now available on the connected screens. Content will be played in accordance with the chosen layout, sequence, and time to have error free and smooth playback. Check images, placement, and transition to provide a perfect, professional presentation to your audience.

Your Digital Signage Display is Now Ready
Congratulations, You have successfully transformed your Android tablet into a professional digital signage display.
Troubleshooting : Common Issues
Issue: App Won't Install
Solution:
Make sure that the option of installing unknown sources is on in the device settings.
Make sure that you got the right .apk file according to the android version.
Ensure that you have enough storage in your tablet.
You can start your tablet and then try to install it again.
Issue: App Crashes or Freezes
Solution:
Clean the app cache in the Settings Apps Wilyer Digital Signage Clear cache.
Make sure that you have the newest version of the Android OS on your tablet.
Ensure that your tablet is of the required minimum system requirements.
Problems can be overcome by uninstalling and reinstalling the app.
Problem: Wi-Fi Connection is constantly dropping.
Solution:
Bring your tablet nearer to the WiFi router to have stronger signals.
Switch off battery optimization of the WiFi service.
Better coverage is provided by the use of WiFi extender or mesh network.
Assign a permanent ip address to your tablet in the router settings.
Wired Ethernet and USB-to-Ethernet adapter is an option to consider.
Issue: Content Not Updating
Solution:
Make sure that your tablet is connected to the internet.
Ensure that the right content is uploaded to your device in the cloud dashboard.
Pull down to refresh Force sync (when possible) in the app.
Reboot the digital signage application.
Check and ensure that your device is registered and online on the management dashboard.
Best Practices for Tablet Digital Signage Screens
Select the Right Tablet: Select a tablet that has a sufficient screen size that can be viewed comfortably. 7-10 inch tablets are appropriate to view on close-up. Use 10-13 inch tablets in case you are placing a lobby display or bigger area. Think about the brightness of the display, in case the display will be used in sunny areas.
Invest in Quality Mounting: A professional tablet mount or a stand should be used to ensure that your display is secure. There are wall mounts, floor stands, countertop stands, and VESA-compatible mounts which can be applied in various applications.
Strategy Plan Your Content: Build an interest in visually stimulating easy-to-read-from-afar content. Use contrasting colors, big fonts and do not use cluttered designs. Make messages short and change content frequently to ensure the interest of the viewer.
Clean your Hardware: Clean your tablets and ensure they are dust free. Check for software patches and security regularly. Keep an eye on the battery life of tablets that are not always attached to the power supply.
Test Before Releasing: Test your digital signage system over a few days in a test-based scenario before releasing it to the general public. Check the stability, the connectivity and the quality of display of content.
Have a Backup Plan: Have the prepared alternative tablets so that in case of failure of any device, you can still have a backup. Keep up contingent power supplies of important displays. Also have printed signage as a fallback due to the inability to access internet resources currently.
Measure Performance: The analytics and monitoring tools that are given by your digital signage system will help you to measure uptime, content performance, and device health. Install connectivity or device failure notifications.
Advanced Feature to Explore
Multi-zone Layouts: Have split-screen layouts showing several content items at once. Display a menu on the one hand and advertising videos on the other.
Interactive Touch Content: Develop interactive contents where the viewers can browse products, search directories or access information by touching the screen.
Social Media Integration: Show live social media feeds or Instagram posts with your hashtag or Twitter posts to be mentioned so that social media presence can be enhanced.
Data Visualization: Present real-time data dashboards, sales, production statistics, or analytics in graphical formats.
QR Code Additions: Include QR codes on your screens, which can be scanned by the viewers to get more information, special deals, or to make transactions.
Emergency Alerts: Replace normal contents with emergency messages or critical announcements when necessary.
Evidence of Play Reporting: Retrace how and how long a piece of content was shown on the advertising policy and sponsorship needs.
AI-Driven Content: Use artificial intelligence to show personalized content by the viewer in accordance with their demographics, time of day, or other criteria.
Conclusion
Tablet into digital signage is a cost-efficient, adaptable, and efficient tool that can be used by any business. Through this detailed guide, you would be able to convert inexpensive Android tablets into professional digital displays that create a better customer experience, help to improve communication, and achieve business outcomes.
It is simple to download your digital signage application, connect it via the USB, connect it to WiFi and set up your content. When your tablet digital signage network is well configured and maintained, you will have several years of service.
Digital signage (tablet-based) will be the answer, because it is cost-effective and easy to use and achieves the necessary image of a restaurant, promotional, or corporate message in an office. Take one tablet as a pilot project and then increase with the observed benefits.
Always remember to maximize your display configurations, possess kiosk mode to prevent any security issues, produce interesting content, and access the cloud-based management platform that provides access to control your digital signage network at any place.

Compatibilidad Multi-Plataforma para Cada Pantalla de Señalización Digital
Ejecute el software de señalización digital de Wilyer en su sistema operativo preferido sin complicaciones.
