Samsung Tizen Display
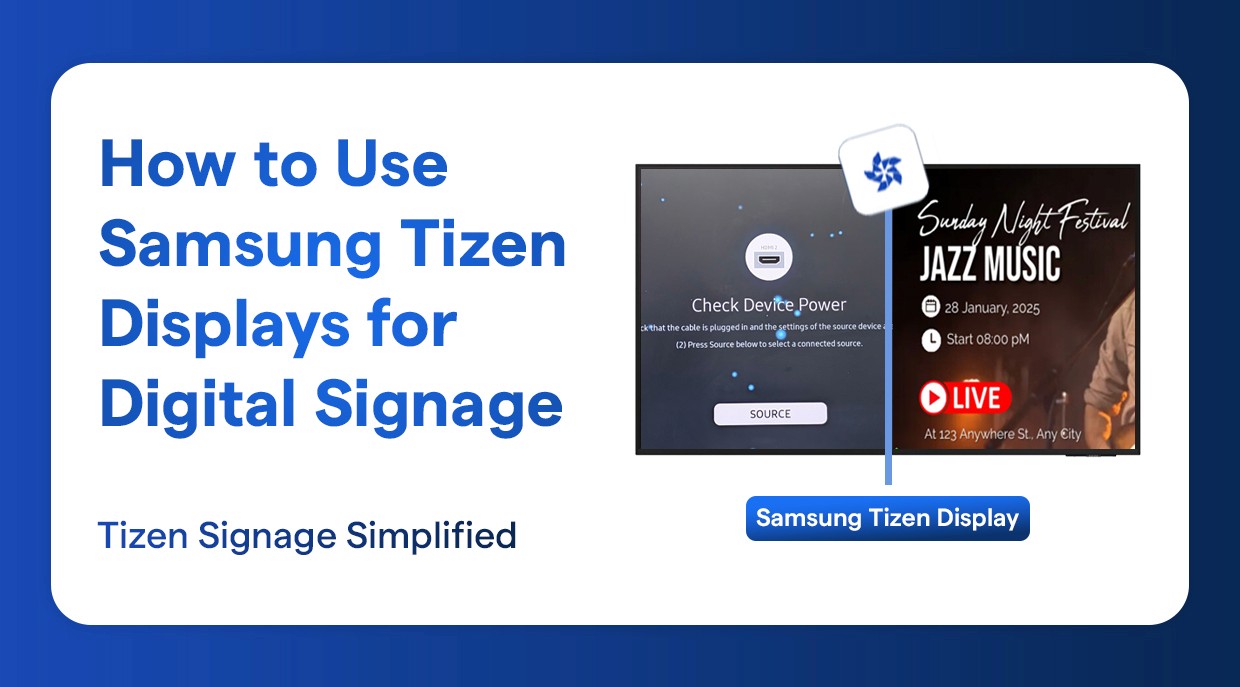
How to Use Samsung Tizen Displays for Digital Signage
Complete Guide to Using Samsung Tizen Displays for Digital Signage
٢٤ شعبان ١٤٤٧ هـ
Introduction
The Samsung Tizen screens have gained a following in digital signage systems in a number of industries. Whether you are installing a digital menu board in a restaurant, building an information display in a corporate office or a retail advertising screen, Samsung Tizen digital signage provides an efficient, dependable framework on which to base your content delivery requirements.
This step-by-step manual will help you install and configure your Samsung tizen television or business screen to use in digital signage. We will provide detailed screenshots and clear instructions on how to do each of the steps with respect to Power-on sequence to network configuration and display orientation.
Why is Samsung Tizen best to use in Digital Signage?
Samsung Tizen digital signage platforms have many strong features that can attract interest of the business considering the implementation of professional display solutions:
Commercial-Grade Reliability Samsung Tizen screens are designed to work 24/7, and can thus be used in digital signage 24/7.
Inbuilt Signage player: Tizen signage software allows external media players to be used in a large number of cases.
Cloud-Based Content Management: Cloud digital signage is compatible with cloud based digital signage to update contents remotely and schedule them.
Multi-Display Orientation: The landscape and portrait mode signage configurations are supported.
Enterprise Featuring: Samsung Tizen signage management software is designed to enable the centralized management of a large deployment.
Large Display Sizes: They come in sizes with different display requirements of digital signage.
System Prerequisites and Requirements.
Prior to starting the Samsung Tizen digital signage system, you will need the following:
Samsung Tizen television (Model QB43 or others)
Wi-Fi network connection or Ethernet cable that is stable.
PIN code (000000) to enter the system.
Power socket of proper voltage.
Wilyer Digital Signage software can be installed on Samsung Tizen TVs using two methods:
Install Wilyer Digital Signage Software via Link
Using the browser link method, the Wilyer Digital Signage software can be installed directly on a Samsung Tizen TV with an active internet connection. By opening the TV’s and entering the Wilyer installation link, the application downloads and installs directly on the screen without the need for a USB device. Once installed, the display shows a pairing code that can be used to connect the screen to the Wilyer dashboard. This method is ideal for quick and hassle-free setups.
Install Wilyer Digital Signage Software via USB Drive
The USB installation method allows the Wilyer Digital Signage software to be installed using a pen drive. The installation file is copied to a USB drive from a computer and then connected to the Samsung Tizen TV. This method is ideal for bulk deployments, limited internet environments, or when installing the software on multiple TVs quickly and consistently.
Samsung SSSP / Tizen Platform Compatibility & Recommended Firmware
Platform Version | Tizen Version | Model Line-Up | Recommended Firmware |
SSSP x (Higher Spec) | Tizen 7.0 | QHC | S-PTMLWWC-1060.9 / 80.7 |
SSSP x (Higher Spec) | Tizen 7.0 | QMC | S-PTMLWWC-1060.9 / 80.7 |
SSSP x (Lower Spec) | Tizen 7.0 | QBC | S-KSU2EWWC-1050.21 / 70.5 |
SSSP 10 | Tizen 6.5 | QHB | S-PTMWWC-1140.7 |
SSSP 10 | Tizen 6.5 | QBB | S-PTMWWC-1140.7 |
SSSP 10 | Tizen 6.5 | QMB | S-PTMWWC-1140.7 |
SSSP 10 | Tizen 6.5 | QBB-N | S-PTMWWC-1140.7 |
SSSP 10 | Tizen 6.5 | QMB-T | S-PTMWWC-1140.7 |
SSSP 7 | Tizen 5.0 | OHA, OHA-S | T-MSMLWWC-1330.1 |
SSSP 7 | Tizen 5.0 | OMB | T-MSMLWWC-1330.1 |
SSSP 7 | Tizen 5.0 | OMA | T-MSMLWWC-1330.1 |
SSSP 6 | Tizen 4.0 | KM24A (Kiosk) | T-KTM2ELKWWC-0703.10 |
SSSP 6 | Tizen 4.0 | QHR | T-KTM2ELAKUC-2460.1 |
SSSP 6 | Tizen 4.0 | QMN | T-KTM2ELAKUC-2220.5 |
SSSP 6 | Tizen 4.0 | QBN | T-KTM2ELAKUC-2220.5 |
SSSP 6 | Tizen 4.0 | QEN | T-KTM2ELAKUC-2220.5 |
SSSP 6 | Tizen 4.0 | OMN | T-KTM2ELAKUC-2220.5 |
SSSP 6 | Tizen 4.0 | OHN | T-KTM2ELAKUC-2220.5 |
SSSP 6 | Tizen 4.0 | OMN-D | T-KTM2ELAKUC-2220.5 |
SSSP 6 | Tizen 4.0 | OHN-D | T-KTM2ELAKUC-2220.5 |
SSSP 6 | Tizen 4.0 | QMR | T-KTM2ELAKUC-2370.2 |
SSSP 6 | Tizen 4.0 | QBR | T-KTM2ELAKUC-2220.5 |
SSSP 6 | Tizen 4.0 | QBR-N | T-KTM2ELAKUC-2220.5 |
SSSP 6 | Tizen 4.0 | SH37R | — |
SSSP 6 | Tizen 4.0 | SBB-SSN | TB-KTM2SPMDWWC-1090.3 |
SSSP 5 | Tizen 3.0 | QMH | QMH |
SSSP 5 | Tizen 3.0 | QHH | T-KTMLAKUC-2040.1 / 2111.0 |
SSSP 5 | Tizen 3.0 | QBH-N | T-KTMLAKUC-2040.1 / 2111.0 |
SSSP 5 | Tizen 3.0 | DBJ | T-KTMLAKUC-2040.1 / 2111.0 |
SSSP 4 | Tizen 2.4 | PMF | T-HKMLAKUC-2160.1 |
SSSP 4 | Tizen 2.4 | PMF-BC | T-HKMLAKUC-2160.1 |
SSSP 4 | Tizen 2.4 | PHF | T-HKMLAKUC-2160.1 |
SSSP 4 | Tizen 2.4 | MLF | T-HKMLAKUC-2160.1 |
SSSP 4 | Tizen 2.4 | PHF-P | T-HKMLAKUC-2160.1 |
SSSP 4 | Tizen 2.4 | PMH | T-HKMLAKUC-2160.1 |
SSSP 4 | Tizen 2.4 | SBB-SSF | TB-HMSCFDWWC-2050.5 |
SSSP 4 | Tizen 2.4 | OMF | T-HKMLODWWC-2120.5 |
SSSP 4 | Tizen 2.4 | OHF | T-HKMLODWWC-2120.5 |
SSSP 4 | Tizen 2.4 | OHF-V | T-HKMLODWWC-2120.5 |
SSSP 4 | Tizen 2.4 | OHF, OMH | T-HKMLXODWWC-1010 |
SSSP 3 | — | DBE | T-GFSLE2AKUC-1039.1 |
SSSP 3 | — | DHE | T-GFSLE2AKUC-1039.1 |
SSSP 3 | — | UDE-P | T-GFSLE2AKUC-1039.1 |
SSSP 3 | — | DB10E-T (POE) | T-GFSLE5AKUC-1018 |
SSSP 3 | — | DME | T-GFSLE2AKUC-1039.1 |
SSSP 3 | — | DME-BR | — |
SSSP 2 | — | DBD | T-GFSLDAKUC-1039.1 |
SSSP 2 | — | DM32D | T-GFSLDAKUC-1039.1 |
SSSP 2 | — | DM32DS | T-GFSLDAKUC-1039.1 |
SSSP 2 | — | DMD | T-GFSLAKUC-1039.1 |
SSSP 2 | — | DSD (40–75) | T-GFSLAKUC-1039.1 |
SSSP 2 | — | DHD (40–55) | T-GFSLAKUC-1039.1 |
SSSP 2 | — | UED | T-GFSLAKUC-1039.1 |
SSSP 2 | — | DM82D | T-GFSLEAKUC-1016 |
SSSP 2 | — | OMD / UDDP (NA & Korea) | T-GFSLAKUC-1048.2 |
Complete Step-by-Step Setup for Samsung Tizen Digital Signage
In the following steps, you can use the Tizen display of the Samsung to set up programs as digital signage. Every step will be accompanied by a screenshot that will allow you to follow the procedure.
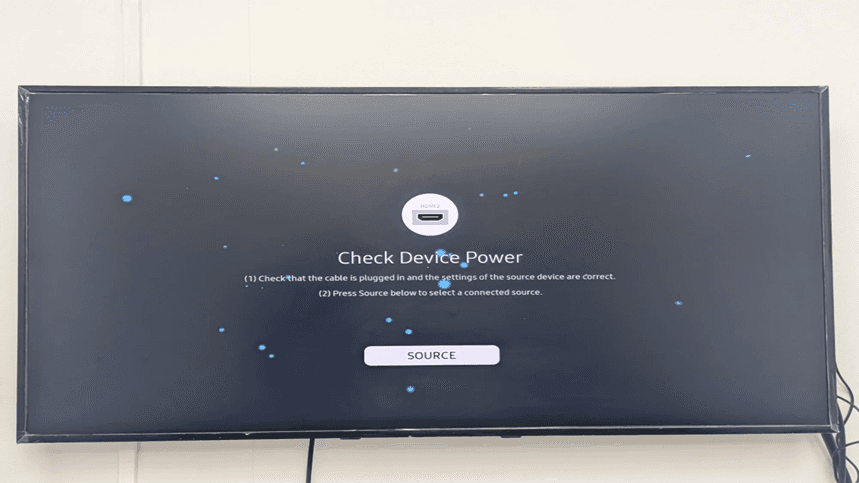
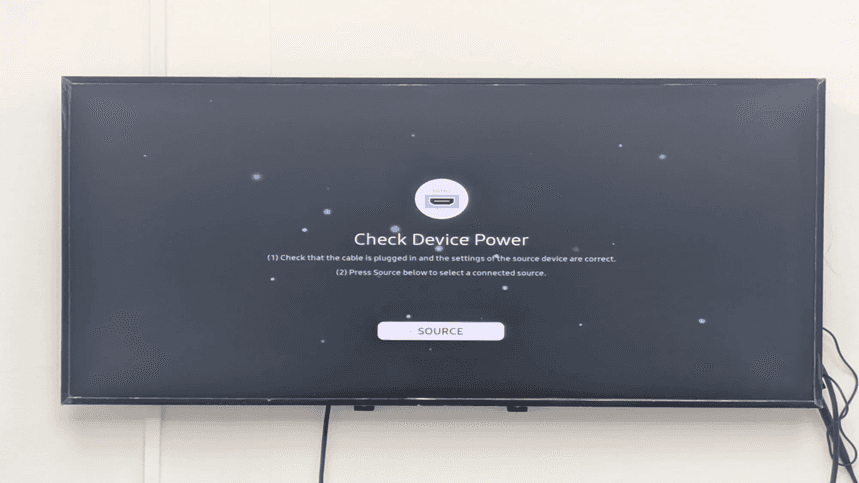
Step 1: Open Samsung Tizen TV - Verify Devices power screen.
After starting your Samsung Tizen display your first screen is the one which shows the Check Device Power. It means that the display is in search of an HDMI input source. The screen displays the input (HDMI 2 in this case) that is being used at the moment and asks you to make sure that cable connections are correct or press the Source button and choose another input.
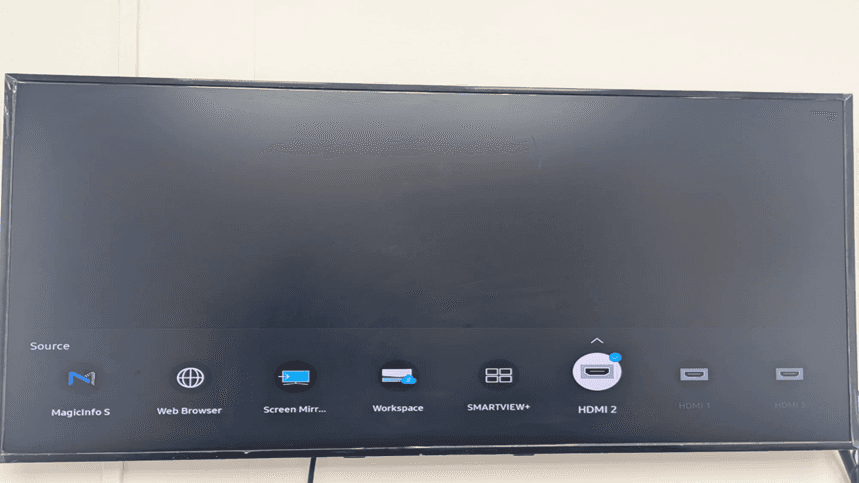
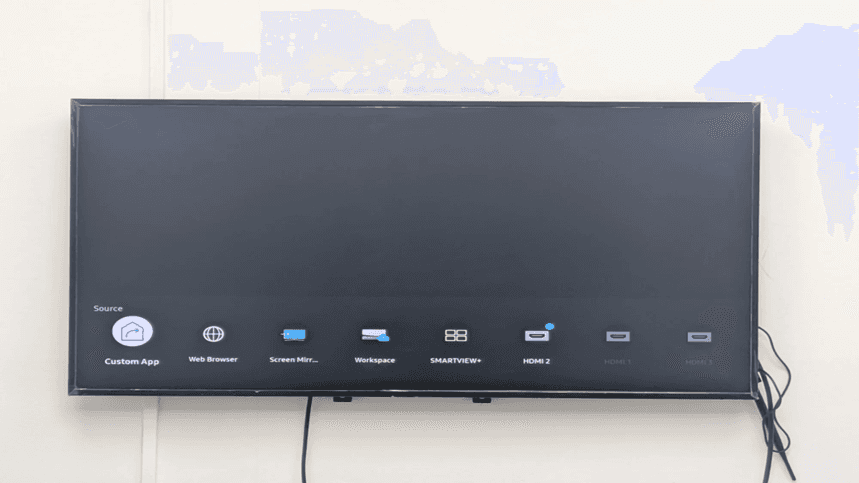
Step 2: Use the Source button to choose HDMI 2.
The Source menu provides you with all the possible input sources to your Samsung Tizen display. Available options will be such as MagicInfo (which is the in-built Samsung signage player), Web Browser, Screen Mirroring, Workspace, SMARTVIEW+, and a number of HDMI inputs.
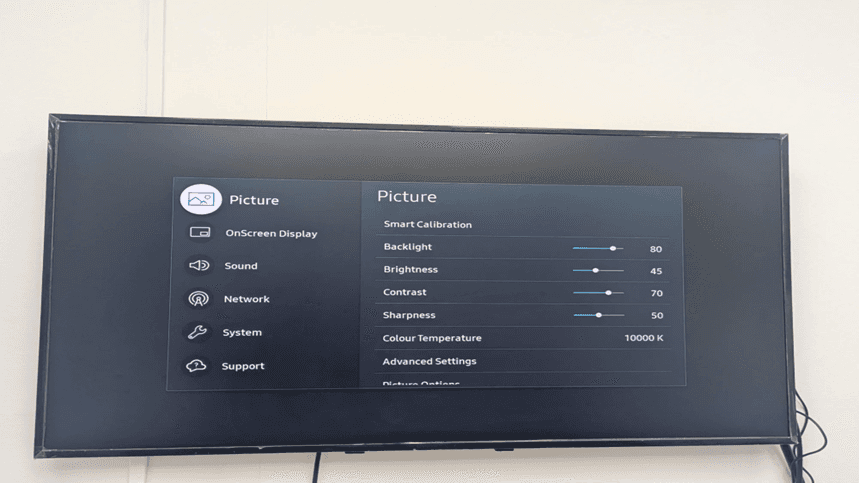
Step 3: Access Settings menu
To access the main Settings menu, use the Menu button of the Samsung display remote Tizen. The Picture settings screen will be the first one that will have Smart Calibration, Backlight, Brightness, Contrast, Sharpness, Colour Temperature and Advanced Settings.
Action needed: Press the arrow keys on your remote control down to the Support menu option. Important system configuration options will be found here.
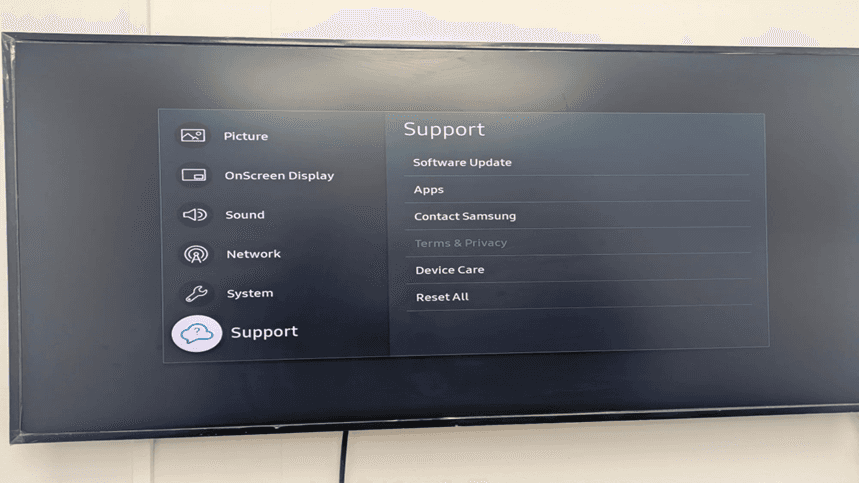
Step 4: Go to the menu of Support.
The Support menu gives access to the necessary Samsung Tizen signage management features such as Software Update, Apps, Contact Samsung, Terms and Privacy, and Device Care, and Reset All.
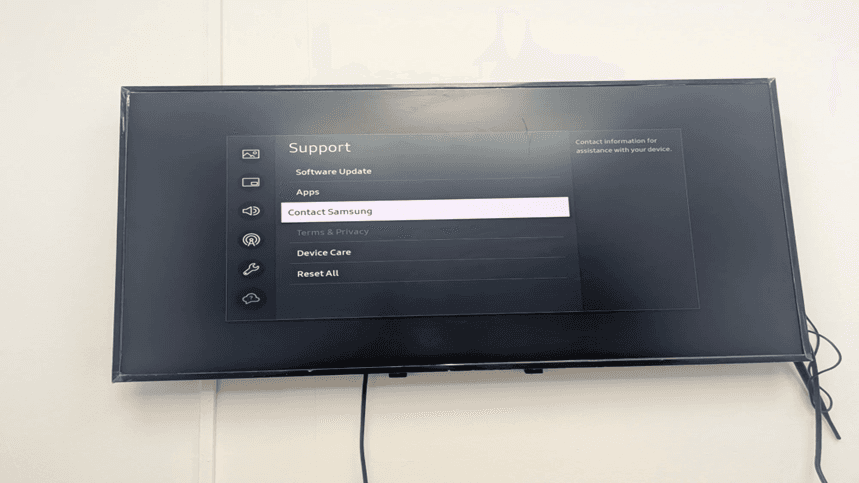
Step 5: Select Contact Samsung
The Contact Samsung screen also gives direct contact details of technical support as well as product vital details required during troubleshooting and Samsung Tizen CMS configuration.
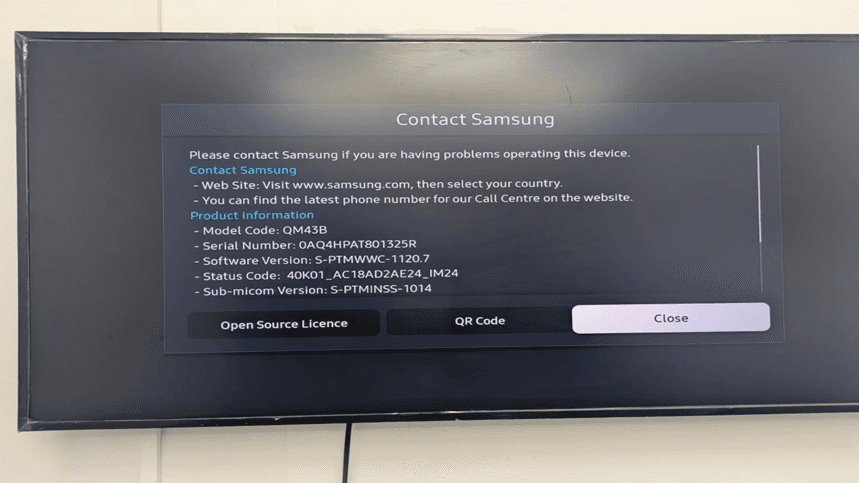
Step 6: Product Information (Model Code)
Product Information display provides detailed information concerning your Samsung Tizen display:
Model Code: QM43B (here in this case)
Serial Number: 0AQ4HPAT801325R
Software Version: S-PTMWWC-1120.7
Status Code Version Sub-micocom Version
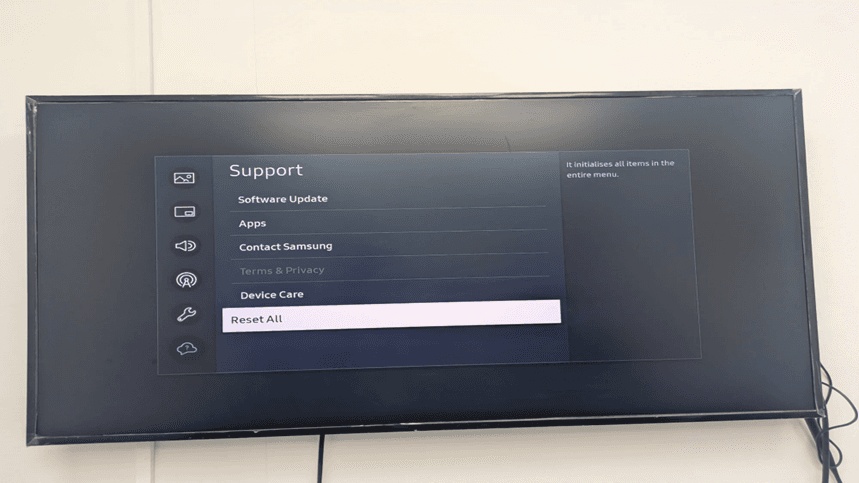
Step 7: Click on Reset All.
The Support menu with Reset All feature underline. This option will restore everything in the whole menu to factory default settings. This can be used when recycling a display or troubleshooting uncooperative problems.
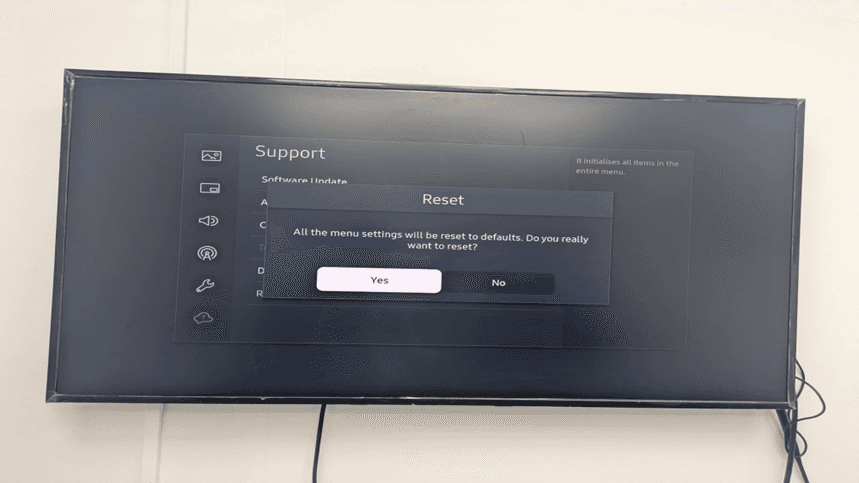
Step 8: Confirm Reset -Click yes.
A confirmation box comes out which says All the menu settings will be changed to default. Do you really want to reset? This is the last option to cancel the reset operation.
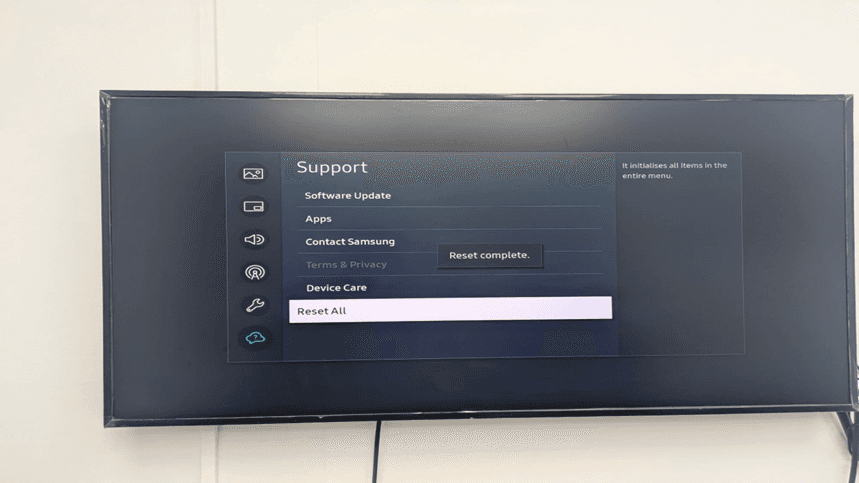
Step 9: Reset Complete message shown.
The confirmation is the reset complete message which indicates that your Samsung Tizen display has been reset to factory settings successfully. The system will now force you to repeat the first setup process.
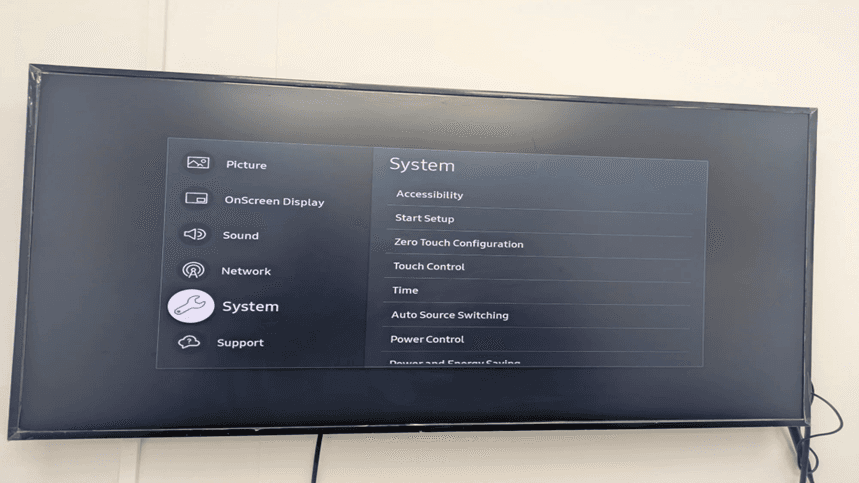
Step 10: Access System menu
System menu offers necessary Samsung Tizen signage platform settings such as Accessibility, Start Setup, Zero Touch Configuration, Touch Control, Time, Auto Source Switching and Power Control settings.
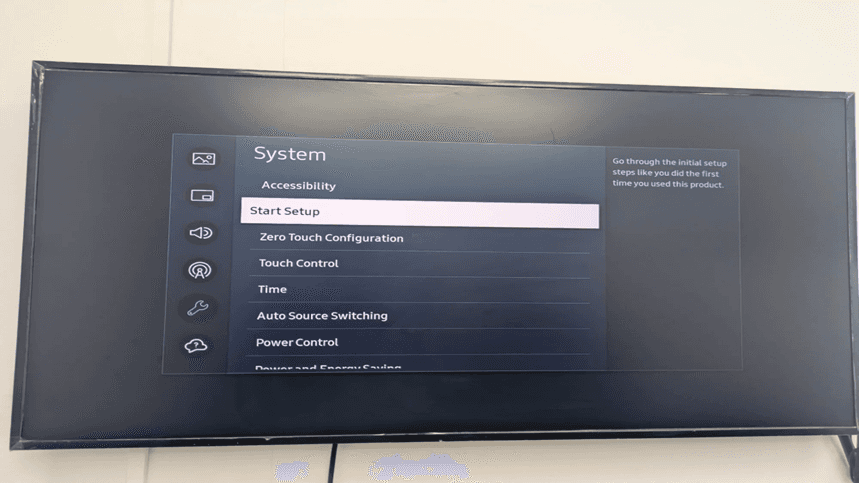
Step 11: Select Start Setup
The Start Setup option is indicated in the System menu. The helper text stated: 'Follow the first set up steps as you did the first time you used this product. This reboots the entire Samsung Tizen signage installation guide wizard.
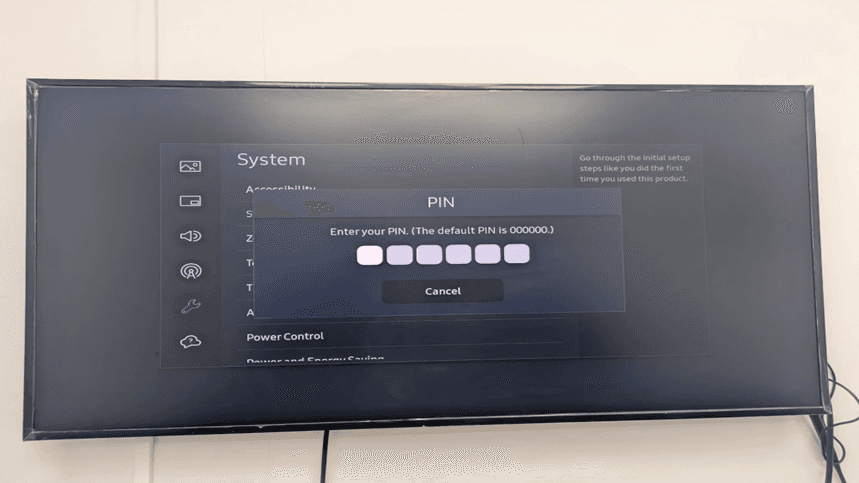
Step 12: Enter PIN (Default: 000000)
The PIN entry screen is displayed, which demands security authorization prior to making Samsung Tizen display content management changes. On the screen, it is shown: 'Input your PIN. (The default PIN is 000000.)' containing six characters in place of the PIN digits.
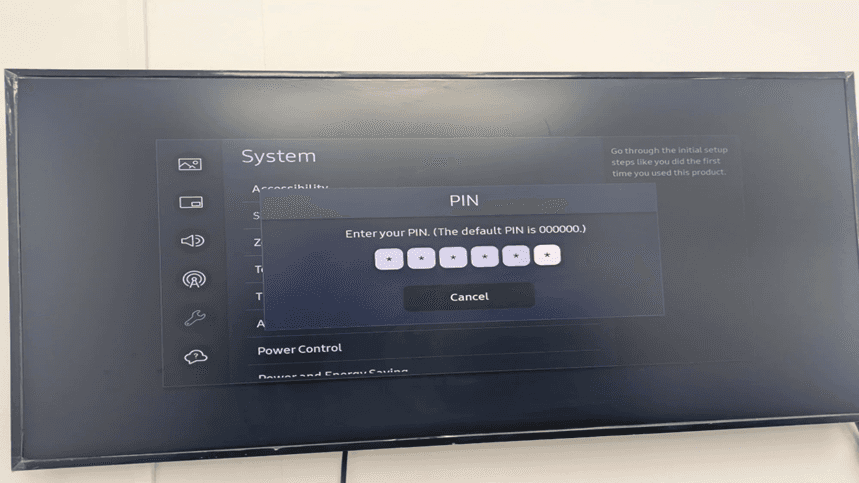
Step 13: Pin Entered Successfully
The PIN entry screen with all the 6 digits entered. The system will also automatically check the PIN when all the digits are typed in and then it will move on to the next step of setting up.
What needs to be done: Samsung Tizen signage set up will proceed automatically in case the PIN is correct. In case of a wrong one, then you will be required to enter the PIN again.
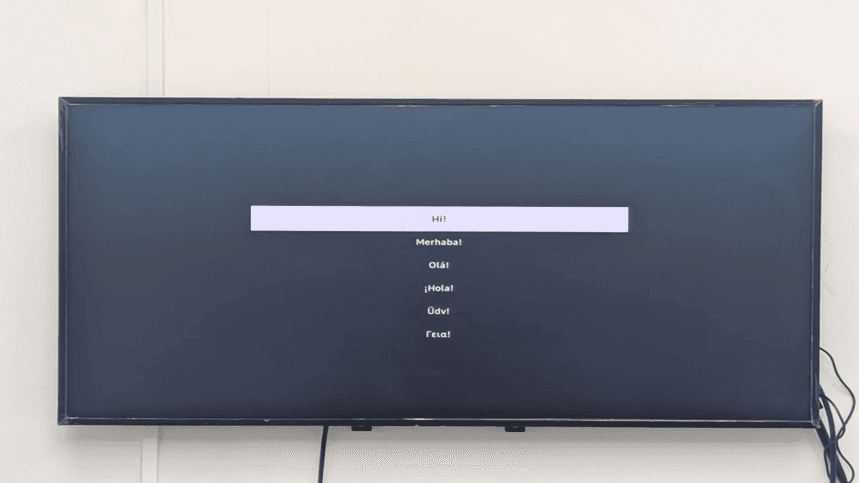
Step 14: Choose language (Hi! screen)
The language choice menu has greetings in several languages such as English (Hi!), Turkish (Merhaba!), German (Ola!), Spanish (!Hola!), Portuguese (Udv!), and Greek (Geial). This is where you start with personalization of your Samsung tizen digital signage.
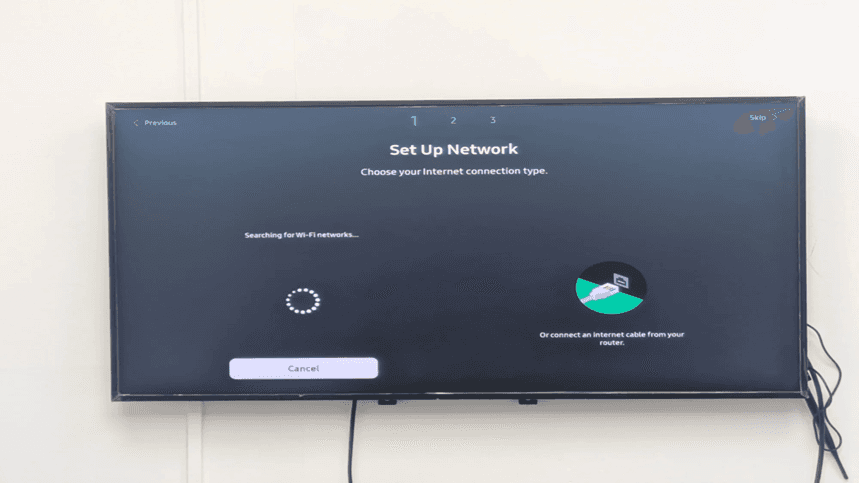
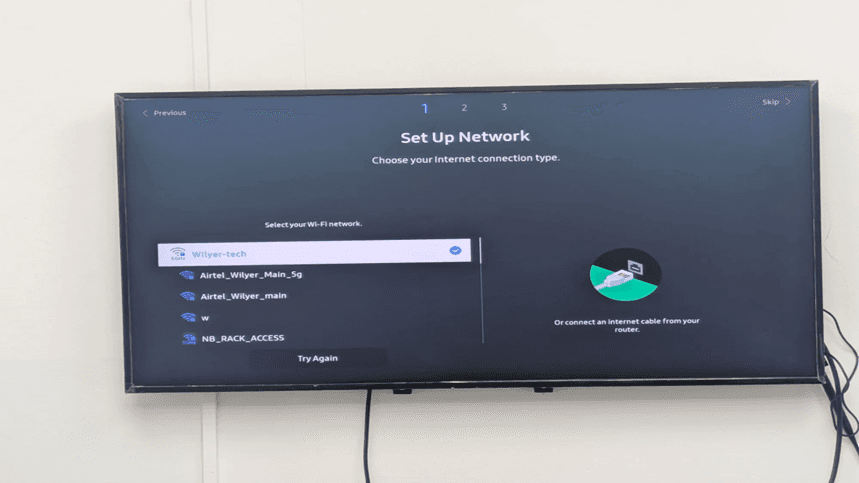
Step 15: Network configuration- Wi-Fi search.
The system is searching available Wi-Fi networks and this is viewed in the Set Up Network screen (Step 1 of 3). The screen shows a loading indicator and search on Wi-Fi networks. You can also have an opportunity to connect an internet cable to your router.
Action needed: Wait until Samsung Tizen display displays available wireless networks. This normally requires 10-30 seconds. You have an option of pressing Cancel to set Wi-Fi later after configuring network settings or Skip to not configure network settings at all.
Step 16: Choose Wi-Fi network
On the Wi-Fi network selection screen, all available wireless networks detected by the Samsung Tizen TV will be displayed. You may connect to any network with a stable internet connection, depending on availability and signal strength. Networks with stronger signals typically appear at the top of the list, helping you select the most reliable option for uninterrupted connectivity.
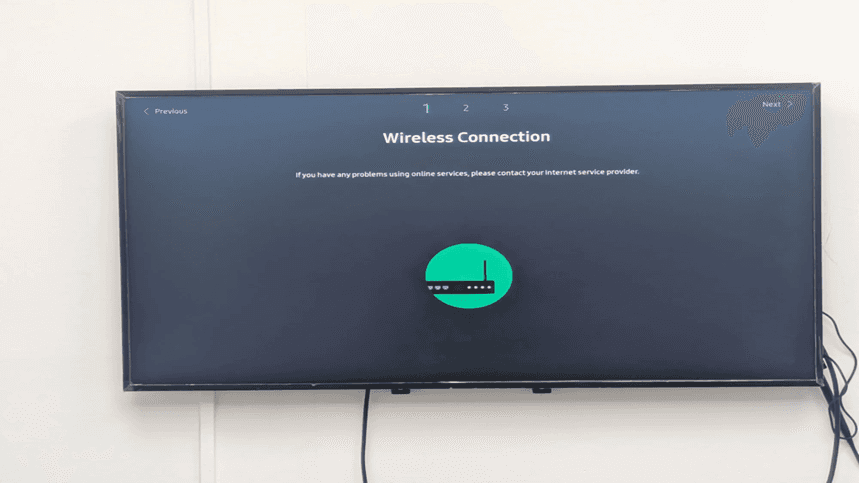
Step 17: Under progresses wireless connection.
The initial screen is the 'Wireless Connection' (Step 1 of 3) which shows the router icon, which means that Samsung Tizen display is trying to connect to the Wi-Fi network of your choice. Its message is as follows: 'In case of difficulties in using online services, refer to your Internet service provider.
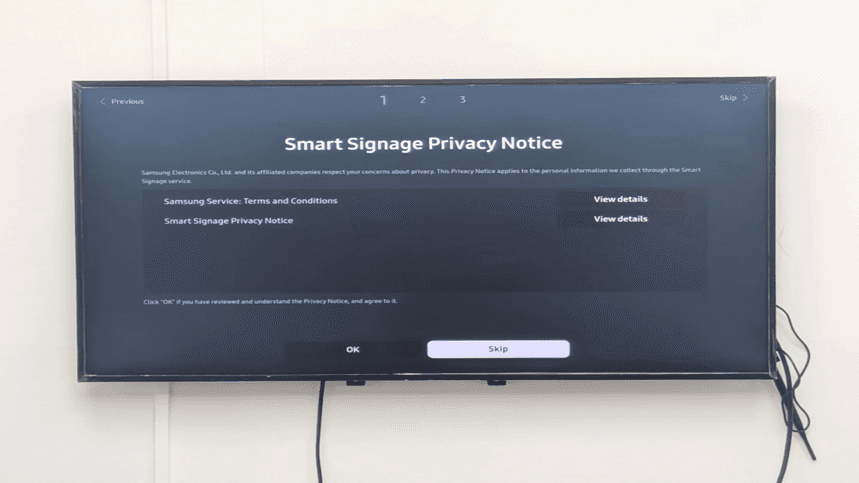
Step 18: Smart Signage Privacy Notice.
The Smart Signage Privacy Notice screen presents (Step 1 of 3) with the information on the privacy policy of Samsung. The notice outlines: Samsung Electronics Co., Ltd. and the affiliated firms care about your privacy issues. This Privacy Notice is applicable to all the personal data we gather with the help of the Smart Signage service.
Two sections are shown:
Samsung Service: Terms and Conditions (View details).
Smart Signage Privacy (View details) Notice.
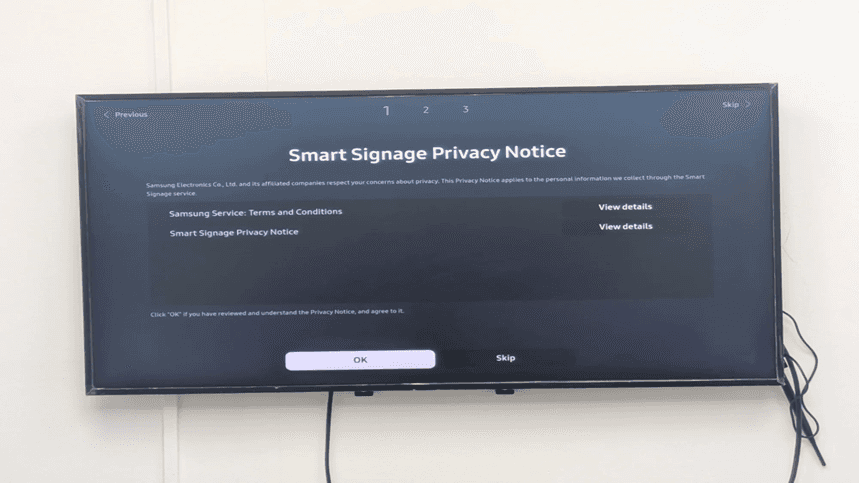
Step 19: Accept Privacy Notice by clicking on OK.
The OK button has been highlighted on the Smart Signage Privacy Notice screen. It reads as follows: Click "OK" when you have read and comprehended the Privacy Notice, and accept it. This is a confirmation that you have accepted the privacy policy of Samsung concerning Samsung smart signage services.
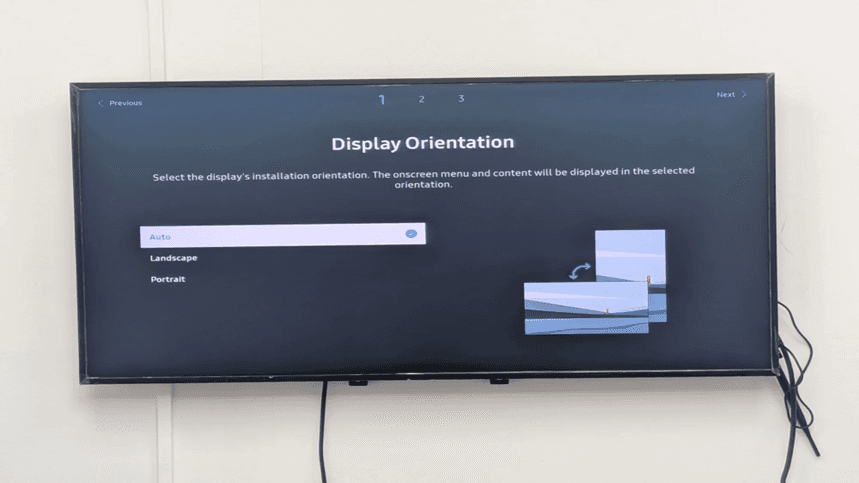
Step 20: Show Orientation - Choose Auto, Landscape or Portrait.
Display Orientation screen (Step 1 of 3) enables you to arrange the way your Samsung Tizen display is going to be installed physically. The message says: Choose the installation orientation of the display. Onscreen contents and menu will be shown in the desired orientation.
There are three orientation options, namely:
Auto (selected): Automatic detection of orientation.
Landscape: Samsung is to be installed horizontally as a digital signage display.
Portrait: To display Samsung Tizen portrait mode signage vertically.
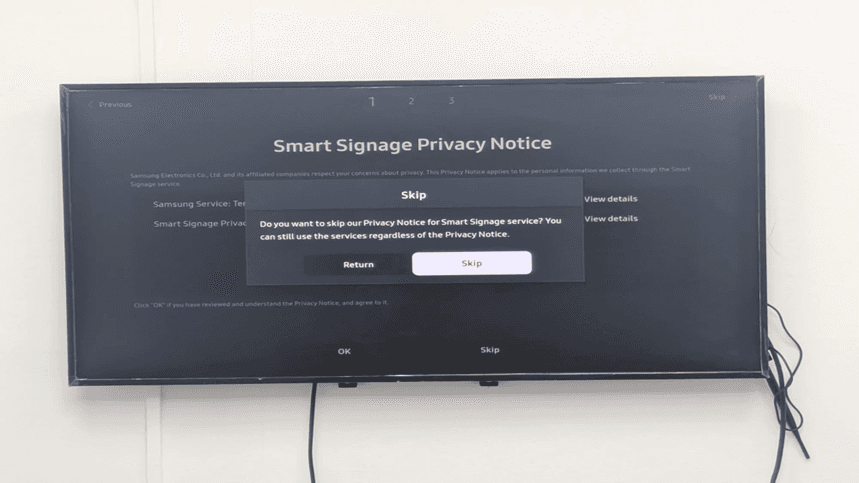
Step 21: Skip Privacy Notice confirmation dialog
A confirmation box would present on the Smart Signage Privacy Notice screen which requests: Do you want to skip our Privacy Notice of the Smart Signage service? The services may still be used irrespective of the Privacy Notice. This gives a way out where the privacy agreement can be avoided.
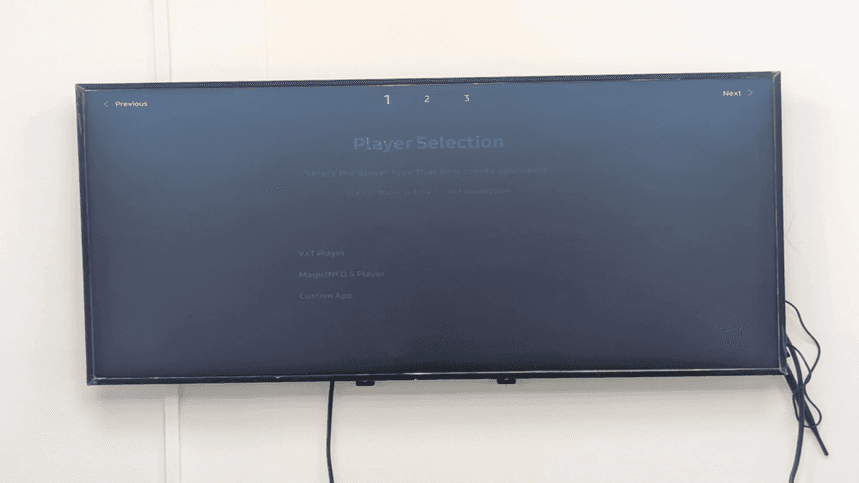
Step 22: Player Selection screen - Initial view
The first dimmed screen of the available player options is displayed (Step 1 of 3) as the Player Selection screen opens. Using this screen, you can make your selection of the Samsung Tizen signage player to be used to deliver content to your display.
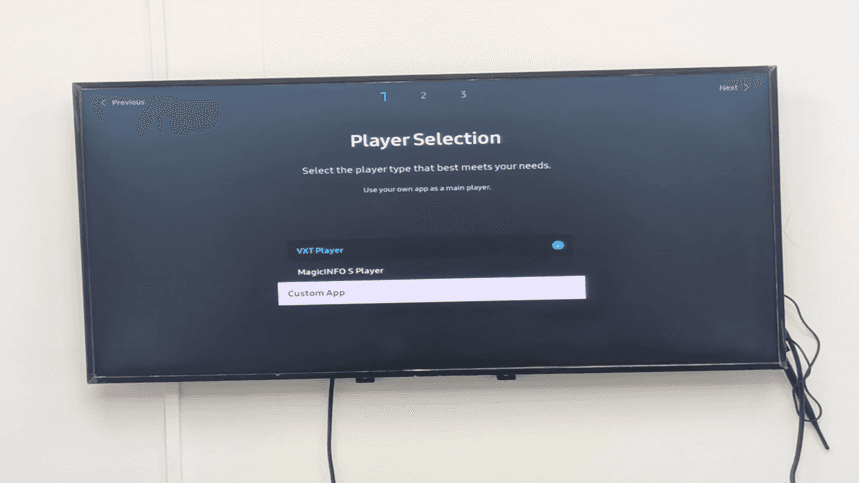
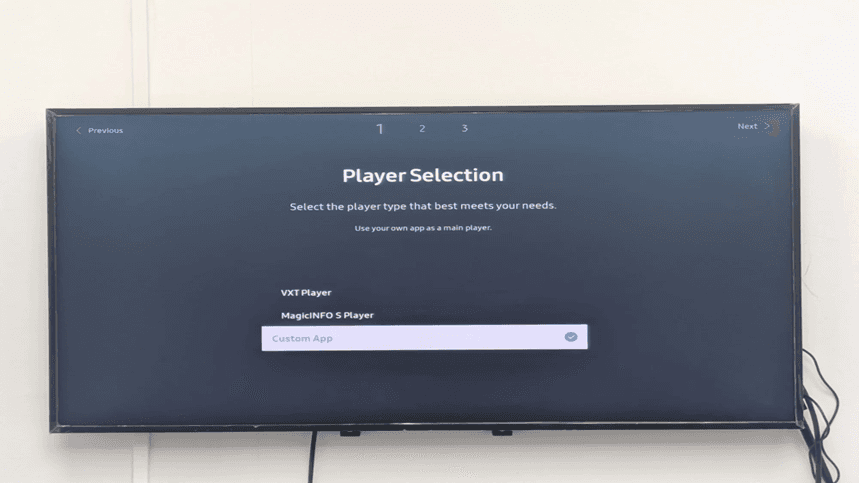
Step 23: Choice of the player - VXT Player, MagicINFO S Player, Custom App options.
The screen with selections of the players has become transparent:
VXT Player: Simplistic Tizen inbuilt Samsung signage player (selected currently)
MagicINFO S Player: Samsung is its own Samsung Tizen CMS solution.
Custom App: You can use third-party cloud digital signage applications.
Step 24: Player Selection with Custom App highlighted
The option of Custom App highlighted in the Player Selection screen. The screen also teaches; Use your own app as a primary player. This alternative is best suited in the implementation of third party Samsung Tizen signage management software or bespoke cloud digital signage.
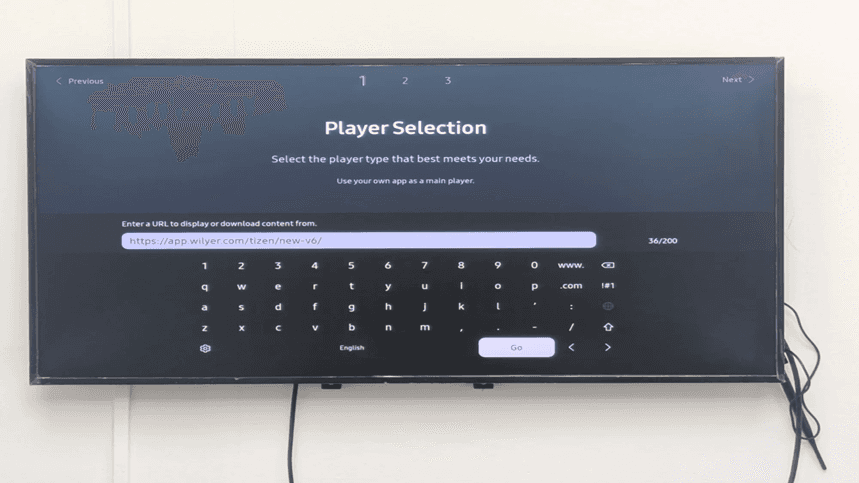
Step 25: Custom App URL entry - Enter content delivery URL
The screen of the Custom App URL entry shows an on-screen keyboard. The urgent message is: 'Enter a URL to view or download content of. The URL here being keyed in is; https://app.wilyer.com/tizen/new-v6/.
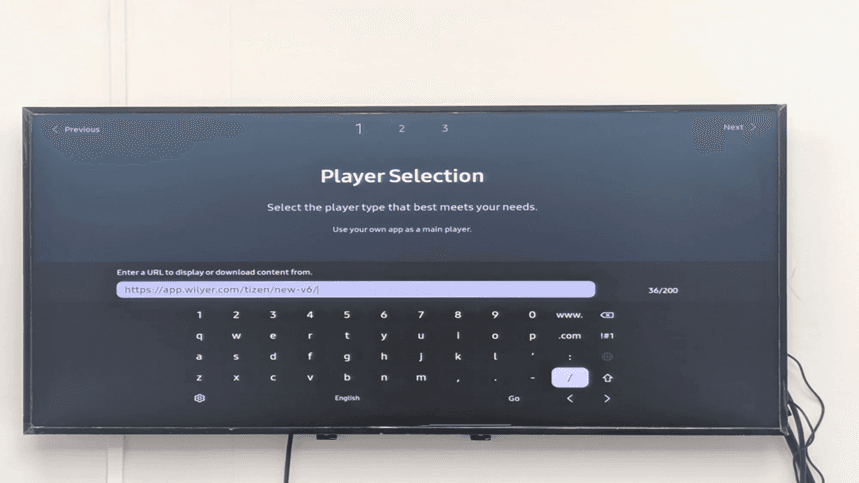
Step 26: Custom App URL entered (https://app.wilyer.com/tizen/new-v6/)
The URL entry field with the address to the entire custom app: 'https://app.wilyer.com/tizen/new-v6/'. The forward slash (/) key is emphasized on the keyboard, and the URL is finished with this Samsung Tizen digital signage deployment.
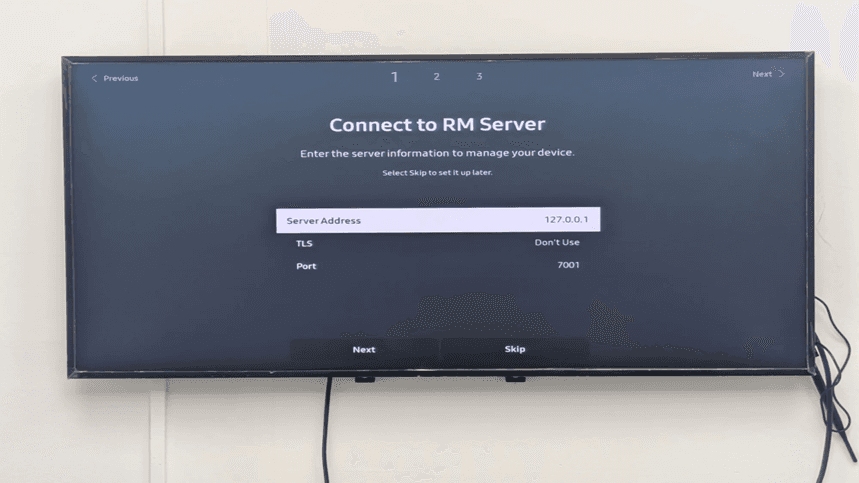
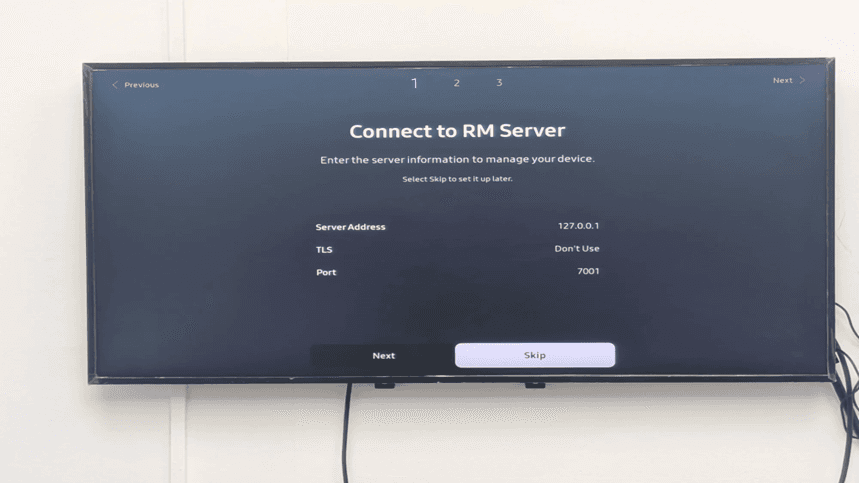
Step 27: Connect to RM Server configuration screen
The screen of setting up the RM Server connection opens (Step 1 of 3). This screen gives the possibility of connecting to a Remote Management server in order to have a centralized management of Samsung Tizen signage. The settings depicted consist of:
Server Address: 127.0.0.1 (localhost)
TLS: Don't Use
Port: 7001
Step 28: App custom selected and verified.
The screen that validates the choice of Player Selection has been checked, and the option of a checkmark has been placed on Custom App. The main content spur to be offered through this display has now been established as the custom Samsung Tizen signage player.
Step 29: RM Server connection - Skip option selected.
The RM Server connection interface with the Skip button indicated. The message does not forget: You can either type in the server information to control your device. Select Skip to set it up later.' This would enable you to skip RM Server set up, when deploying standalone Samsung Tizen signage.
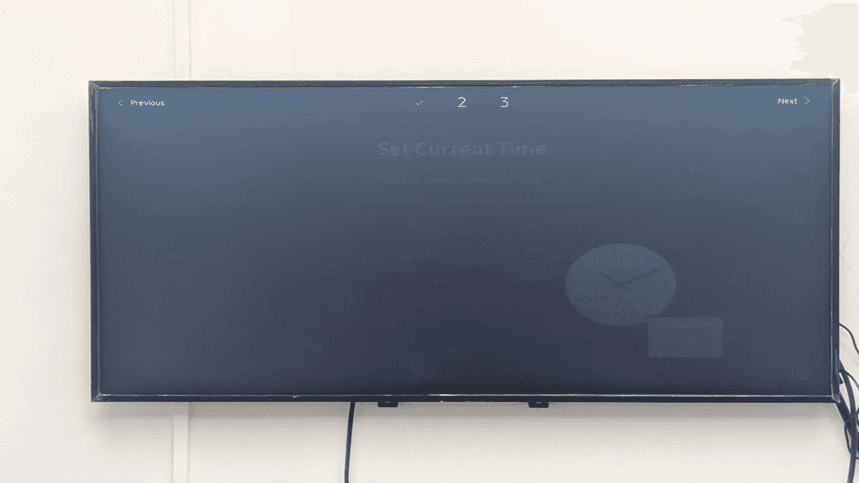
Step 30: Set Current Time - Step 2 of 3 loading
The loading of the screen of setting the current time (step 2 out of 3). An icon clock and calendar shows that the system requires a date and time setup that is vital in timely content delivery in Samsung Tizen digital signage applications.
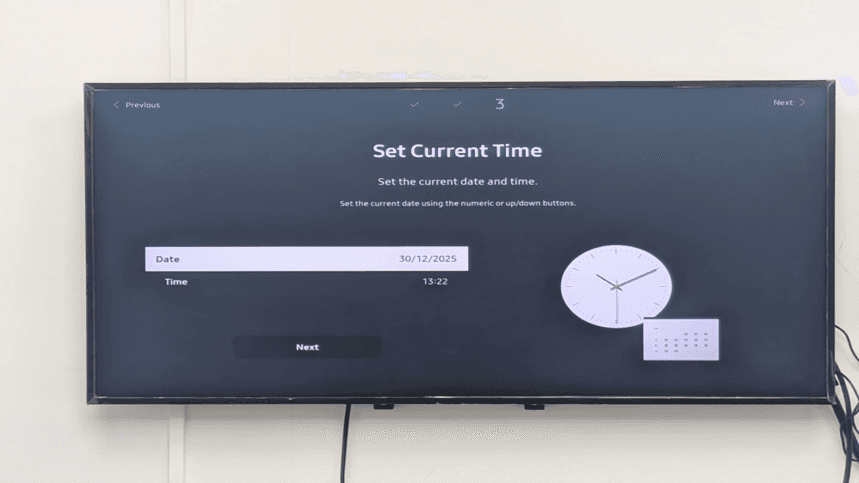
Step 31: Set Current Time - Date field highlighted (30/12/2025)
A screen with the Date field selected with the Set Current Time screen with the date field displayed as 30/12/2025. The instruction is as follows: Select the current date with the use of numeric/up/down buttons. On the right side there is a visual clock and calendar.
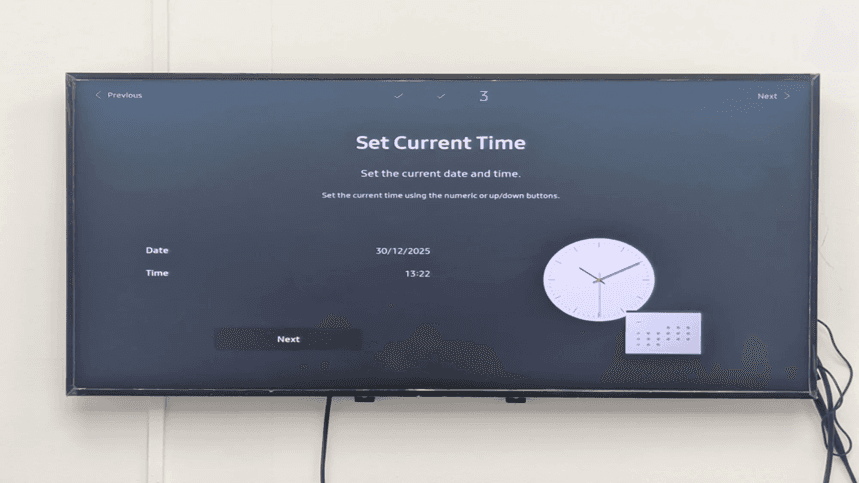
Step 32: Set Current Time - Complete view with date and time
Under the 'Set Current Time' screen set with the date (30/12/2025) and time (13:22) set. The text of instruction has been modified to point at the time adjustment: Set the current time by means of the numeric or up/down buttons.
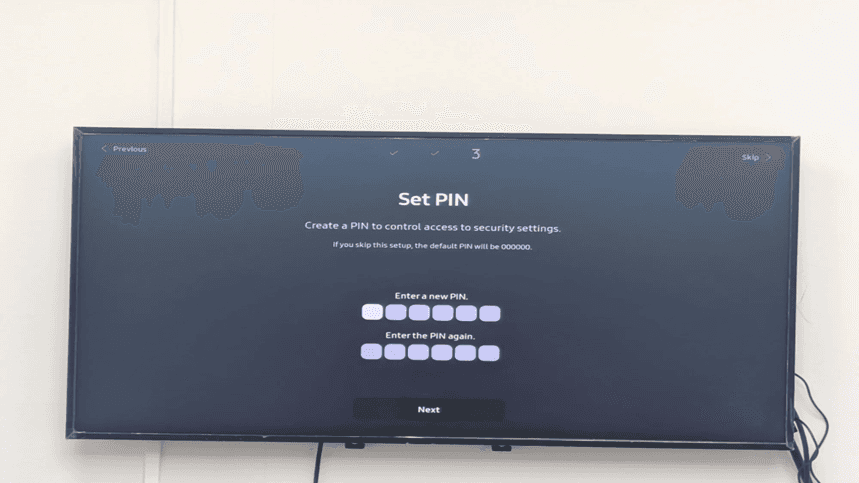
Step 33: Set PIN - Create security PIN for settings access
The security configuration screen ( Step 3 of 3 ) will tell us to create a PIN that will control the ability to modify security settings. The message is as follows: Morning, in case you miss this setup, you will have the default PIN of 000000. Two entry fields are shown:
Enter a new PIN (6 digits)
Input PIN again (confirmation)
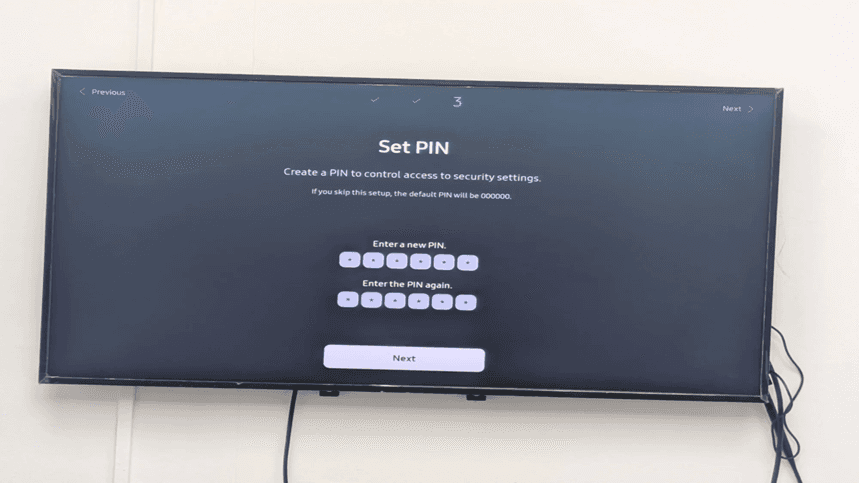
Step 34: Set PIN - Confirmation screen with Next button
The next button can now be seen clearly on the Set PIN screen. Both PIN entry fields appear empty and willing to take input. The last security measure involved in Samsung Tizen signage installation is the creation of a custom PIN.
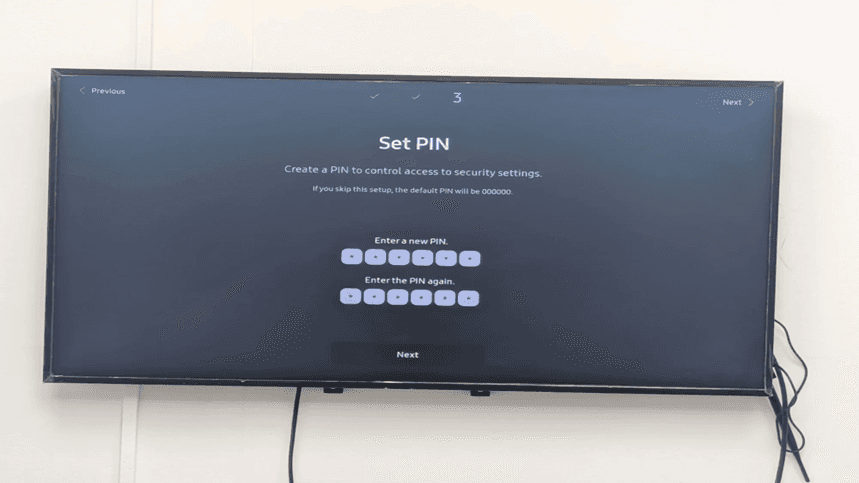
Step 35: Enter PIN - PIN fields have been filled.
The Set PIN screen with both entry fields of PIN with symbol (******). PIN is entered and validated and is awaiting final validation. This would save your Samsung Tizen digital signage configuration settings.
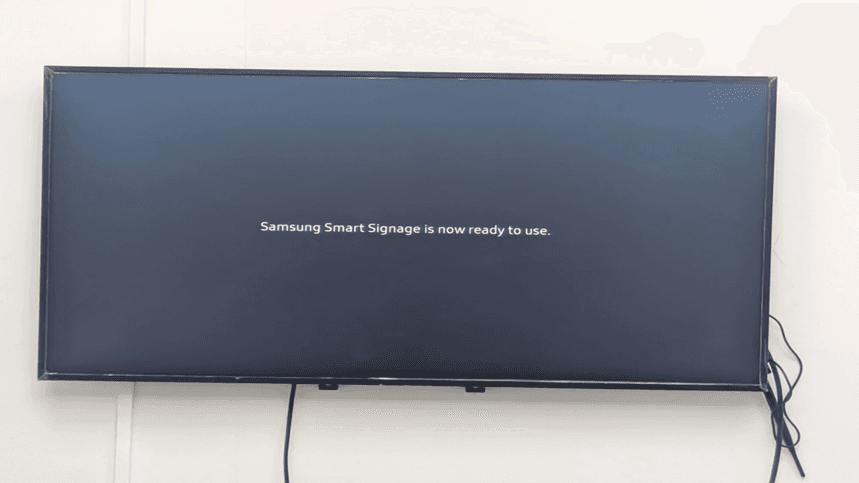
Step 36: Samsung Smart Signage is now ready to use
The completion screen displays the message: 'Samsung Smart Signage is now ready to use.' This confirms that your Samsung Tizen digital signage setup is complete and the display is prepared to begin showing content from your configured custom app or selected player.
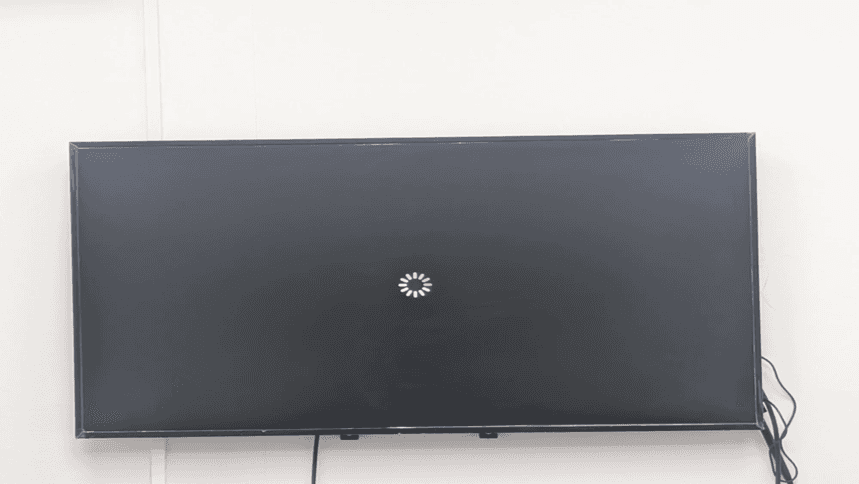
Step 37: System loading with spinning indicator
A loading screen with a circular spinning indicator appears as the Samsung Tizen display initializes the configured settings and prepares to launch the custom signage application. This process typically takes 30-60 seconds.
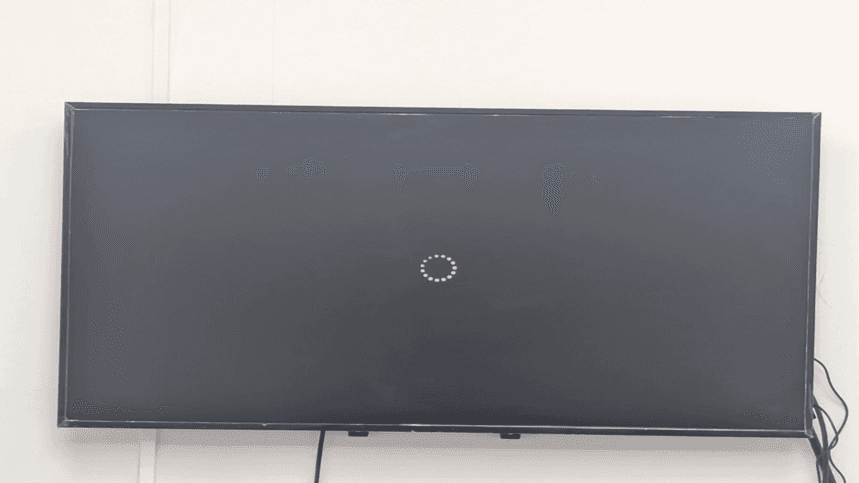
Step 38: verifying the device power screen Once setup is completed.
The screen of the Check Device Power is re-discovered momentarily as the system undergoes the process of startup. There is a HDMI 2 icon and SOURCE button displayed with animated dots to show activity in the system. This is the norm in the Samsung Tizen signage boot-up.
Step 39: Source menu showing Custom App as first option
The first option in the Source menu will reflect as the Custom App which has a notification badge, signifying that it is configured successfully and is set as the primary input. Additional sources available are Web Browser, Screen Mirroring, Workspace, SMARTVIEW+ and HDMI inputs.
Step 40: WilyerPlayer Loading - Custom digital signage app initializing
The last screen displays 'WilyerPlayer loading' - the Samsung custom Tizen signage application is loading. It is an indication that the cloud digital signage platform was successfully deployed to your Samsung Tizen display.

Step 41: Application Full Access to Server.
Once you choose Custom App player, your Samsung Tizen signage player connects to the remote Samsung Tizen CMS server. The loading indicator indicates that the Samsung Tizen display content management application is connecting with your cloud digital signage to Samsung Tizen platform.
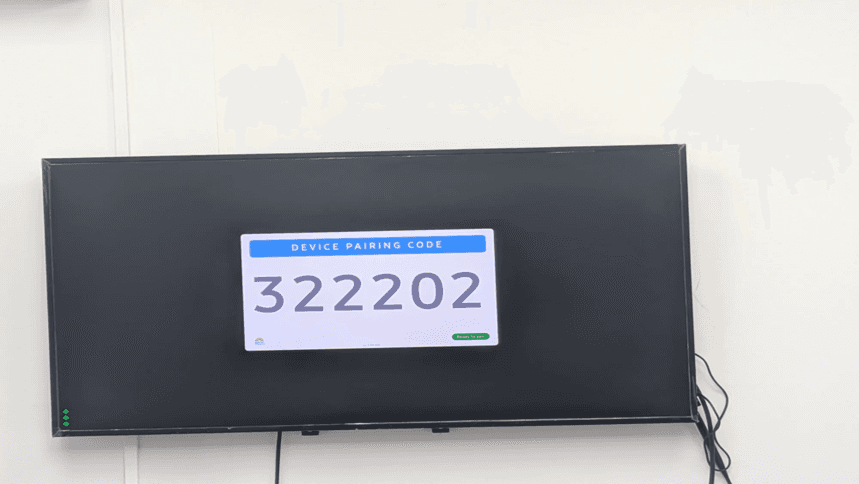
Step 42: Device Pairing Code Display
The Samsung intelligent signage board displays a one-of-a-kind 6-digit device pairing code (such as 322202). This is a pairing code that is required when registering your Samsung Tizen commercial display signage with your Samsung Tizen CMS dashboard. Ready to pair has been used to verify that the display is in wait of registration to CMS.
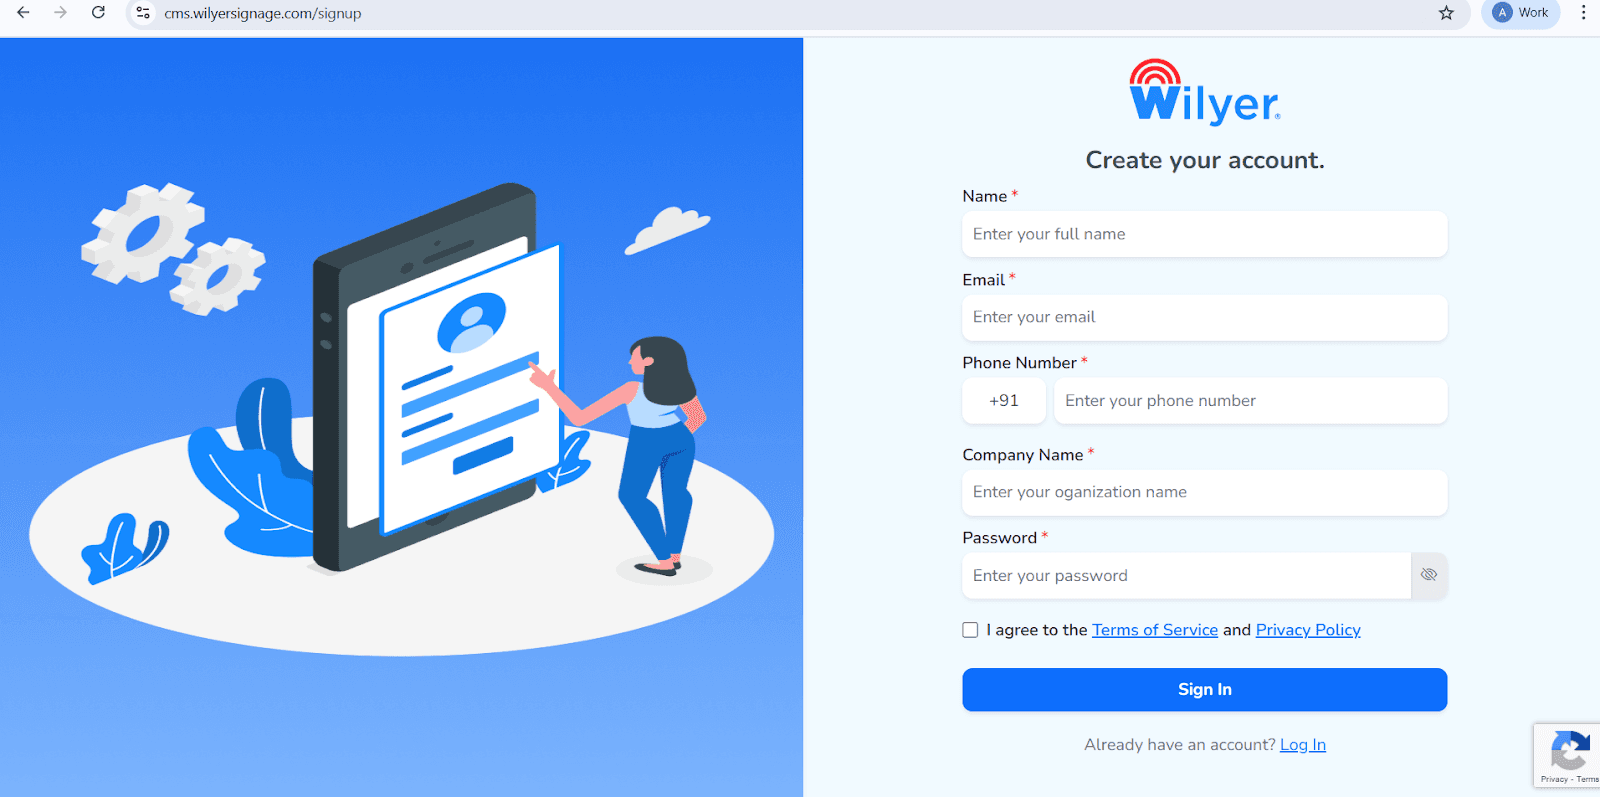
Open the Wilyer Registration Page
Visit the official Wilyer Cloud CMS sign-up page to begin creating your digital signage account.
Enter Your Full Name
Provide your full name, which will be registered as the primary administrator of the signage dashboard.
Add Your Email Address
Enter a valid email address that will be used for login, account verification, and important notifications.
Provide Your Phone Number
Enter your mobile number, including the correct international country code.
Enter Your Company Name
Specify your business or organization name to establish a professional identity within the Wilyer platform.
Create a Secure Password
Choose a strong password to protect your Wilyer account.
Accept the Terms and Privacy Policy
Review and accept the Wilyer Terms of Service and Privacy Policy by selecting the confirmation checkbox.
Complete the Registration
Click the Sign In button to complete the registration process and access the Wilyer dashboard.
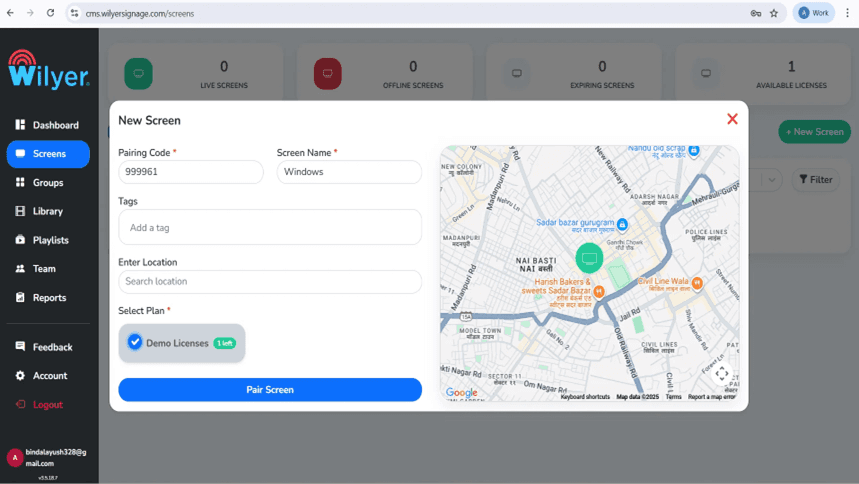
Step 43: Adding New Screen in CMS
To register your Samsung Tizen signage player, in your Samsung Tizen CMS web dashboard (i.e. cms.wilyersignage.com/screens), click the + New Screen button to start registering. You can see at the dashboard that you are in 0 Live Screens, 0 Offline Screens, 0 Expiring Screens, and 1 Available License, meaning that you have the capacity to add this display.
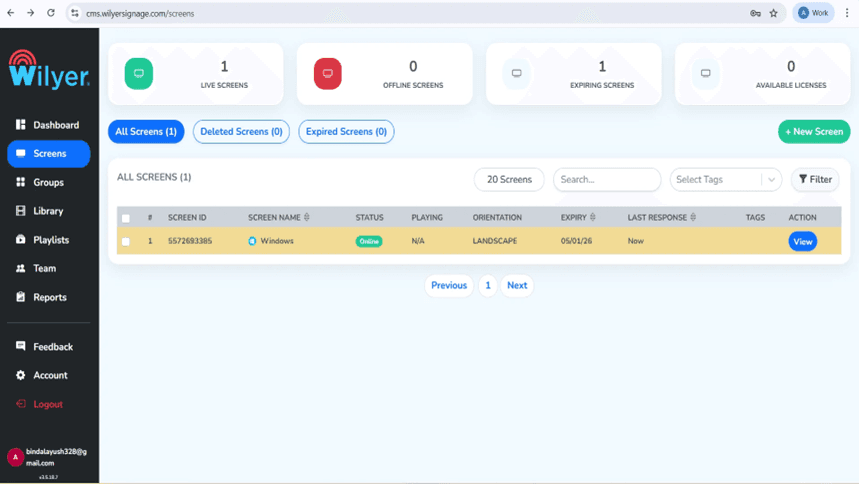
Step 44: Screen Successfully Paired.
Once the pairing code is entered and the "Pair Screen" button is pressed, the Samsung Tizen display content management dashboard changes to display 1 Live Screen and its status as Online. The screen has been added to the screens list with a landscape orientation, which confirms the successful integration of Samsung Tizen CMS.
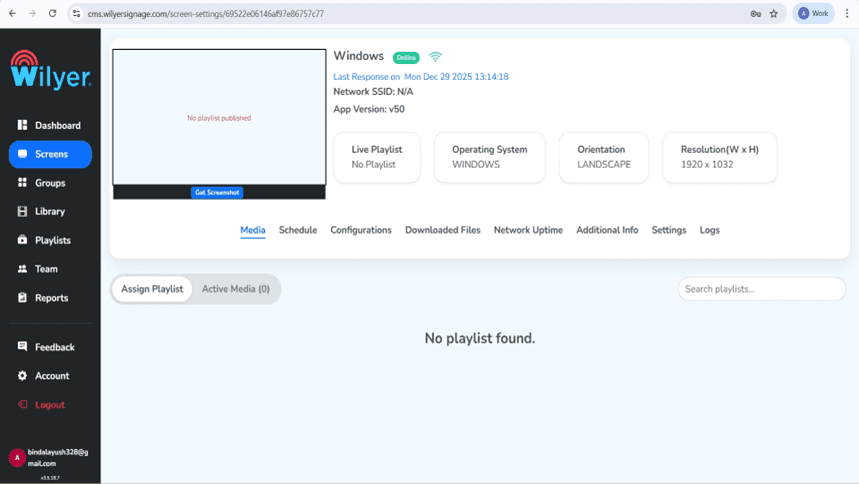
Step 45: Screen Detail View - Media Tab
In the registered screen, click View and this will open the detailed management interface. The Media tab will provide your Samsung smart signage display and indicate that, Network SSID, App Version (v50), Live Playlist status (No Playlist) and Resolution (1920 x 1032).
Step 46: Screen Configurations Tab
The Configurations tab offers detailed options of your Samsung Tizen signage platform. General is also customization of the Screen name, Fit Content on, Analytics on, Native Video Player on, Rotation Screen (Normal/Landscape), and Adaptive Playback settings to ensure the best Samsung Tizen display content management.

Step 47: Location Settings with Map Integration
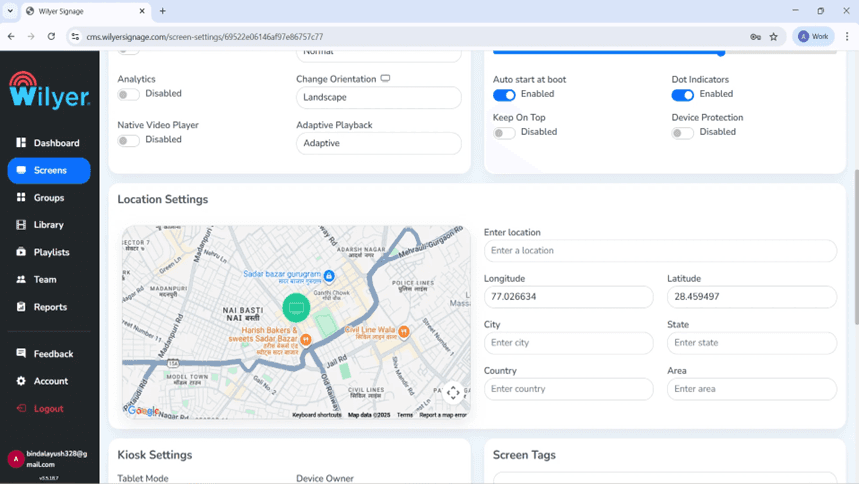
You can also scroll down to Location Settings, with an interactive map (Google Maps integration) of your location of the Samsung smart signage with a pin marker. You may set: Enter location (address search), Longitude (77.026634), Latitude (28.459497), City, State, Country, and Area (fields); to view exact Samsung Tizen signage solution geolocation.
Step 48: Kiosk and Schedule Settings.
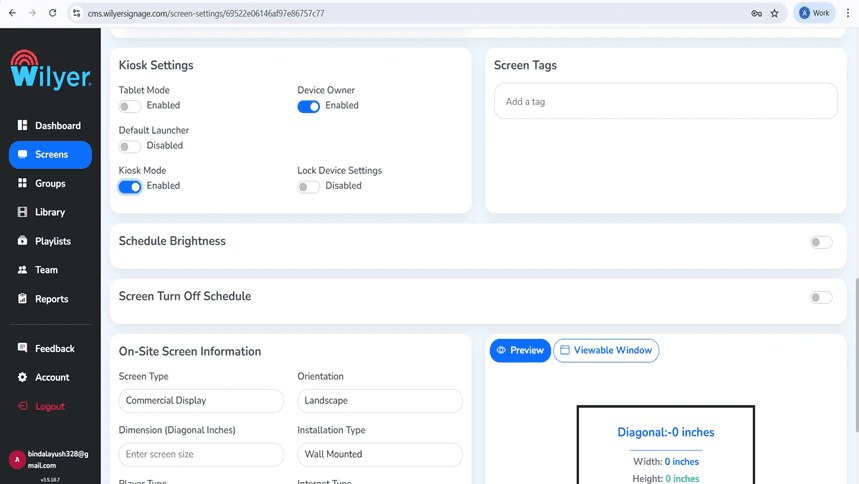
Kiosk Mode disables the system navigation bar and limits access to device controls. When enabled, the Wilyer Digital Signage Player operates in full-screen mode, hiding navigation options such as Home, Back, and Recent Apps. This ensures users cannot exit the signage application or access other system functions, maintaining a secure and uninterrupted display.
Step 49: Finish Screen Set-up.
Look at the preview of a window that you are viewing that indicates your size. Click on the save configurations to complete your digital signage player settings in windows PC.
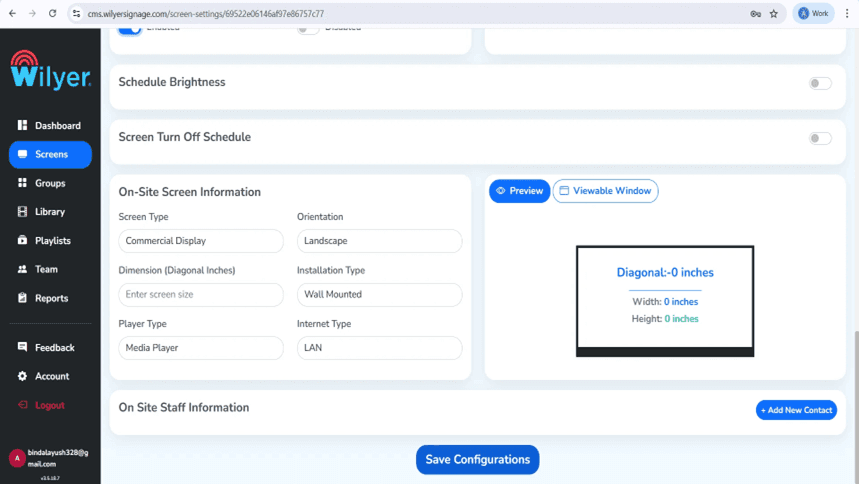
The preview window provides you with a precise view of what you can see on your digital signage display, which helps to check the proper configuration.
Step 50: Save Configurations Confirmation.
Once you have selected all the settings of your Samsung Tizen signage solution, you should press the blue button of the page named Save Configurations. The Samsung Tizen CMS displays a green success notification, Settings updated successfully, to provide the message that everything is saved in your Samsung smart signage display.

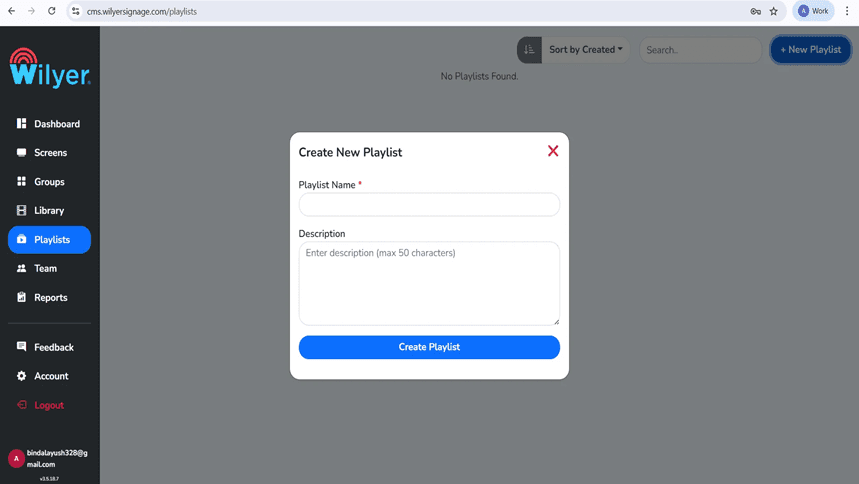
Step 51: Creating New Playlist
Go to the left sidebar menu to the Playlists. Having No Playlists Found on the screen, press the + New Playlist button at the upper-right hand side to create the first content playlist of Samsung Tizen display content management.
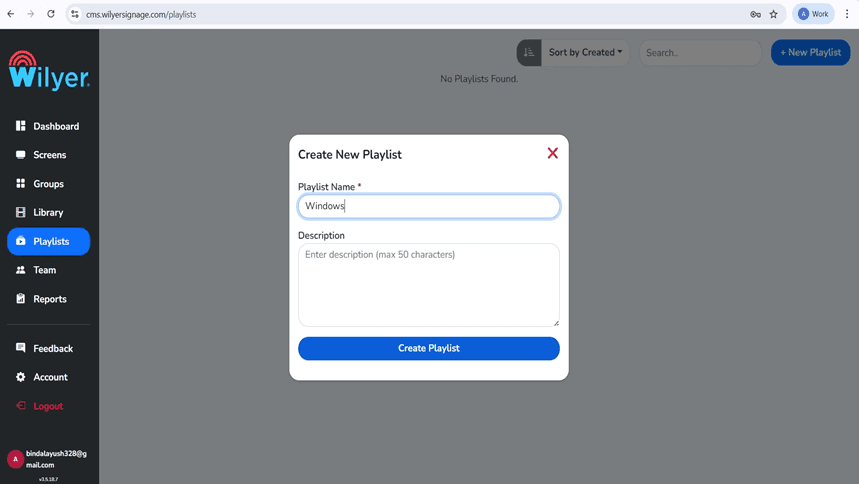
Step 52: Naming Your Playlist
Enter playlist name description (a name such as Windows). The media content, widgets, and sequences you desire to have on your Samsung Tizen commercial display signage will be included in this playlist. The naming conventions are clear and therefore manage various playlists in your Samsung Tizen deployment of signage solution.
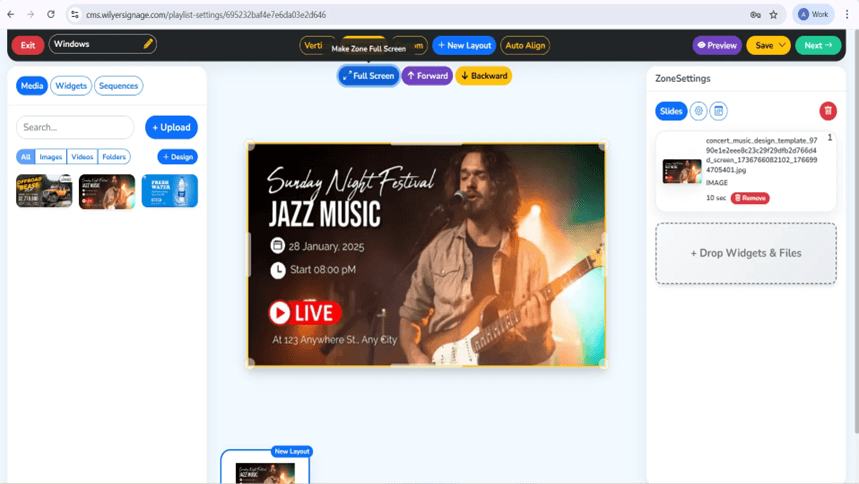
Step 53: Interface of Playlist Editor.
Once the playlist has been created, it is sent to the potent playlist editor of the Samsung Tizen signage management software. The interface consists of three tabs (Media, Widgets, Sequences), a media library panel on the left ( + Upload button and filtering: All, Images, Videos, Folders, & Design) and a big canvas where the content is organized in a grid.

Step 54: Adding Media to Playlist
The media library shows the content templates and design available on your Samsung Tizen digital signage. Three media items are presented in this example: " OFFROAD BEAST" (advertisement to an off-road vehicle), " Sunday Night Festival JAZZ MUSIC " (advertisement poster with the date 28 January 2025, starting at 08: 00 PM, LIVE indicator) and adverts to a product called FRESH WATER.
Step 55: Publishing Playlist to Screen
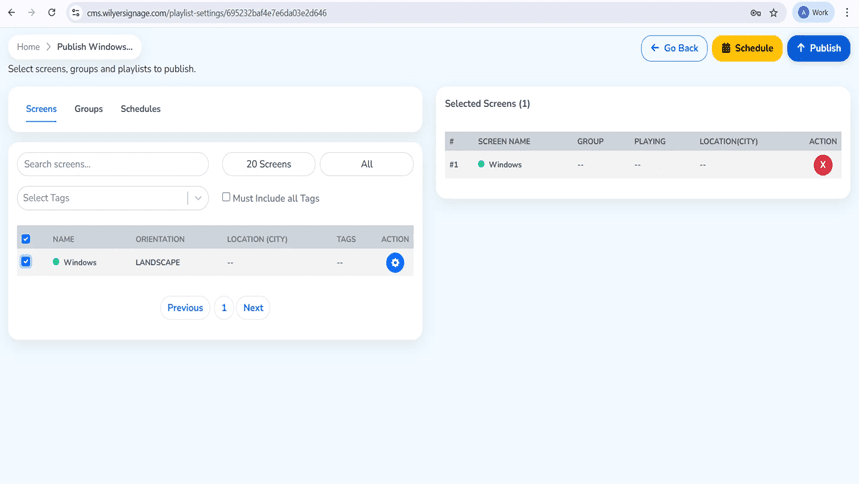
Click the Next- button to go to the publish screen. The "Publish Windows Publishing" is available through an interface where you can select screens and groups as well as playlists. It has three tabs, which are Screens, Groups and Schedules. The list on the screen displays 20 screens, and has filter All on and a search option.
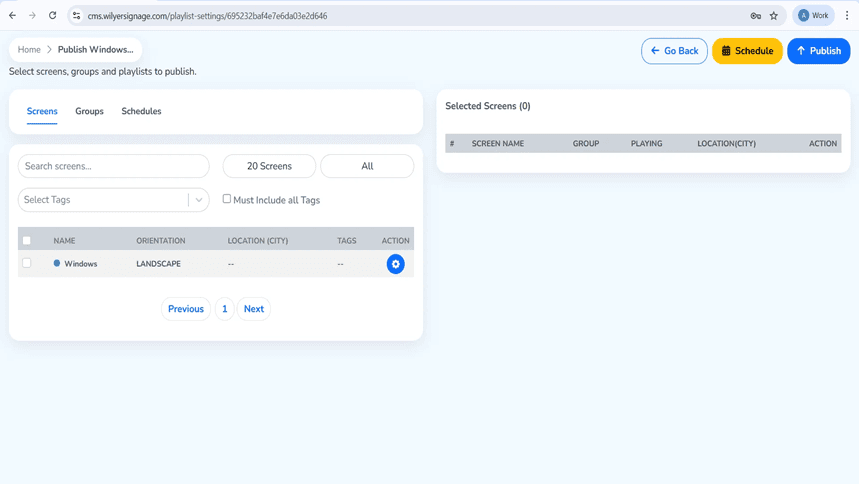
Step 56: Selecting Target Screens
Once the box is checked next to the window screen, it gets transferred to the Selected Screens (1) panel to the right hand side. The panel shows: Screen Name windows, Group, Playing, Location(City), and a red X button appears to delete should there be the necessity. The upper toolbar contains three action buttons, including; Go back, Schedule (yellow) and publish (blue).
Step 57: Publish Confirmation Dialog
Before finalizing, there is a confirmation dialogue of the Publish Playlist that asks whether you are certain about what you are doing and two choices: either Go back (blue button) or Continue (green button). This security test is a way of making sure that you are prepared to roll out content to your Samsung smart signage displays.

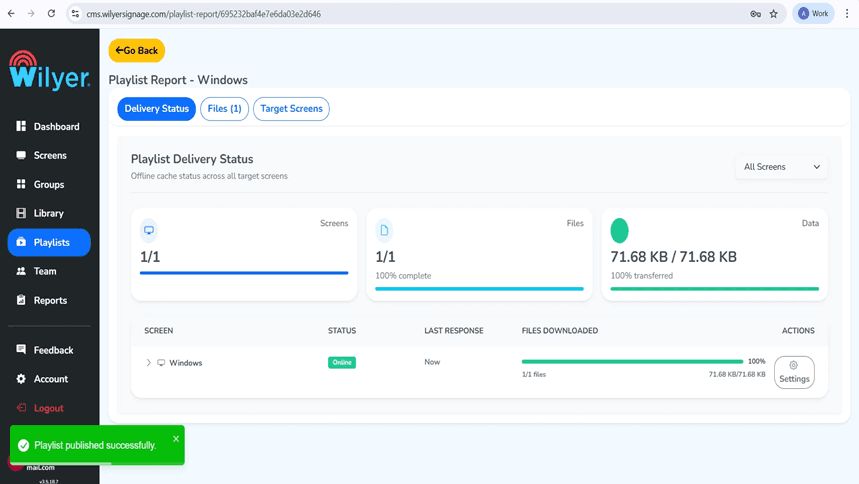
Step 58: Playlist Delivery Status Report
Once it has been published, the Playlist Report will display delivery status. The dashboard shows file transfer progress (71.68 KB / 71.68 KB) which proves that what you are sending is being transferred to the Windows PC.
Step 59: Content Live on Display
The published contents are currently visible on your Samsung Tizen commercial display signage. The promotional poster of the Sunday Night Festival: JAZZ MUSIC is seen in the screen with a musician holding a guitar, event details (28 January, 2025, Start 08:00 PM), a bright red badge with LIVE on it, and location details (At 123 Anywhere St.,). Any City).
Congratulations, Your Samsung Tizen digital signage setup is now complete. The display will begin showing content from your configured Samsung Tizen CMS once the player finishes loading. Your Samsung Tizen signage installation is ready for deployment.

The best practices in Samsung Tizen Signage configuration.
Network Configuration
To be used effectively in Samsung Tizen digital signage, it is necessary to properly configure the network:
Create a dedicated network: This should be a separate VLAN or network segment used by digital signage displays so that it enjoys guaranteed bandwidth.
Wired connection is preferred: Wi-Fi is also an option, but Ethernet connection will be a better option to use Samsung Tizen signage.
IP assignment: It is worth considering the use of fixed IPs, as these make Samsung Tizen CMS easier to manage and troubleshoot.
Display Orientation and Installation.
Samsung Tizen shows can be installed in several different orientations to different digital signage applications:
Landscape Mode:Samsung Tizen digital menu boards, video walls and wide-format content in ideal landscape mode.
Portrait Mode: Ideal Perfect Samsung tizen portrait mode signage in retail, wayfinding, and directory applications.
Auto Detection: The Tizen signage software is able to automatically recognise and adapt to the physical orientation.
Scheduling and Content Management.
There are several important considerations in the management of effective Samsung Tizen signage contents:
Select the appropriate Samsung Tizen CMS: Select a cloud digital signage platform that is compatible with Samsung Tizen signage players.
Apply content scheduling: Apply Samsung Tizen signage scheduling functions to show various content at various hours.
Optimize content resolution: Produce content of your preferred display resolution on your Samsung Tizen to produce optimal images.
Frequent content changes: Have your Samsung digital signage updated on a regular basis with content change.
Conclusion
Samsung Tizen digital signage provides a capable, versatile business platform to any business. Since small sized retail shops use only one Samsung Tizen digital menu board and large businesses maintain hundreds of Samsung smart signage displays in many locations, the Tizen signage software and ecosystem offers flexibility and the tools required to achieve successful digital signage implementations.
With this complete Samsung Tizen digital signage solution guide and best practices in place, you will be in an excellent position to develop attractive and professional digital signage solutions. You can use the Samsung Tizen signage player as a corporate communication tool, retail advertisement tool, and hospitality tool, and in any case, the reliability of the platform and its high level of features makes it a good option in the current digital signage requirements.
It is important to keep in mind that a productive Samsung Tizen signage management implies the constant monitoring of the quality of the content, stability of the network and systematic maintenance of the system. Consistent and effective messaging to your audience will be achieved through a cloud digital signage network that has been appropriately configured and administered with Samsung Tizen CMS solutions.

