
FIre TV Stick
How to Set Up Digital Signage with a Fire TV Stick
A complete guide to turning a Fire TV Stick into a remotely managed digital signage screen.
Turn Your Amazon Fire TV Stick into a Digital Signage Player.
Fire TV Stick is now the preferred cheap digital signage player among companies in the global business. Firestick solution, which has the cloud signage of Wilyer, enables any organization to install professional HDMI signage devices within minutes. This is a step by step tutorial of the entire Firestick digital signage setup process.
Why Choose Fire TV Stick for Digital Signage?
The Ultimate HDMI Signage gadget.
Most Affordable Solution
Fire TV Stick is the cheapest signage of Firestick media player at only $29-59. No costly proprietary equipment--simply all you need to do is to plug in any HDMI window and you are all set.
Cloud-Based Management
Cloud based Firestick signage by Wilyer offers full remote signage management Firestick feature. One-dashboard control has unlimited displays, real-time content updates, and remote monitoring of every screen.
Fire OS Ready Digital Signage.
Fire OS, which runs on Android, is compatible with potent digital signage software on Firestick. The platform is robust, stable and has an optimized 24/7 performance.
Perfect For:
In-store advertising and marketing.
Corporate office pronouncements.
Restaurant menu boards
Healthcare waiting rooms
Real estate property exhibitions.
Exhibitions in educational institutions.
Hotel and hospitality signage.
What You Need to Set Up Firestick TV for Digital Signage
Hardware:
Amazon Fire TV Stick (Any model: 29-59)
HDMI port (TV or monitor) display.
Solid internet connectivity (WiFi connection or Ethernet)
Power outlet
Software:
Wilyer Digital Signage Player (free Firestick signage app).
Wilyer cloud account (14 days free trial at wilyer.com)
Complete Setup Guide
Step 1: Setting up a Fire TV Stick for Digital Displays
The first step in preparing to use the Fire TV Stick is to establish a connection to the television or display device as well as set up everything for optimal performance prior to launching any of the digital signage content.
Hardware Setup
You will first want to connect the Fire TV Stick to the physical hardware of your TV or display device. Here's how:
Plug the Fire TV Stick into any HDMI port that is available on your TV or other commercial-grade monitor.
Connect the USB power cord to a standard wall outlet with the included power supply.
Turn your TV or other display on and switch to the HDMI Input that corresponds with where you connected the Fire TV Stick.
The Fire TV Stick should automatically power up and open the user's interface.
Initial Device Configuration
To complete the device configuration after powering on, follow the on-screen instructions:
Choose your preferred language.
Connect to your wireless network or wired LAN.
Log in with your existing Amazon account or create a new one if needed.
Set the appropriate resolution and display scale.
Skip any of the optional entertainment services or suggestions to keep the Fire TV Stick focused on digital signage use.
Once complete, your Fire TV Stick will be fully set up and ready for use in your business's digital menu board or signage installation.
Step 2: Optimize Fire TV for Digital Signage
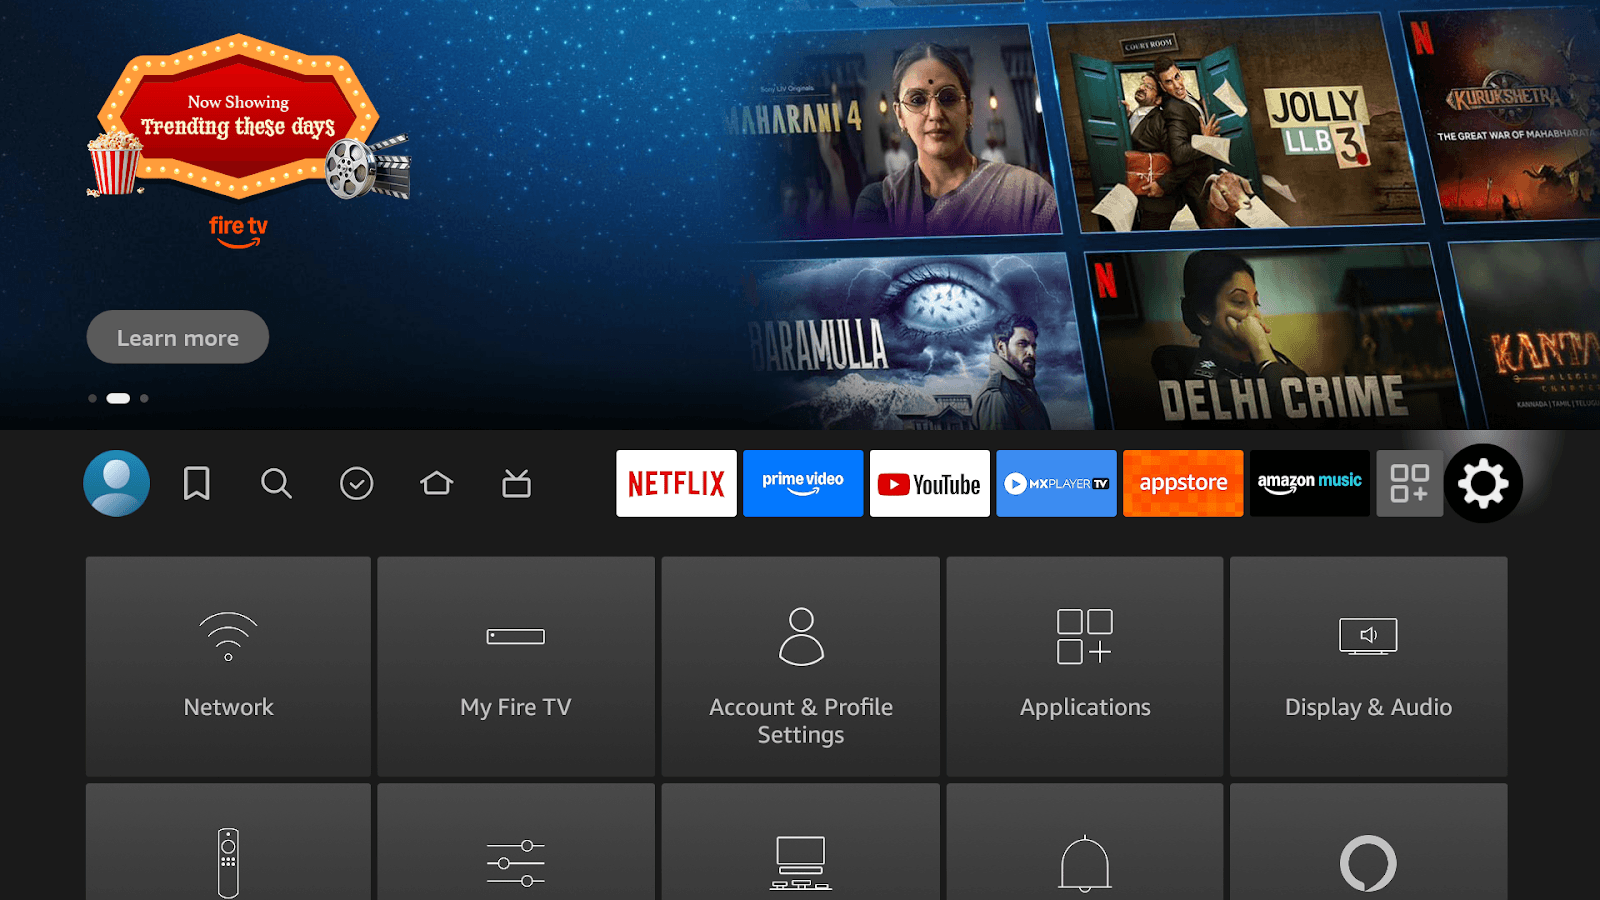
Access Settings:
Fire TV remote Press Settings button (gear icon).
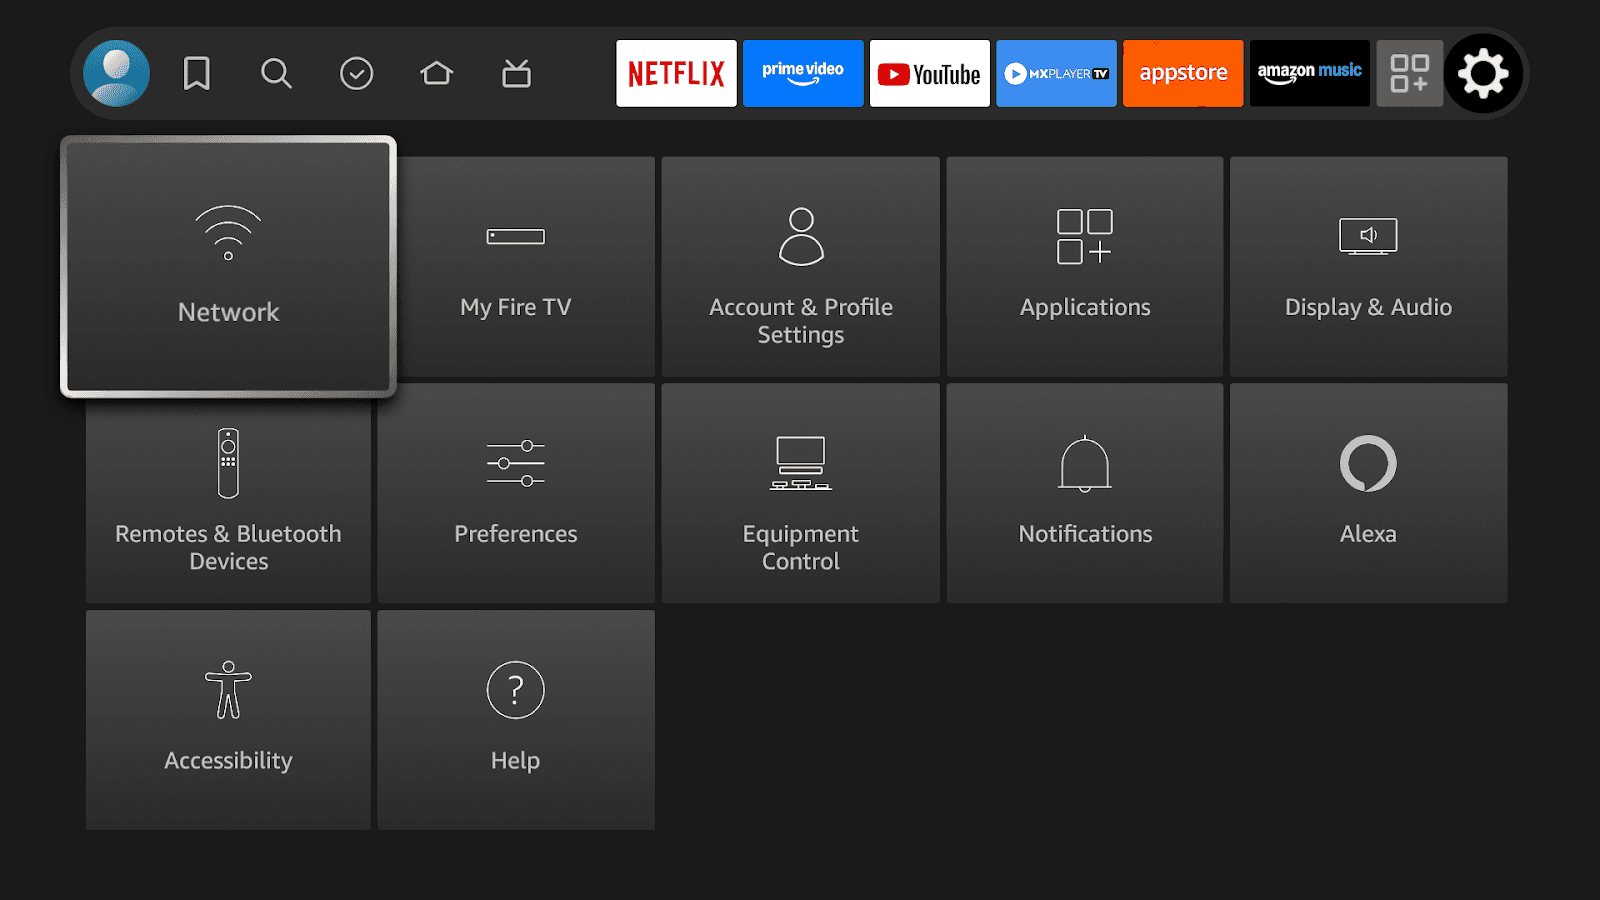
Navigate to key settings:
Network: Have competent WiFi/Ethernet connection.
Access system settings of my Fire TV.
Applications: Apps management.
Display/Audio: Use display settings to optimize the display settings.
Critical Optimizations:
Display Settings:
Shut off screen saver.
Set display sleep to "Never"
Disability adaptive brightness off.
Maximize screen brightness
Power Management:
Turn off all the energy saving options.
Turn off sleep timers
Disable auto shut-off
Enable "Stay awake" mode
Application Settings:
Uninstall unnecessary apps
Turn off automatic updates of apps when in business.
Turn off notifications
Off autoplay content Disable content autoplay
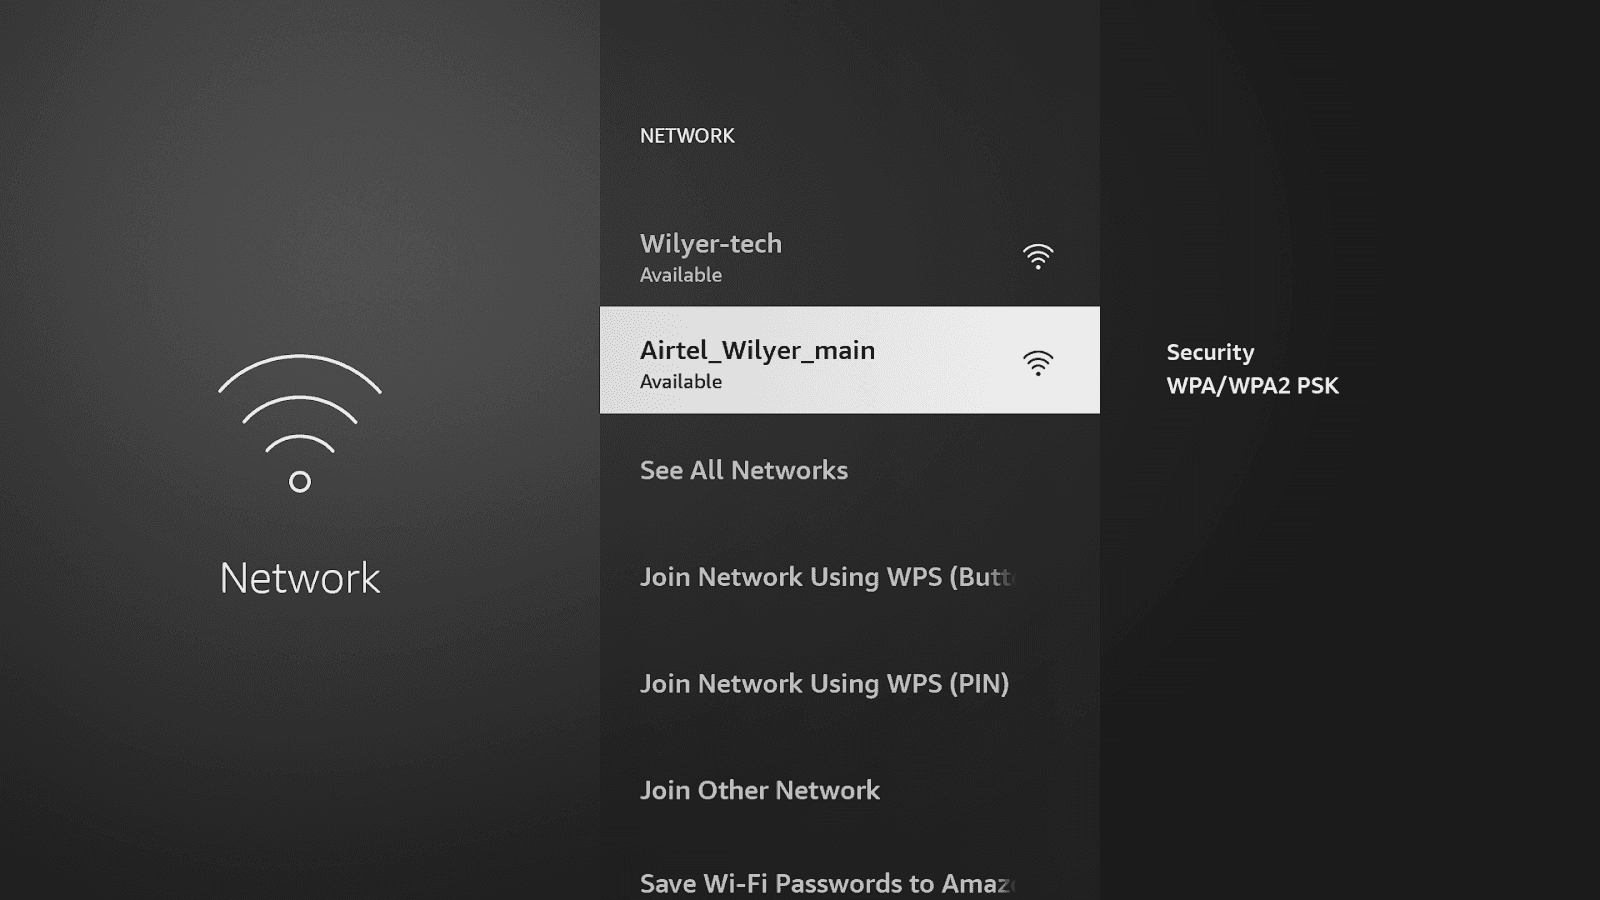
Network Configuration:
Get connected to special business WiFi.
Or use an Ethernet adapter to be the most reliable.
Have a minimum connection speed of 5 Mbps.
Set static IP when required in management of the network.
Critical in consumers commercial display and uninterrupted operation on Firestick.
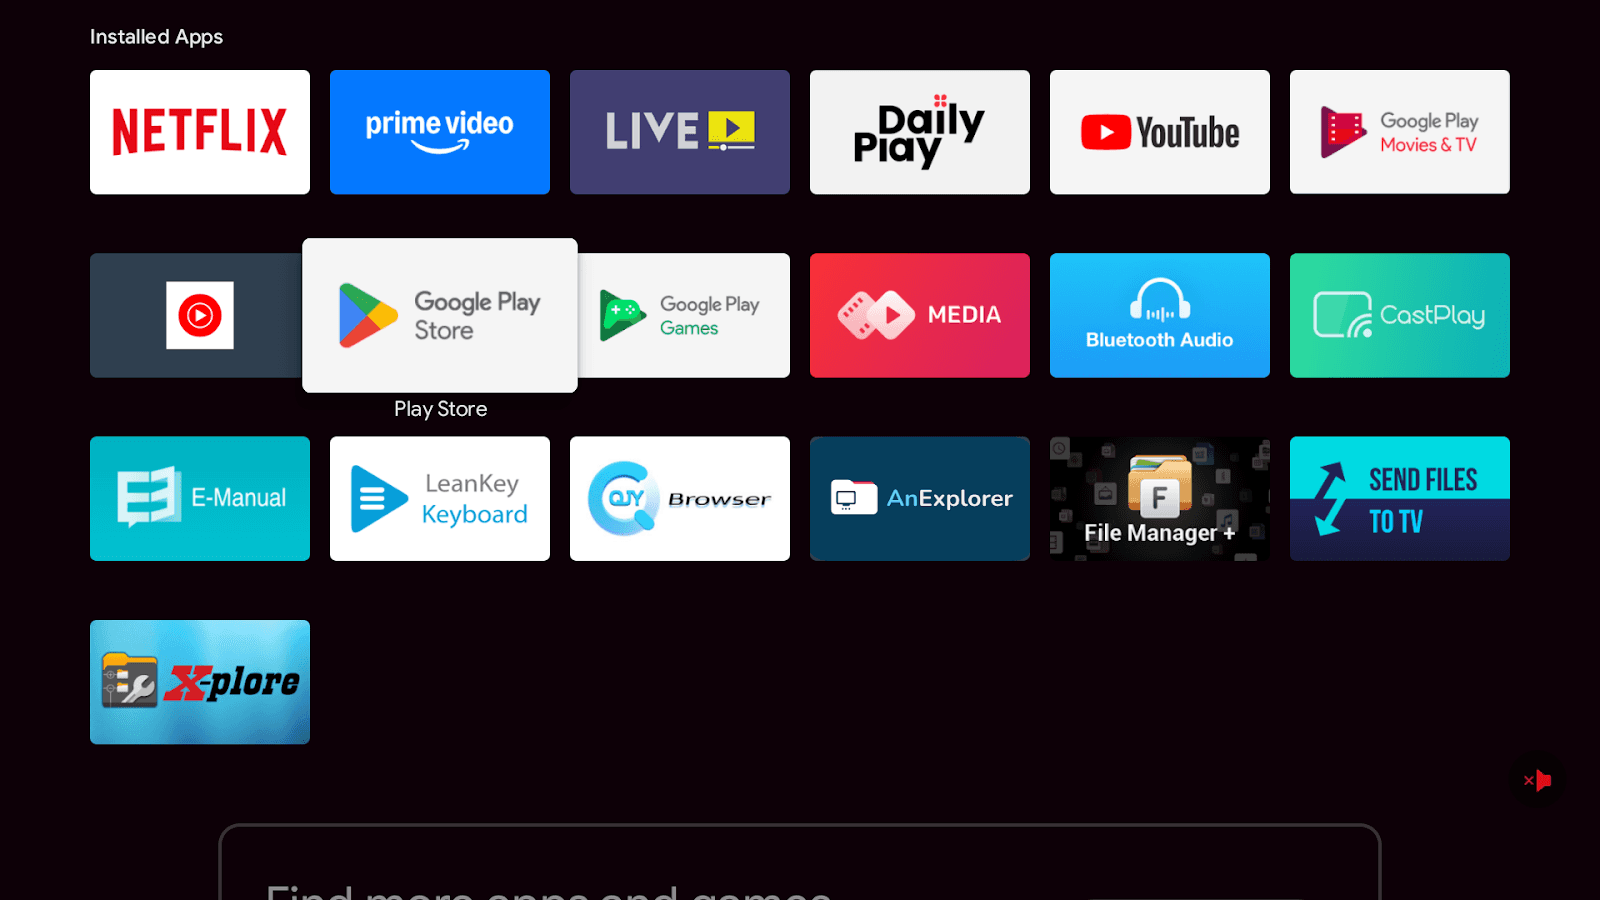
Go to the app section on your device, locate the play store, open it, and prepare to download the Wilyer Digital Signage app for for your screen setup
Step 3: Install Wilyer Signage App
Search for Wilyer:
Fire TV remote Home button on the Fire TV remote.
Go to find (magnifying glass) icon.
Select "Search"
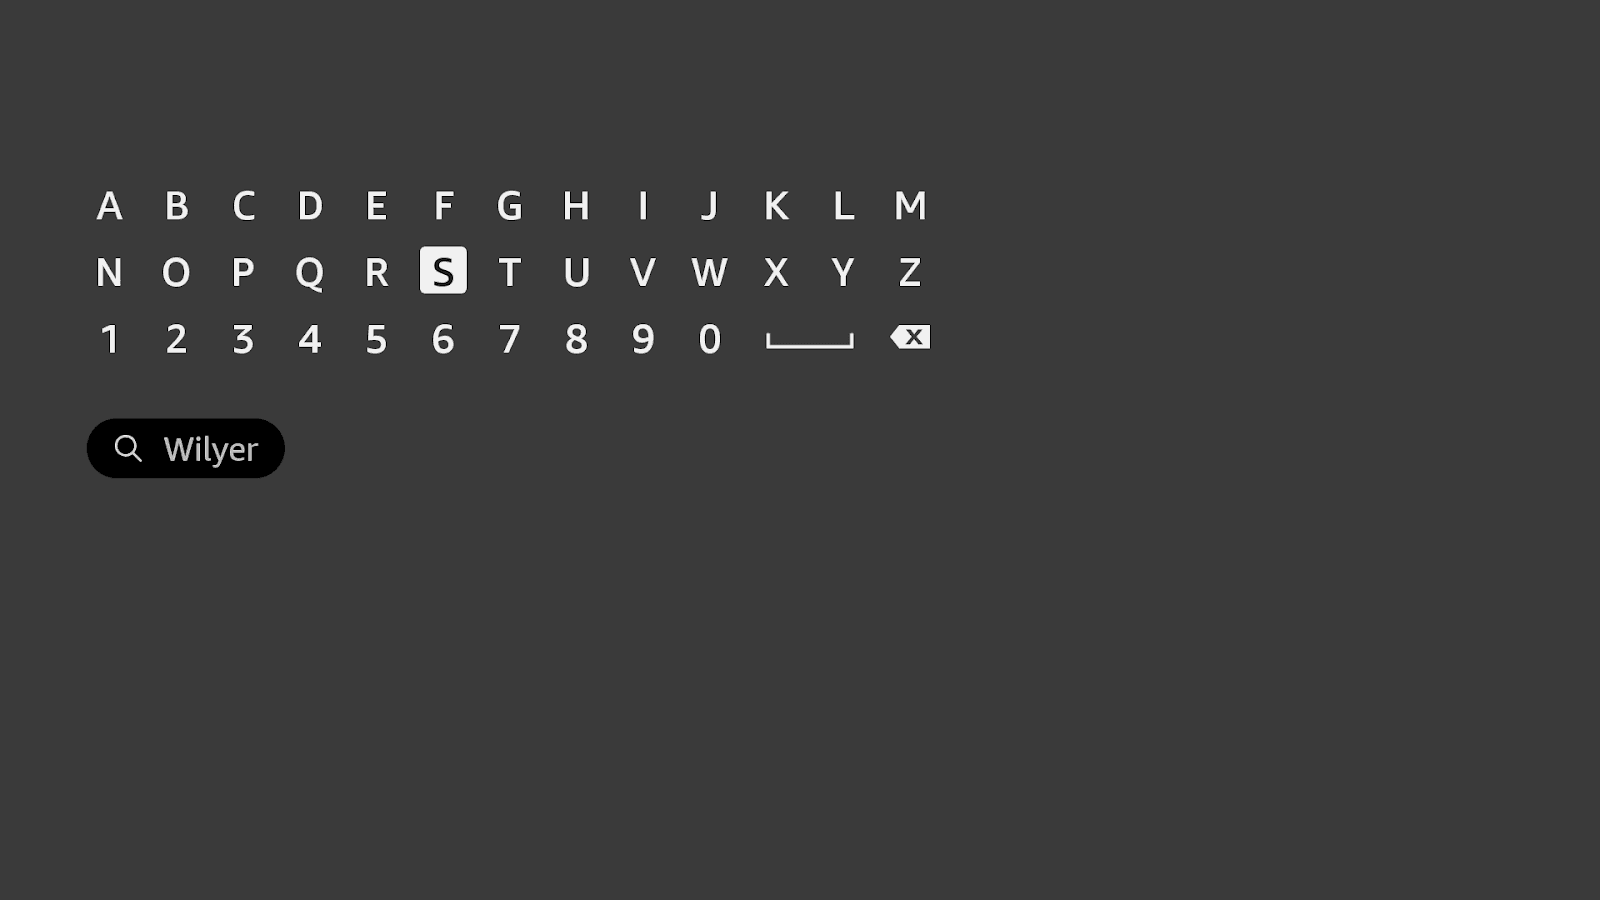
Type "Wilyer" on-screen keyboard.
Or tap and press microphone button: "Alexa, find Wilyer Digital Signage Player"
Find the App:
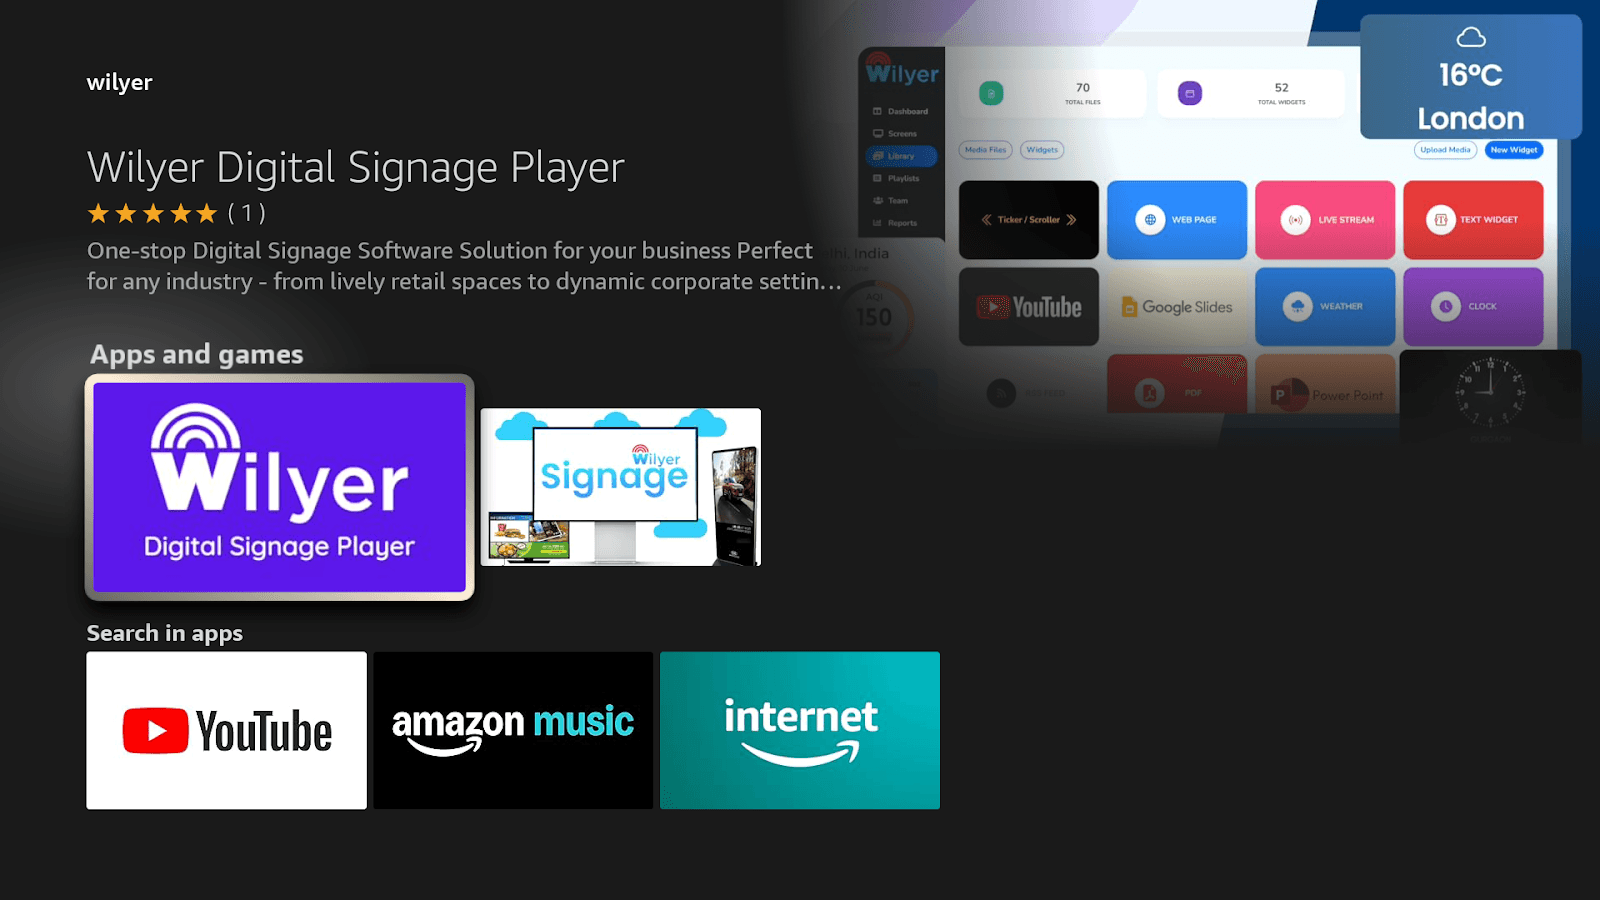
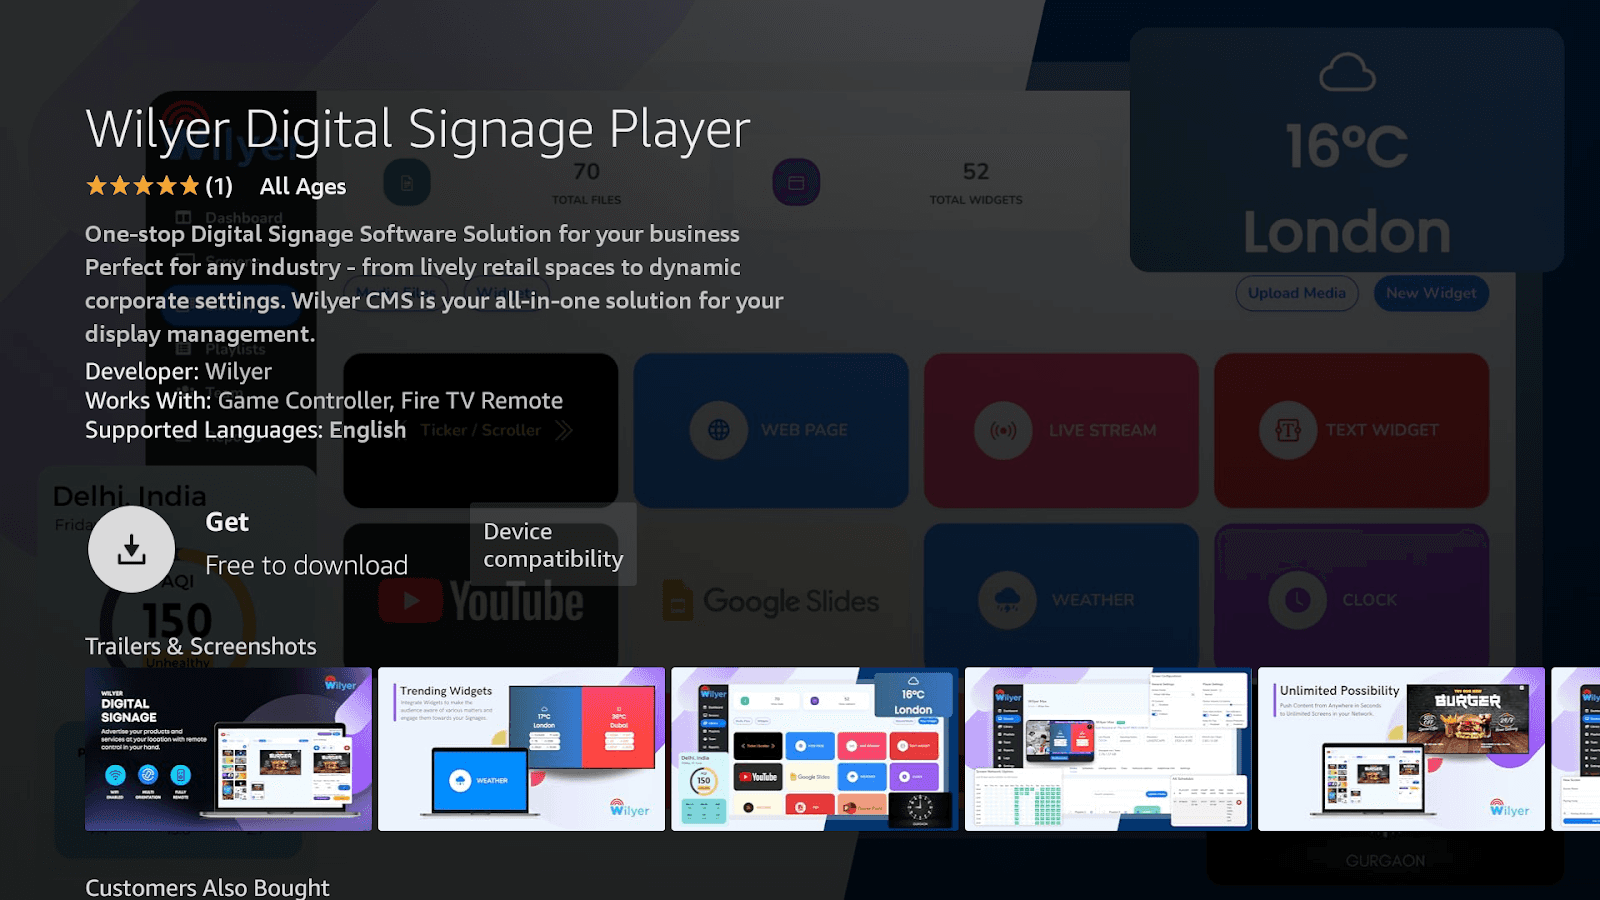
Wilyer Digital Signage Player displayed with:
Electronic Signage Software Solution to your business in one stop.
App icon with Wilyer logo
Developer: Wilyer
Works with Fire TV Remote
Download and Install:
Wilyar Digital Signage Player.
Select Get button (Free to download)
Review app details:
Developer: Wilyer
Supported Games: Game Controller, Fire TV Remote.
Supported Languages English
Compatibility of the devices verified.
Wait for download (1-2 minutes)
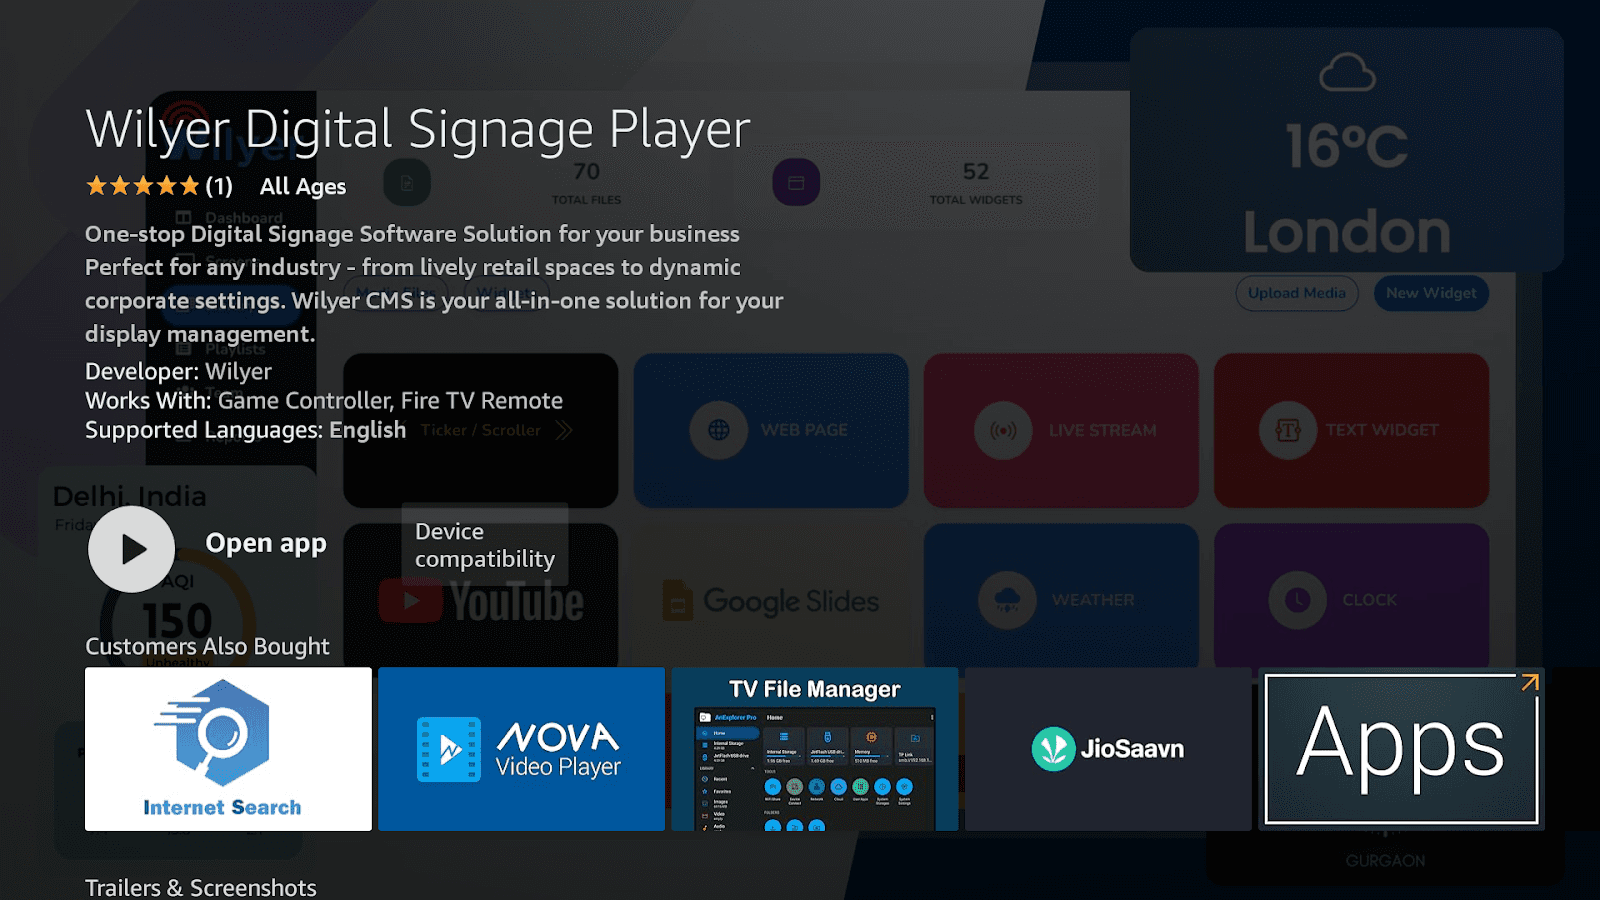
When it has been installed, click on the Open app.
find in the "Apps and games" section.
Step 4: Start and Customize Your Signage Display.
Open Wilyer App:
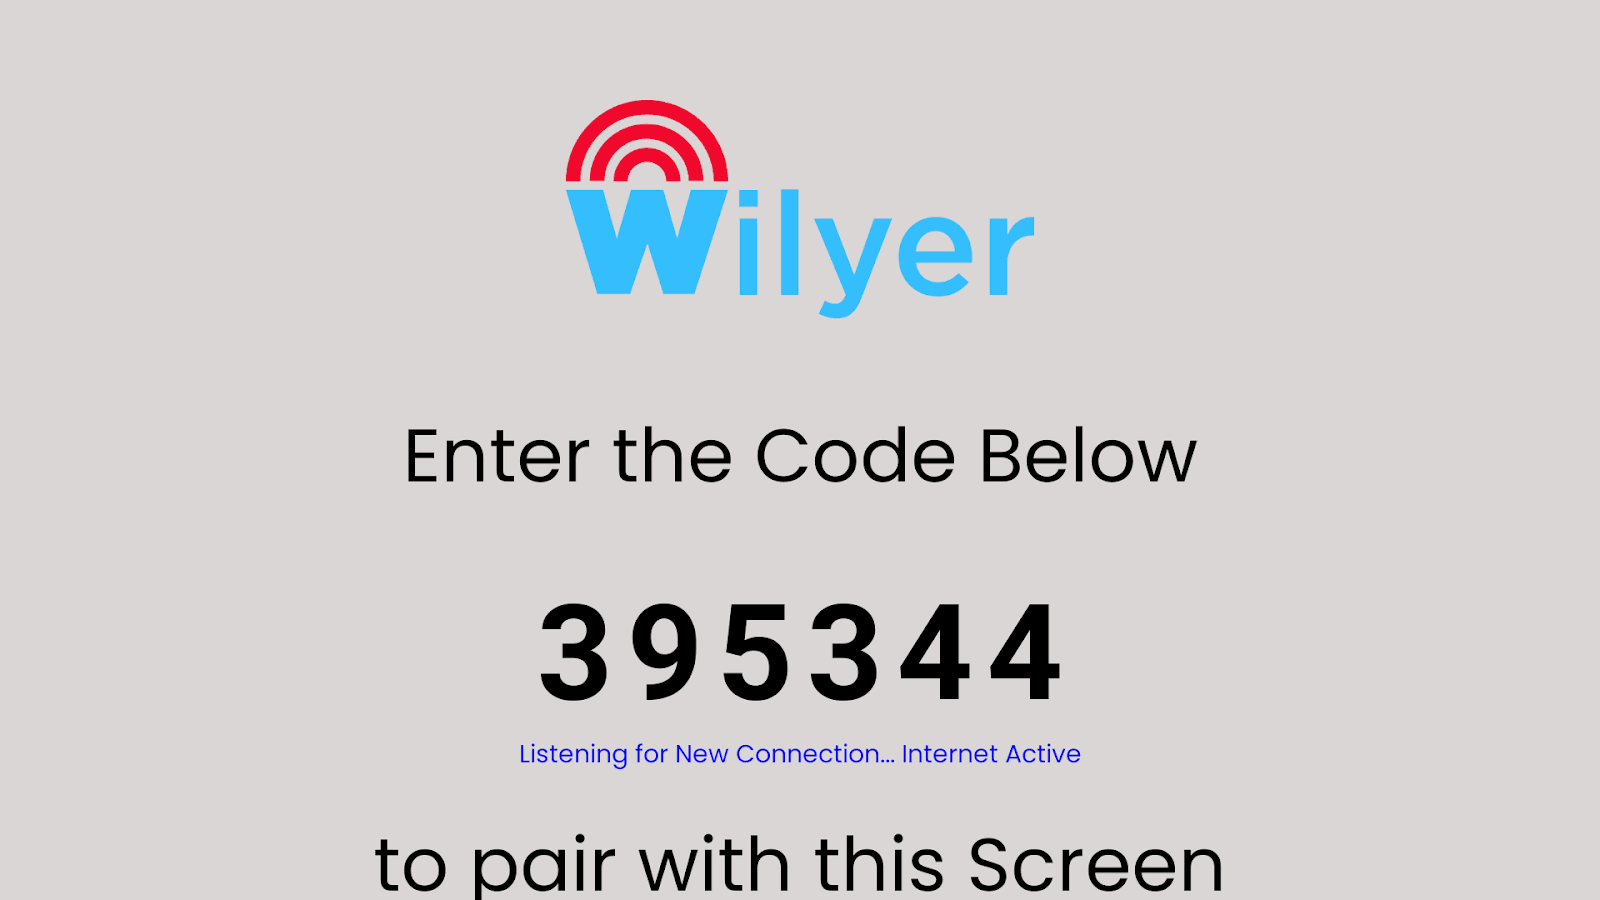
Upon opening Wilyer, you will get the following pairing screen:
Wilyer logo at top
Huge 6 digits pairing code (e.g. 395344)
Text: "Enter the Code Below"
Status: Listening to New Connection... Internet Active"
Direction: to match up with this Screen.
Leave this screen on your Fire TV screen.
Create Wilyer Account:
On your tablet, smartphone, or computer:
Visit wilyer.com
Click on Start Free Trial/ Sign up.
Fill in your details about your business:
Company/Business name
Your name and email
Create password
Location details
Click "Create Account"
Verify email address
Log into Wilyer dashboard
Set Pair: Fire TV Signage Display:
In Wilyer dashboard:
Press Screens in the left hand menu.
Click "Add Screen" or "+" button
Enter Fire TV (395344) 6-digit pairing code.
Name your screen:
Add address (address or room number)
Add tags if needed (optional)
Click "Pair Screen" or "Add"
Allow the waiting time of 5 to 10 seconds.
Customers should see Connected Successfully on the screen of their Fire TV and it will display as Online on your dashboard.
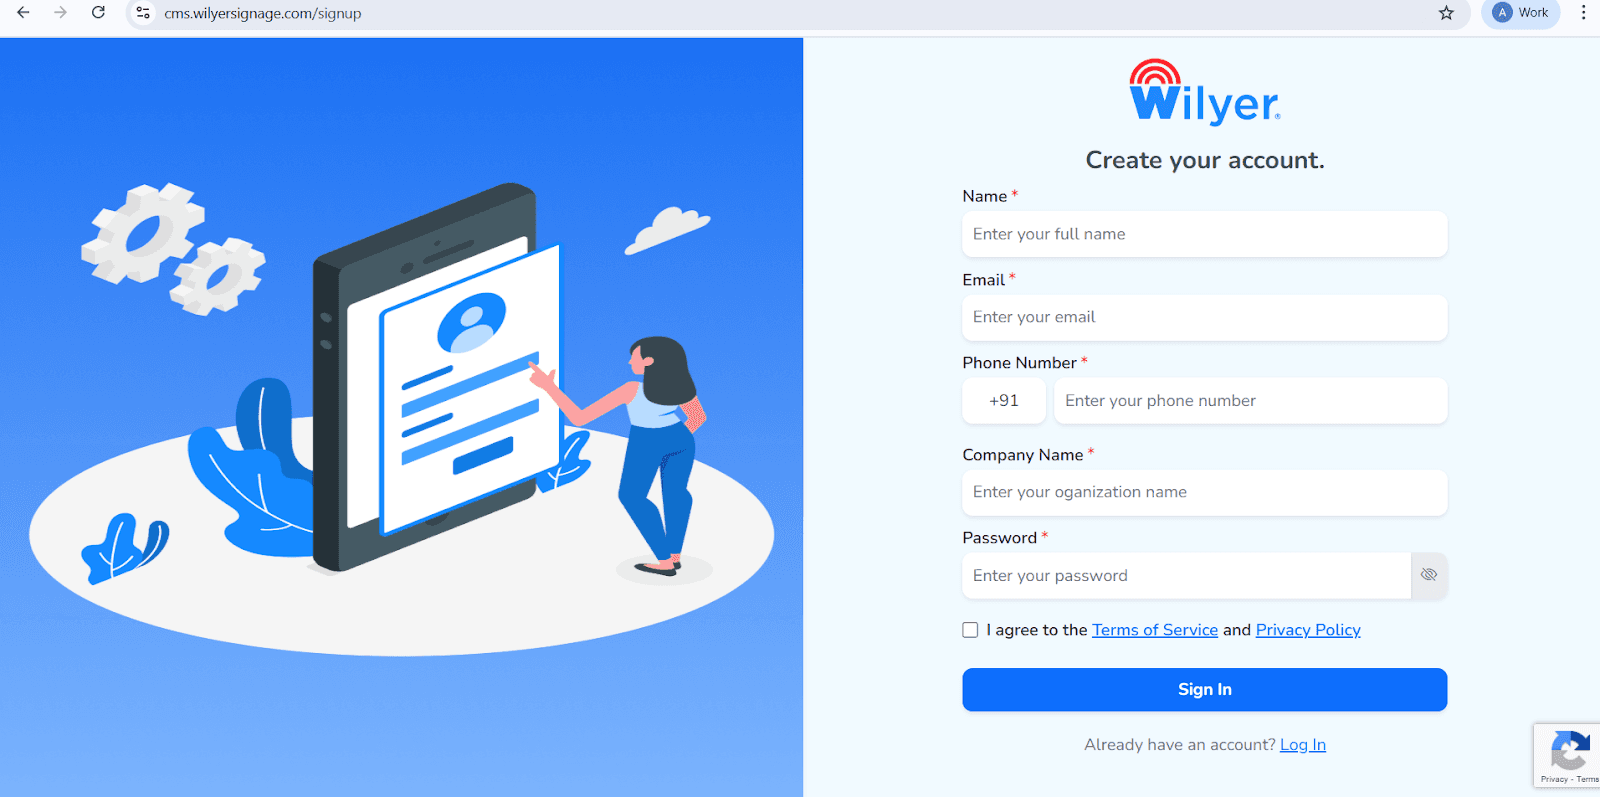
Open the Wilyer Sign-Up Page
Access the official Wilyer Cloud CMS registration page to start setting up your digital signage account.
Enter Your Full Name
Provide your full legal name, which will be used as the primary account holder for managing the signage dashboard.
Provide Your Email Address
Enter a valid and active email address. This will be used for signing in, account verification, and receiving important updates.
Enter Your Phone Number
Add the mobile number associated with the account, including the appropriate international country code.
Enter Your Company Name
Provide your company or organization name to create a professional identity within the Wilyer signage platform.
Create a Secure Password
Choose a strong password to protect your account and ensure secure access at all times.
Accept the Terms and Privacy Policy
Carefully review and agree to the Wilyer Terms of Service and Privacy Policy by selecting the confirmation checkbox.
Click the “Sign In” Button
Once all details are completed, click the blue “Sign In” button to finish creating your account and access the Wilyer dashboard.
Now your Fire TV Stick has been paired as a digital signage display
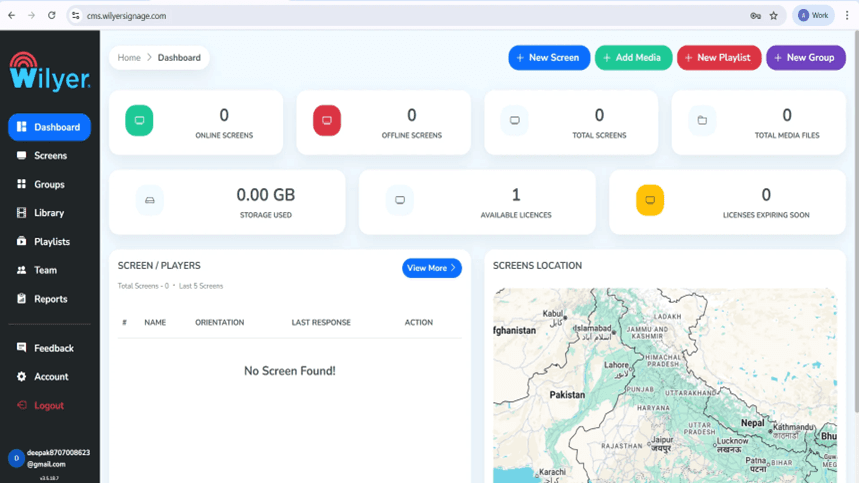
Step 5: Enter into Your Wilyer Dashboard.
Upon signing in, the Wilyer Dashboard will be launched. This is a centralized control panel that gives you the entire view of your digital signage network consisting of online and offline screens, total displays registered, uploaded media files, storage use and licenses available. Your signage environment can be seen and be controlled in the dashboard.
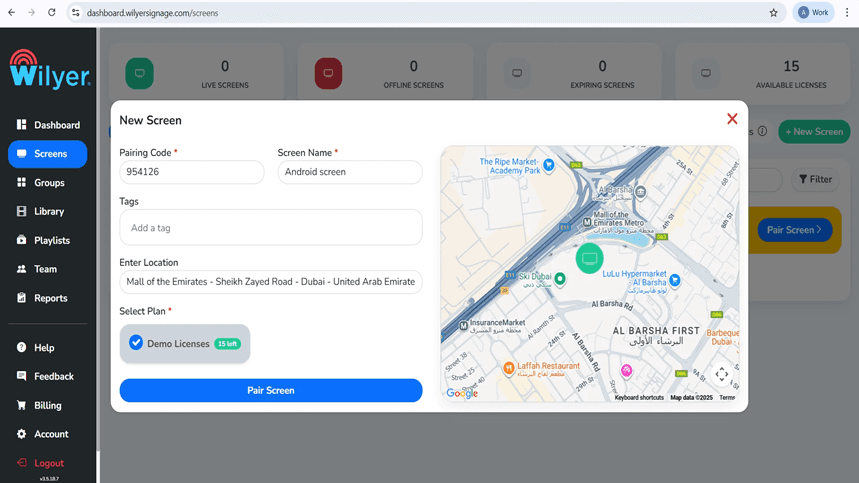
Step 6: Android TV Pairing.
Clicking on the dashboard + New Screen or Add Screen will add a new screen. Enter pairing code of 6 digits on the Android TV. Enter a screen name, tags, location of installation, and a suitable plan of the license. Touch Pair Screen to complete connection.
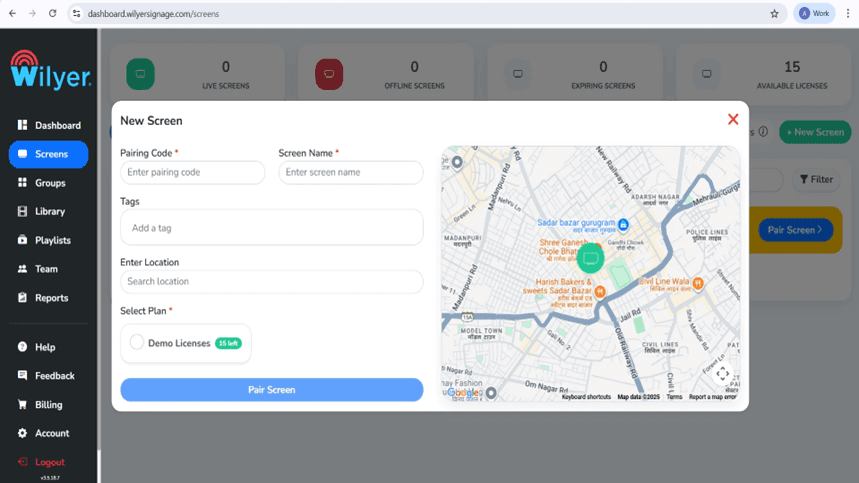
Step 7: Match the Screen through Wilyer Dashboard.
The second step is to go to the Screens section in the Wilyer web dashboard and choose Pair Screen. Add the 6-digit pairing code on your TV, select a screen name, add tags and set display location. Select a license plan, which is available, and then click on Pair Screen to activate and connect the display.
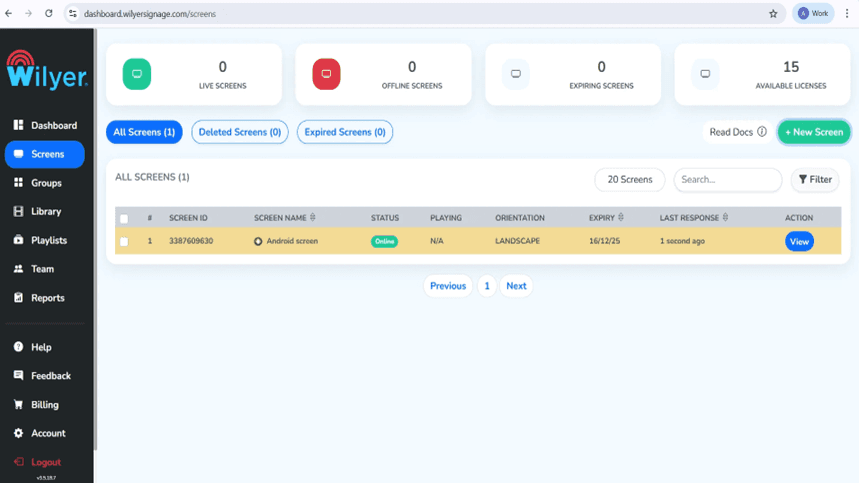
Step 8: Successful Pairing of Clients.
After the process of pairing, the display will be visible in the Screens with an Online status that will indicate a successful connection. Screen ID, orientation, the date of license expiration, and time of last response are only a few of the most important details that you will be able to see. The screen is now prepared for playlist assignment, configuration and actual performance monitoring.
Creating Your Digital Signage Content.
Step 9: Upload Media Files
In the Library, go to the Upload Media and upload pictures, videos, and other files containing content. The one is able to support various formats, such as JPG, PNG, and MP4. Media library is the basis of visual playlists creation.

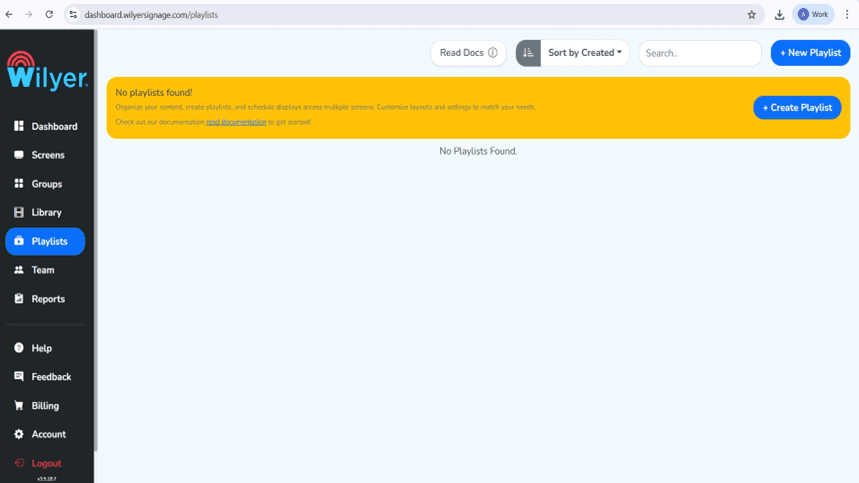
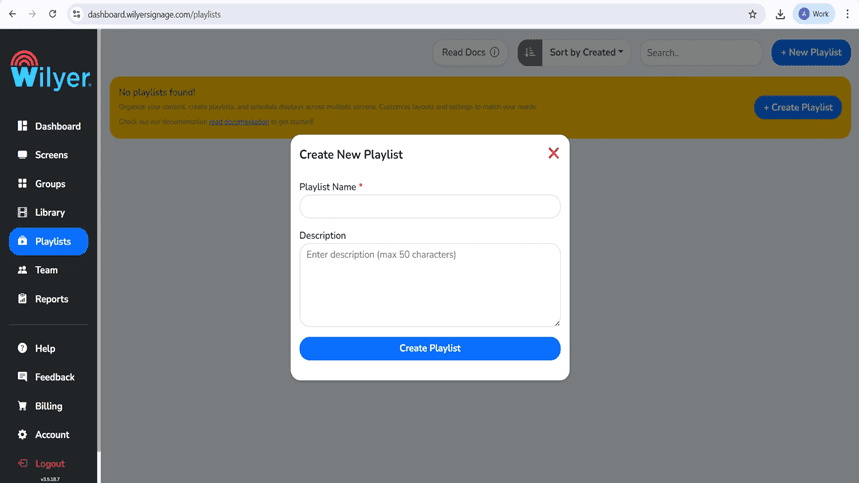
Step 10: Make Your First Playlist.
Go to the Playlists option and either press + New Playlist or Create Playlist. Write a descriptive title of the playlist and optional description. This playlist will be employed to play out and show content on respective connected screens.
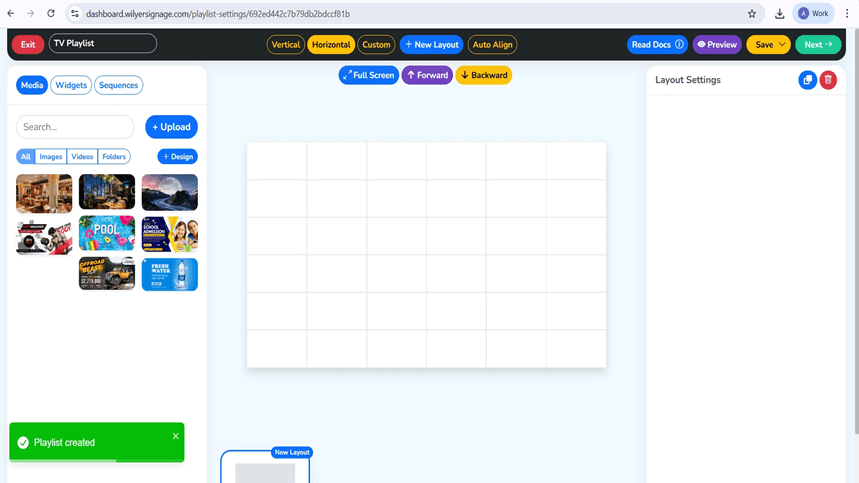
Step 11: How to Choose and Design your Playlist Layout.
Playlist editor Organize your content. Selection between Vertical, Horizontal and Custom layouts. Add media files in the library to the canvas and configure the duration of the slides and add transitions. The editor has a live preview option so that you can look at your design live.
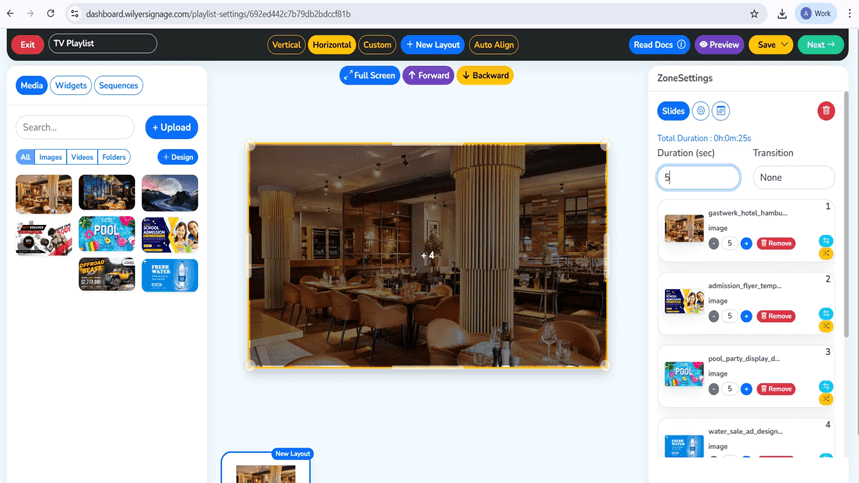
Step 12: Adding media and playback settings.
Drag photos or videos in the area of the layouts. The media files then turn into a slide in the playlist and you can set the display time, the order of playback, and effects. The duration of the entire playlist automatically changes when new contents are added or removed. Preview Mode is there so that you can look at your playlist before saving and publishing.
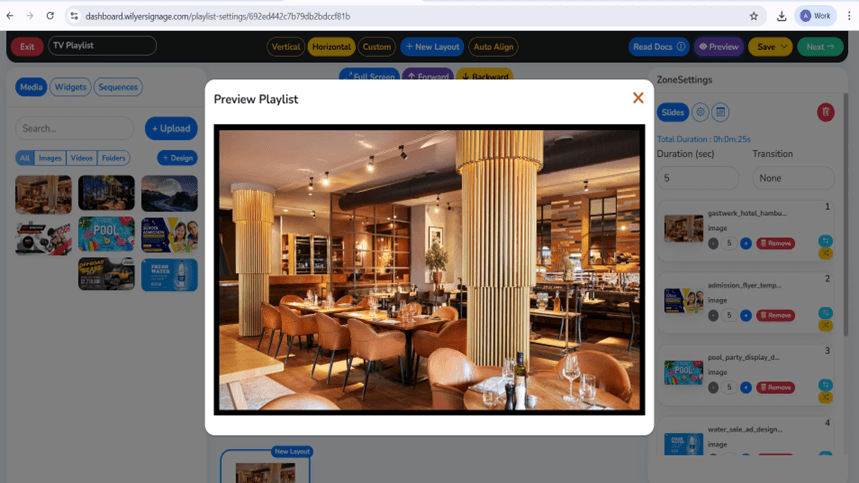
Step 13: Preview Your Playlist
Enter the Preview button to view the way the playlist will look on the display. The preview displays design arrangement, media sequence, schedule, and changeover. This is done by revising all the slides carefully to be sure that you have the right visuals, durations, and transitions before going to press.
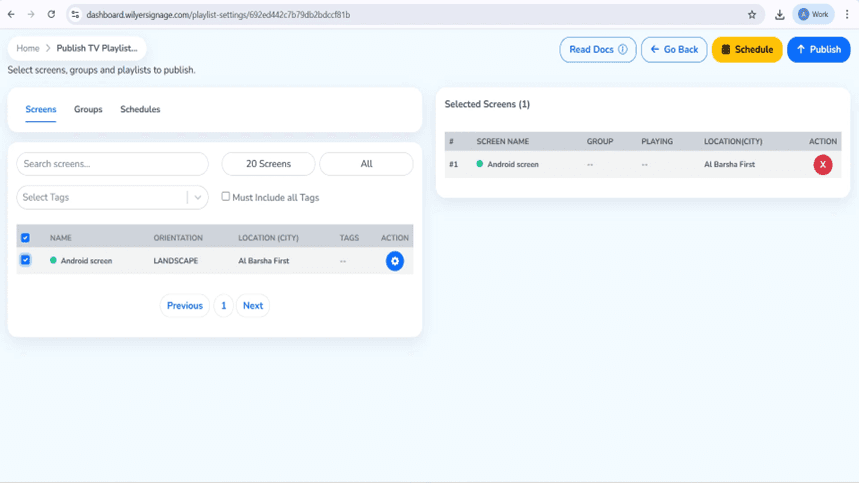
Step 14: Screen Publication of Content.
After creating a list of the songs, press Next and Publish. Choose the target screens or screen groups which the contents should be displayed. Check your choice and this playlist will be automatically installed on the selected screens.
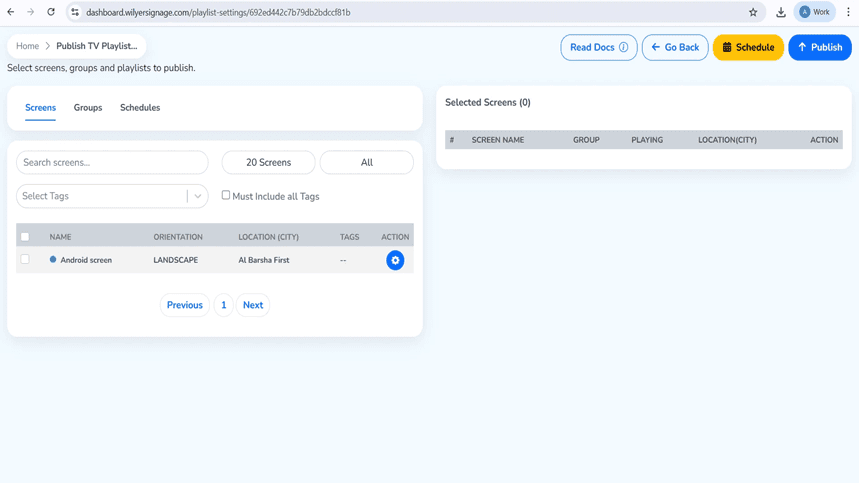
Step 15: Publication of Playlist to Display.
On the Publish TV Playlist page, choose the display group or screen group of your target. You can publish the playlist right away or can be programmed to play at a particular time. Publish or Schedule according to your preference of deployment.
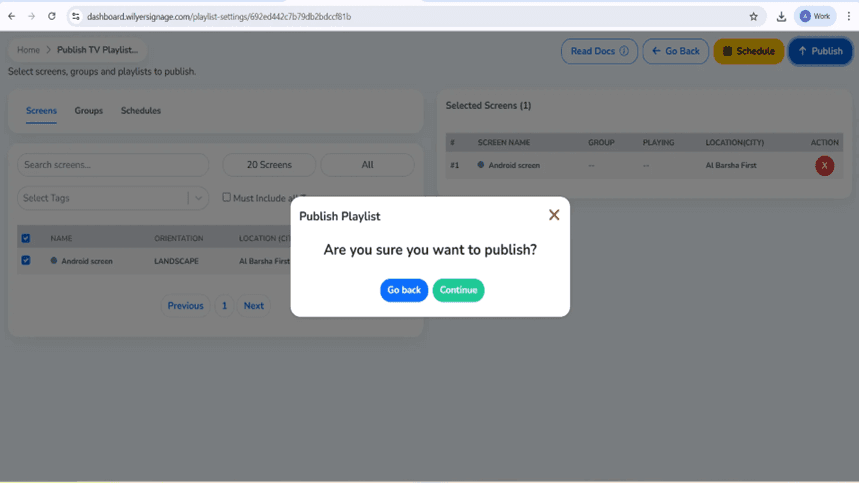
Step 16: which is to confirm Playlist Publishing.
A confirmation dialog would be displayed before the actual deployment. Look through the specifics. In case all is well, do continue so as to verify the publication. In case of the necessity to change anything, choose Go Back to playlist or screen choice.
Step 17: Track Playlist Delivery Progress.
Once published, the Playlist Report will help monitor the progress of delivery. A report shows the count of the targeted screens, the status of data transfer and the completion percentage. Successful status is used to establish that the files have been downloaded and the screen is online. In case delivery is not complete, the playlist will not play until it achieves all the requirements.

Final Step: Playlist Live on Screen.
Your playlist is published successfully and has been put on the connected display. The content is played back as per the chosen layout sequence, timing sequence as well as the media sequence, and plays smoothly without errors. Check images, positioning, and effects to make sure that the presentation will make a good and a professional look to your audience.

Troubleshooting
Fire TV Won't Connect to WiFi:
Verify WiFi password
Move router closer
Employ an Ethernet adapter to be reliable.
Restart router and Fire TV
Wilyer App Won't Auto-Launch:
Enable permissions App Autostart at Boot.
Check Fire TV startup application.
Ensure no conflicting apps
Restart Fire TV to test
Content Not Updating:
Make sure that Fire TV is connected online (green on dashboard).
Check internet connection
Force sync from dashboard
Restart Wilyer app
Display Goes to Sleep:
Turn off all settings on screen savers.
Set display sleep to "Never"
Turn off power-saving modes
Check Fire TV as well as TV settings.
Cost and ROI
Investment:
Fire TV Stick: $29-59 (one-time)
Wilyer Subscription Charged on a per-screen basis/month.
Total setup: Under $100 to start
Savings:
Eliminate printing expense: $2,000- 10,000/year.
Save staff time: 10-20 hours/month
Installment news: No reprints necessary.
Revenue Impact:
Increase sales of items on promotion: 15-30%
Better customer engagement
Professional brand image
Payback period: 1-3 months
Why Choose Wilyer Fire TV Stick Signage
Easy to Use
No technical skills needed. Our Firestick solution cloud signage will be functional with an easy to use dashboard.
Affordable
The cheapest model in terms of cost is the Fire TV Stick commercial display setup. Transfer one screen to hundreds with no budget bust.
Reliable
Auto-start, offline video and 24/7 will have your signage functioning at all times.
Scalable
Start with one Fire TV, grow to multiple locations. Manage everything from one cloud-based menu board software platform.
Full Support
Help center with guides
Email and chat support
Setup assistance available
Training for your team
Conclusion
The combination of Wilyer's digital signage software for the Amazon Fire TV Stick (Firestick) provides the best balance of price, quality and functionality. Small and large companies can use this very affordable digital signage player to install digital signage using the Firestick display, easily.
From using the kiosk mode on a Firestick for unattended operation to providing a complete remote management system for digital signage devices via the Firestick, Wilyer offers all the capabilities necessary to create a professional digital signage platform using HDMI-enabled Firestick devices. Wilyer's content management system (CMS) in the cloud makes it easy for users to manage and deploy content on their Firestick digital signage displays. In addition, the Firestick application can automatically launch at startup and restart automatically when the power goes out. All of these aspects of Wilyer's digital signage system provide a high level of service and support for customers, as well as 24/7 reliability in managing digital signage content.

Multi-Platform Compatibility for Every Digital Signage Display
Run Wilyer’s digital signage software on your preferred operating system with zero hassle.
