


Windows Digital Signage
How to Use a Windows PC as a Digital Signage Player
A step-by-step guide to turn a Windows PC into a digital signage player
Introduction
You can convert your PC, running Windows, into a powerful digital signage player window without spending money on the specialized equipment. This detailed tutorial is going to guide you through the entire procedure of installing PC-based digital signage using Wilyer Signage which is one of the surest digital signage software available on Windows PC.
Need to build digital menu boards or Windows digital signage displays or just a complete commercial digital signage system, this step-by-step Windows PC signage installation guide will assist you in becoming operational fast and effectively.
On a Windows PC, the Wilyer Digital Signage software can be installed using two methods.
The first method is by downloading the software directly through the Chrome browser, which allows quick and easy installation with an internet connection.
The second method is by using a pen drive, where the installation file is copied from another device and then installed on the Windows PC. Both methods provide flexibility based on internet availability and deployment requirements.
Download Wilyer Digital Signage Software for Windows (via Chrome)
The Wilyer Digital Signage software can be directly downloaded on a Windows PC using the Chrome browser. This method is ideal for new customers and quick setups, as it allows fast installation with an active internet connection. Simply download the installer, complete the setup, and connect your screen to the Wilyer cloud dashboard for remote content management.
Link : https://app.wilyer.com/win/x64/wilyer-player.exe
Benefits of Downloading Wilyer Digital Signage Software in Window PC
By downloading the Wilyer Digital Signage software, you can get your device turned into a fully controlled digital signage display within a short period of time. After installation, one can manage content remotely on a single cloud dashboard without walking to the display site.
The software allows real time updates of content hence promotions, menus or announcements can be updated in real time on one or multiple screens. This helps to save time, minimize the use of manuals, and avoids the use of printed materials.
The Wilyer signage software can be installed easily and is compatible with various installation configurations including browser download or USB installation, which makes the software compatible with small installation setups and also in large scale installations. It also guarantees stable playback, content delivery on a schedule and stable screenplay.
All in all, the downloading of the Wilyer Digital Signage software assists the company to control the displays effectively, expand with minimal efforts, and ensure a professional on-screen presence.
Why Windows PC Is a Good Choice for New Digital Signage Customers
The simplest option for new customers getting started with digital signage is generally to use a Windows PC, since most users have a good understanding of this operating system, limiting the amount of training needed after purchase. Existing desktop computers or mini PC hardware can be re-used with no additional purchase necessary.
With a Windows PC, you can install the Wilyer Digital Signage Software quickly and have room to experiment with layouts, content and schedules prior to scaling up to dedicated media players. Therefore, Windows is an excellent choice for introductory pilot project deployments.
As costs increase and requirements change, customers can smoothly shift to Android Media Players and other types of equipment without having to switch between Windows platforms.
A Windows PC offers higher RAM and storage capacity compared to basic media players. It supports playback of high-resolution content, including files above 1080p. Additionally, a Windows PC can be used as a local server if you want to run your digital signage setup within a private or local network.
Full Instruction Guide: Windows Digital signage installation.
These instructions will help you make your PC a digital signage player and begin displaying content a few minutes later. The guide includes all the steps of the first installation and posting your first playlist.
Step 1: Prepare Your Windows PC
This digital signage display format is effective when you have a PC which is true to the digital signage.
Step 2: Access Windows settings.
Click on the Start button to bring up the windows menu. This is where you get the opportunity to set up your PC as a digital signage player.
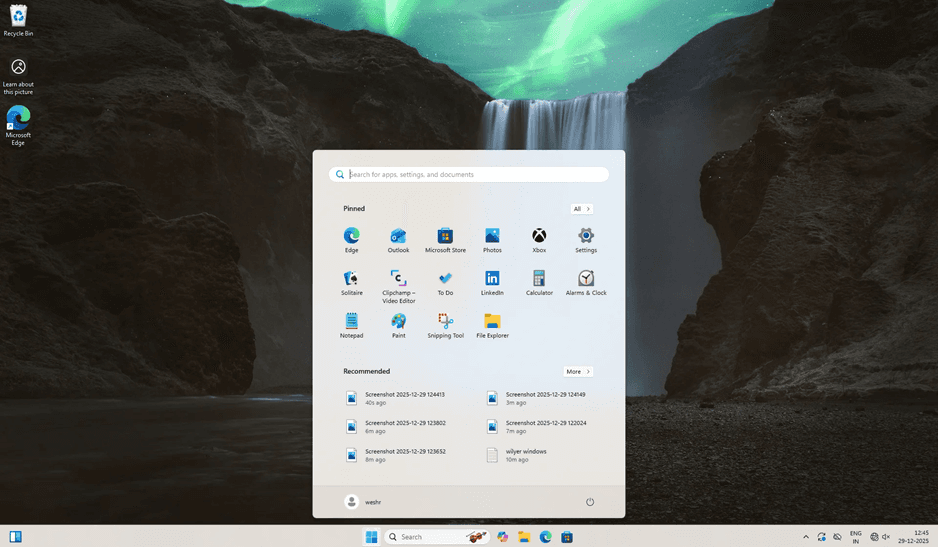
Windows Start Menu will include all the settings of your system that you will require in installing your digital signage software on the windows PC.
Step 3: Network settings configuration.
Direct to the Settings Network and Internet Wi-Fi. Cloud digital signage services heavily rely on a strong internet connection.
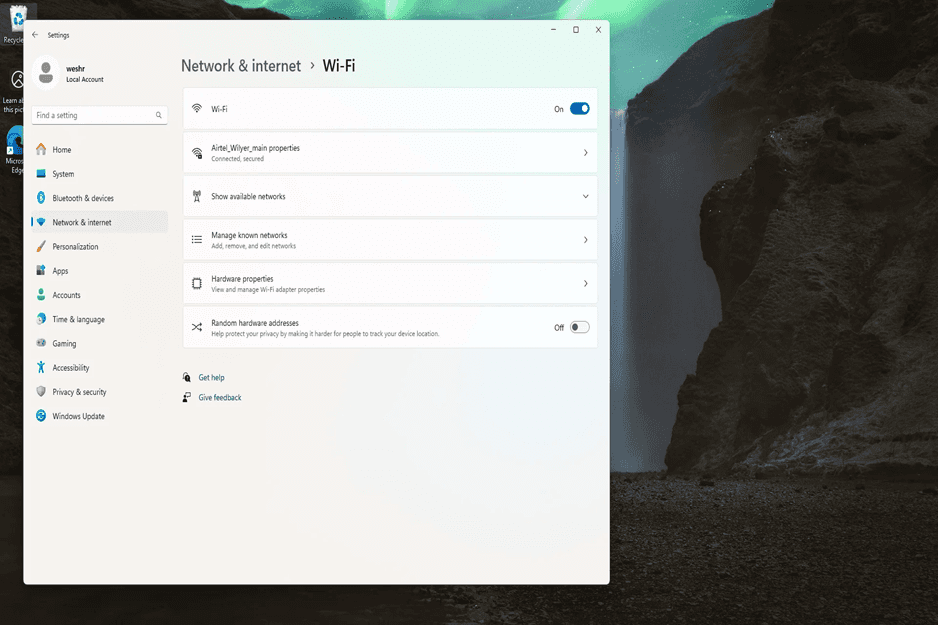
Make sure your windows PC is connected to a good network. With professional windows digital signage installations a wired Ethernet connection is preferred as the most stable one.
Step 4: Search for Your Browser
Go to the windows search and enter the browser in the search box to find your web browser. This will be applied to get the digital signage player app on Windows.
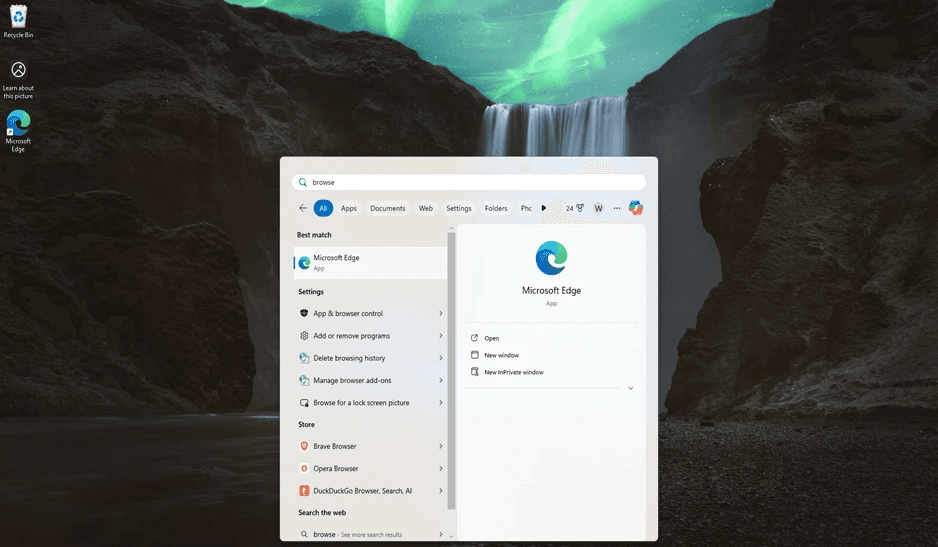
Any contemporary browser ( Edge, Chrome, Firefox ) can be used to download the windows digital signage player software.
Step 5: Open Your Browser
Click and choose a web browser of your choice. Microsoft Edge is already installed on WiN and is the best fit to this windows PC digital signage application.
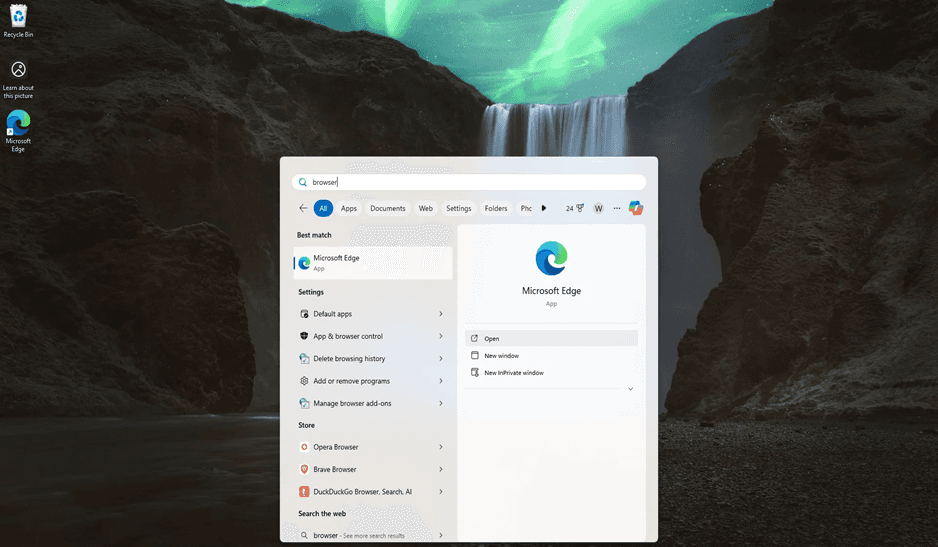
Your browser is now open, and you are now ready to download the Wilyer digital signage player for Windows PC.
Step 6: Visit Wilyer Signage Website.
Open your browser and go to app.wilyersignage.com. Wilyer is a top cloud digital signage CMS, based on windows that simplifies and makes PC-based digital signage both simple and slow.
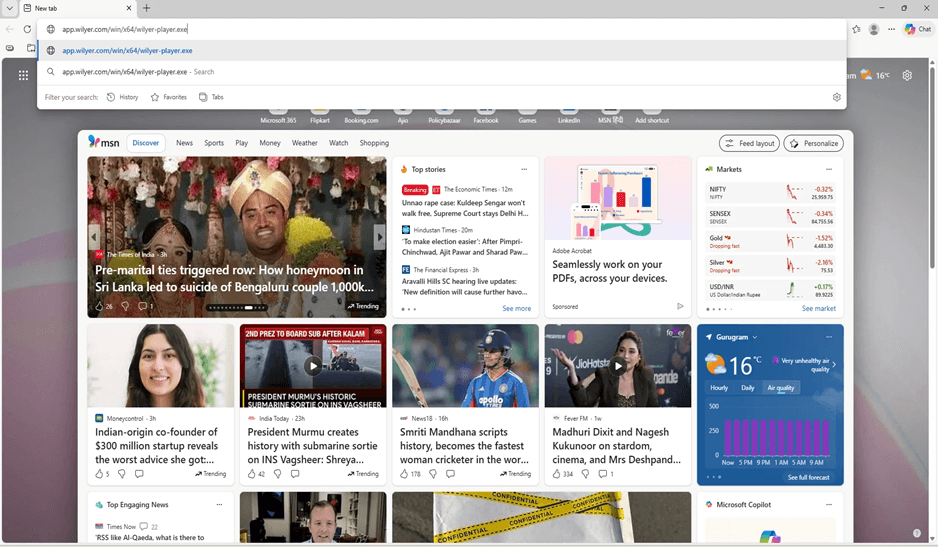
Wilyer Signage is an easy to use digital signage content management system with specific Windows PC signage optimization.
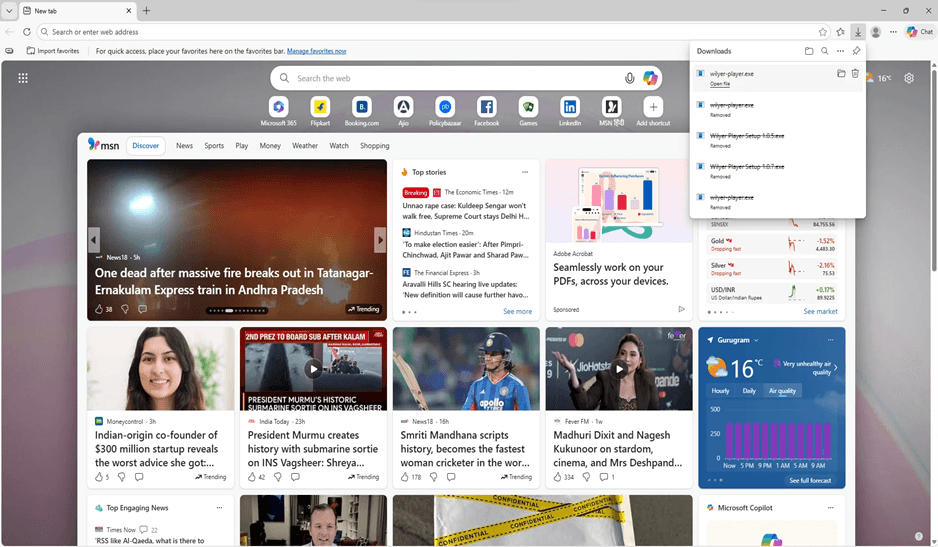
Step 7: Wilyer Player has been downloaded.
Find and choose the download button of the Windows digital signage player. The download size will be a file (wilyer-player.exe) that will be auto-saved in the Downloads folder.
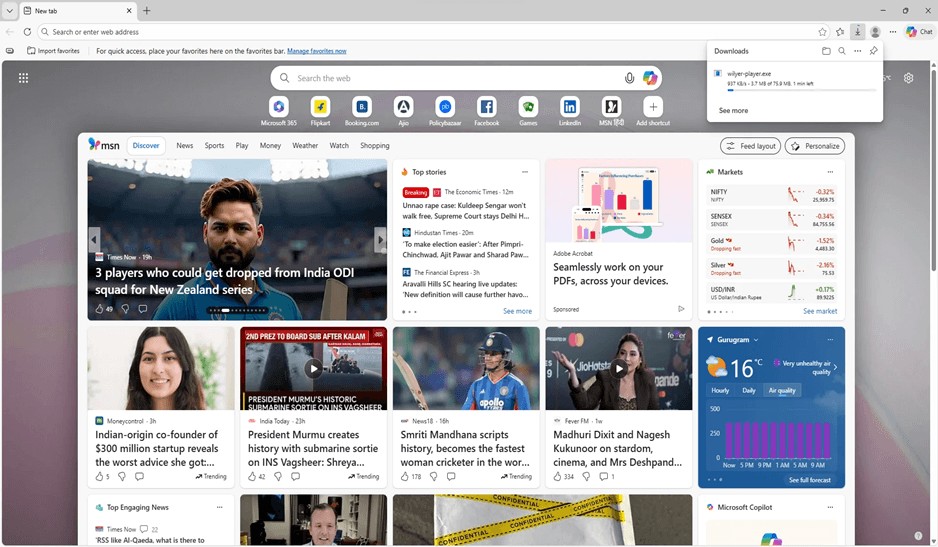
Step 8: Handle Security Warnings.
The downloaded file could carry a security alert on windows. Click the three dots then click on keep so that you will continue using your digital signage player with windows computer.

This is a default Windows security of downloaded programs. Wilyer digital signage is a Windows PC program that is totally harmless to install.
Step 9: Confirm Download
Click on Keep anyway to verify the download. This will enable you to continue with the installation of the windows PC digital signage player.
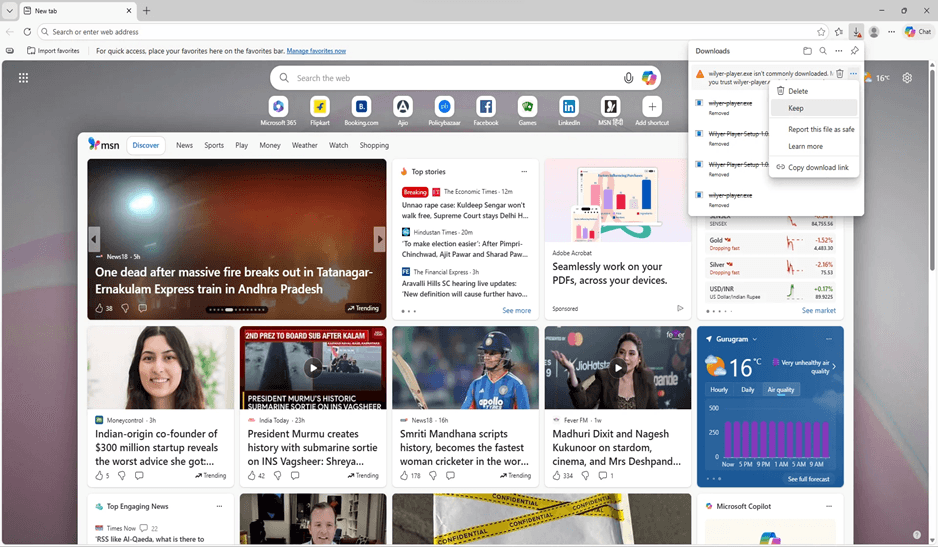
Upon confirmation, the digital signage player application should be all set up to be installed on your windows PC.
Step 10: Confirm the Security Warning.
Check the last security confirmation. This is windows defender smartscreen securing your PC. Keep repeating by clicking through to proceed with your windows digital signage system.

Count on this application because it is a valid digital signage software within Windows PC backdrop.
Step 11: Open Downloads Folder
Click on the Open file or click on a folder called Downloads to find the wilyer-player.exe file. This is your windows PC commercial digital signage installer.
The downloaded file is the key to your PC being converted to a digital signage display of Windows.
Step 12: Find Downloaded File.
Locate wilyer-player.exe at your Downloads. This is the Windows digital signage player application, which will run on your personal computer.
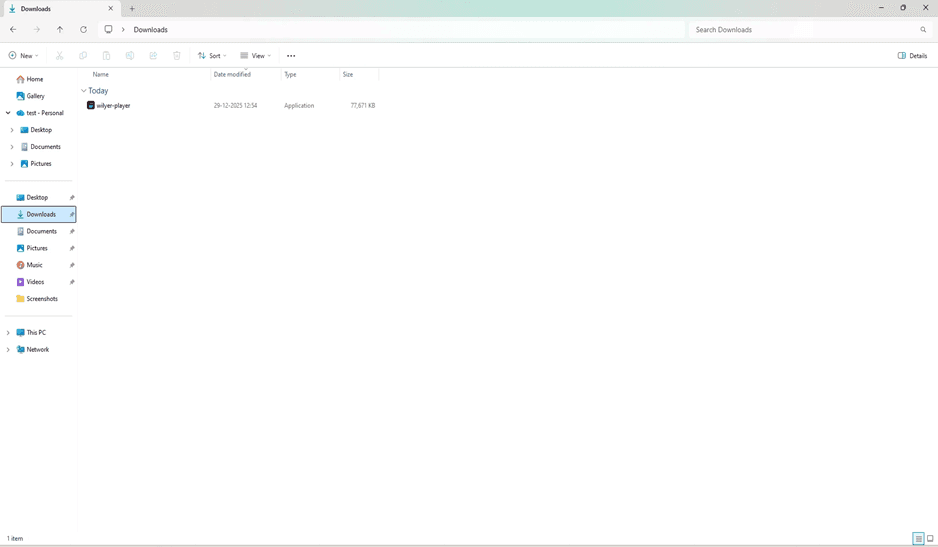
To install the windows PC signage, double-click the file.
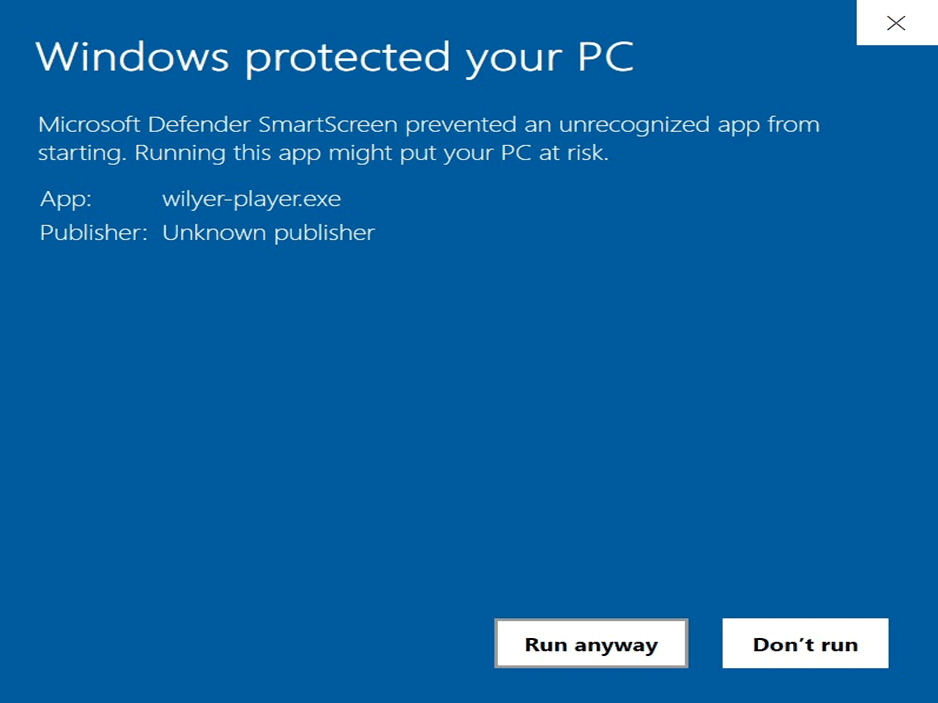
Step 13: Handle Windows Defender SmartScreen (First Warning)
Windows Defender SmartScreen may display an additional security warning stating that an unrecognized application has been blocked from running, as it could potentially put your computer at risk. On this screen, a link labeled “More info” will appear at the bottom, which can be selected to proceed with the installation.

If available, select “More info” to reveal the “Run anyway” option. Click this button to continue with the installation. These security prompts are standard for legitimate applications that have not yet established a broad installation history within Microsoft’s reputation-based security system.
Step 14: Handle Windows Defender SmartScreen (Second Warning)
When you run the installer, Windows Defender SmartScreen may display a warning stating “Windows protected your PC.” This message provides details about the application being installed (wilyer-player.exe) and identifies the publisher as “Unknown Publisher.” This is a standard security measure for applications downloaded from the internet.
Step 15: Run the Installer
The Wilyer Player setup will launch automatically. Follow the installation wizard to complete the setup and install the digital signage software on your Windows PC.
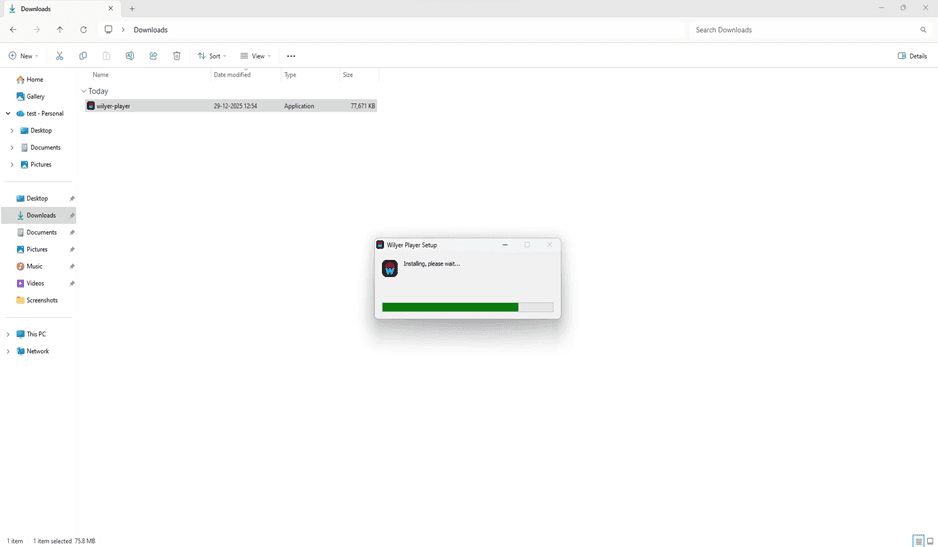
It takes a short time to install, and it is window-based digital signage, specifically formulated to be used with Windows PC.
Step 16: View the Pairing Code
Upon installation, the Wilyer Player will contain a unique device pairing code. This 6-digit code identifies your player of digital signage with Windows to your cloud dashboard.
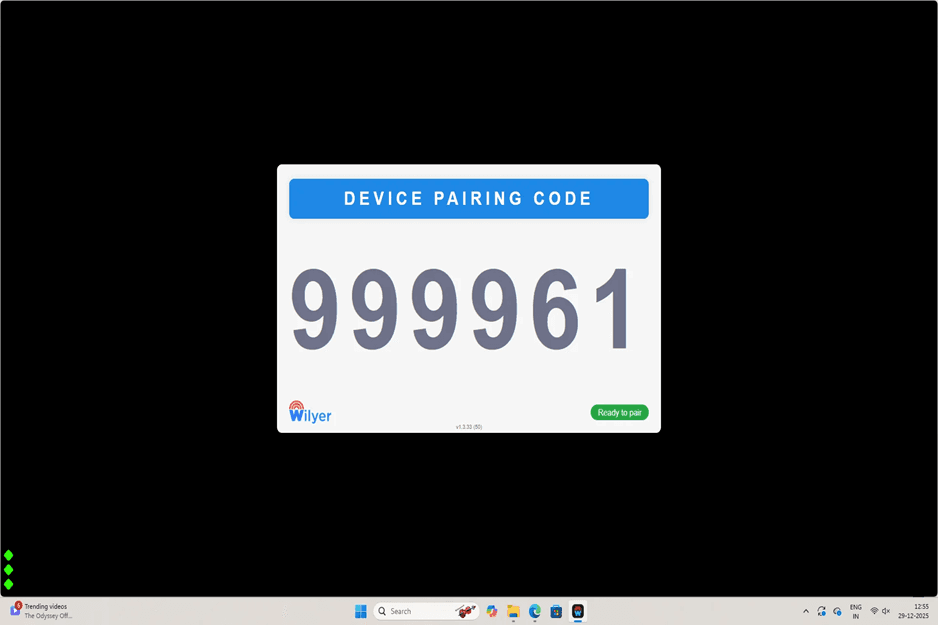
Prepare this pairing code - this will be required when registering your Windows PC as a digital signage player in the Wilyer CMS.
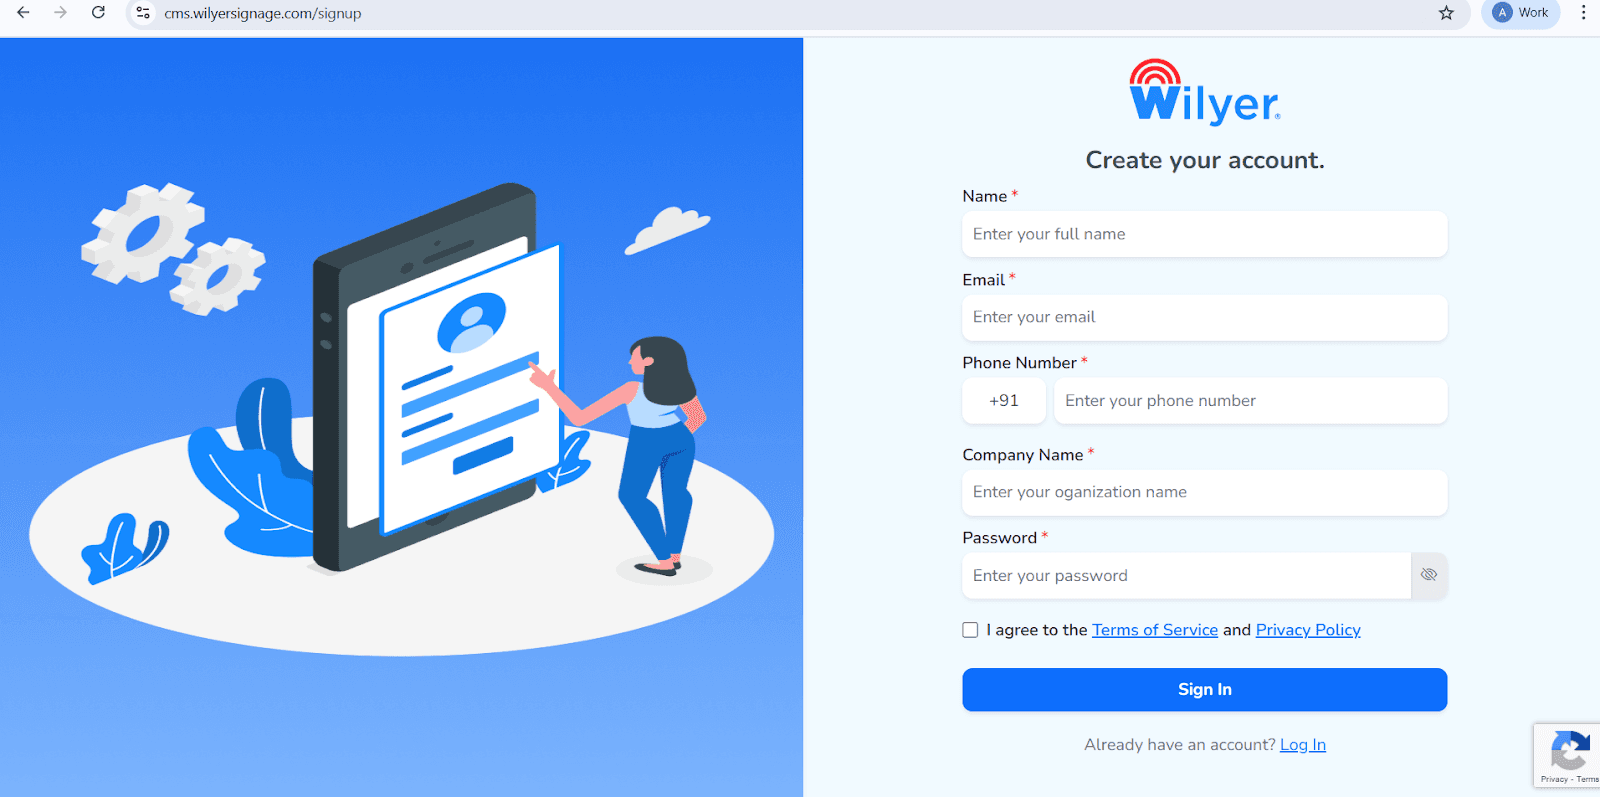
Open the Wilyer Registration Page
Access the official Wilyer Cloud CMS sign-up page to start creating your digital signage account.
Enter Your Full Name
Provide your complete legal name, which will be registered as the primary administrator of the signage dashboard.
Add Your Email Address
Enter a valid, active email address. This will be used for account login, verification, and official communications.
Provide Your Phone Number
Enter the mobile number linked to the account, including the correct international country code.
Enter Your Company Name
Specify your business or organization name to create a professional presence within the Wilyer platform.
Create a Strong Password
Choose a secure password to protect your Wilyer account and data.
Accept Terms and Privacy Policy
Review and agree to the Wilyer Terms of Service and Privacy Policy by selecting the checkbox.
Complete Registration
Click the blue “Sign In” button to finalize the registration and access the Wilyer dashboard.
Step 17: Log Into Wilyer CMS
Get your browser and sign in to your Wilyer Signage account as cms.wilyersignage.com. This is your online signage content management Dashboard to control all your windows PC players.
The windows PC management interface cloud digital signage enables you to manage the contents, schedules and settings remotely.
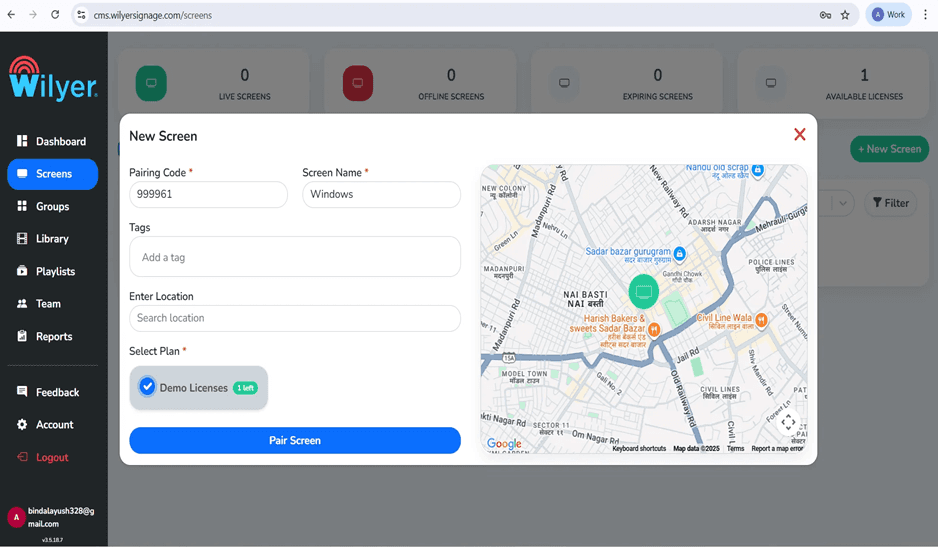
Step 18: Add New Screen
On the CMS dashboard, under the Screens section, press New Screen to register your windows digital signage display.
It is a windows PC signage management software with which you can control numerous digital signage players using a single dashboard.
Step 19: Enter Pairing Details
Insert the 6-digit pairing code of Step 14 and provide your screen with a descriptive name (e.g. Windows). Choose your plan and location, where necessary.
This matches your PC with the cloud digital signage platform, which allows remote control over digital display solutions on windows PCs.
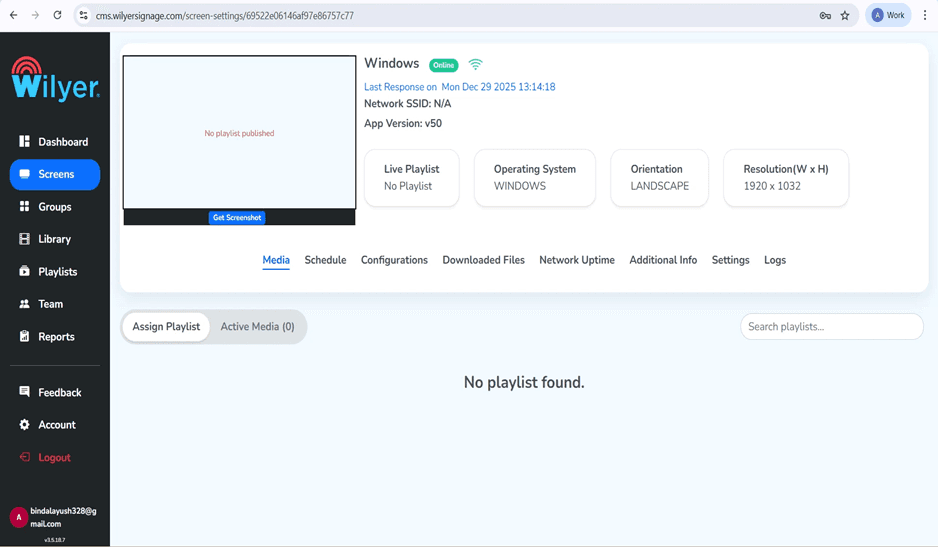
Step 20: Screen Settings configuration.
After matching, customize your windows digital signage screen settings such as orientation (Landscape), resolution (1920 x 1032) and other screen display settings.
These are settings that optimally tune your windows PC digital signage player to provide the optimal display on your display.
Step 21: Establish Location Information.
Use the scroll bar to set up location settings of your windows PC digital signage system. This assists in scheduling the content and analytics.
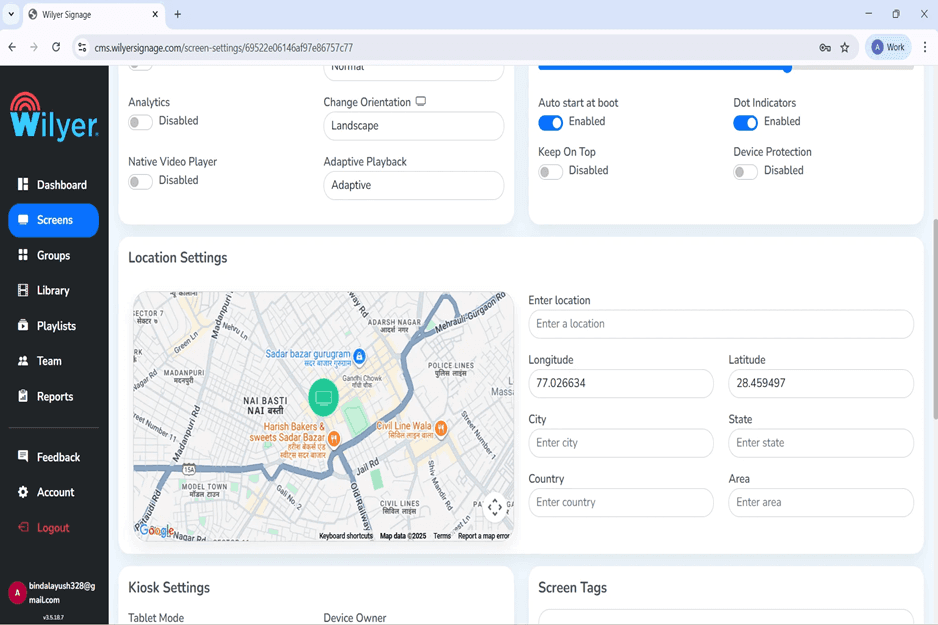
Positioning information allows the high-end capabilities of your Windows PC signage management software such as geo-targeted content.
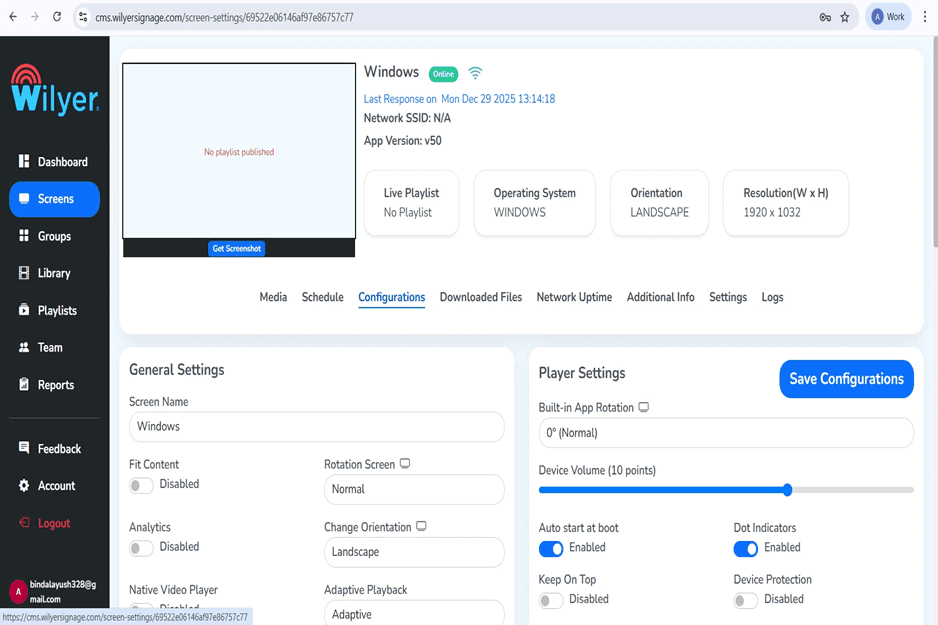
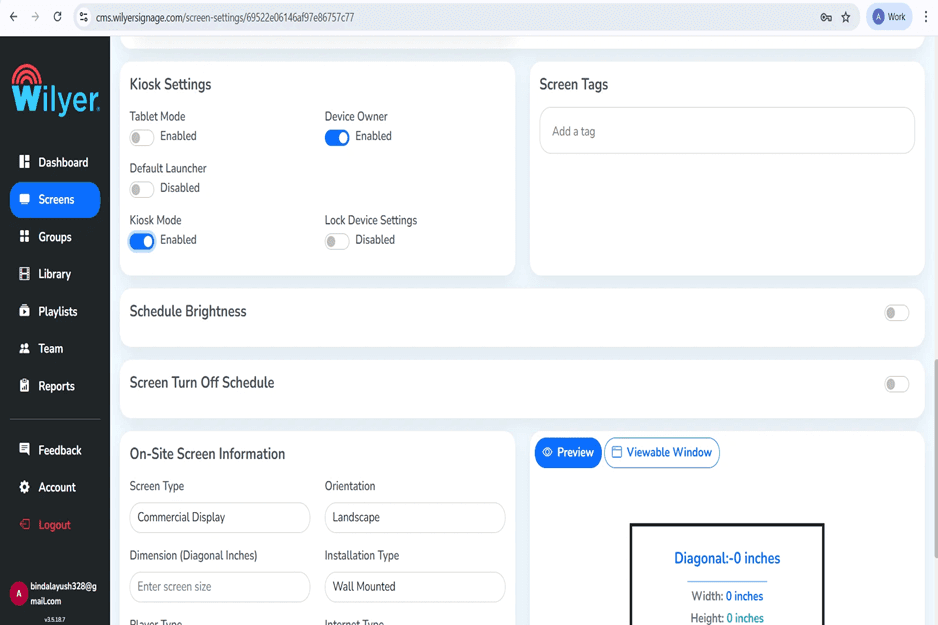
Step 22: Configure Additional Screen Options
Kiosk Mode is used to remove the system navigation bar and restrict access to device controls. When Kiosk Mode is enabled, the Wilyer Digital Signage Player runs in full-screen mode, hiding navigation buttons such as Home, Back, and Recent Apps. This prevents users from exiting the signage app or accessing other system functions.
Step 23: Finish Screen Set-up.
Look at the preview of a window that you are viewing that indicates your size. Click on the save configurations to complete your digital signage player settings in windows PC.
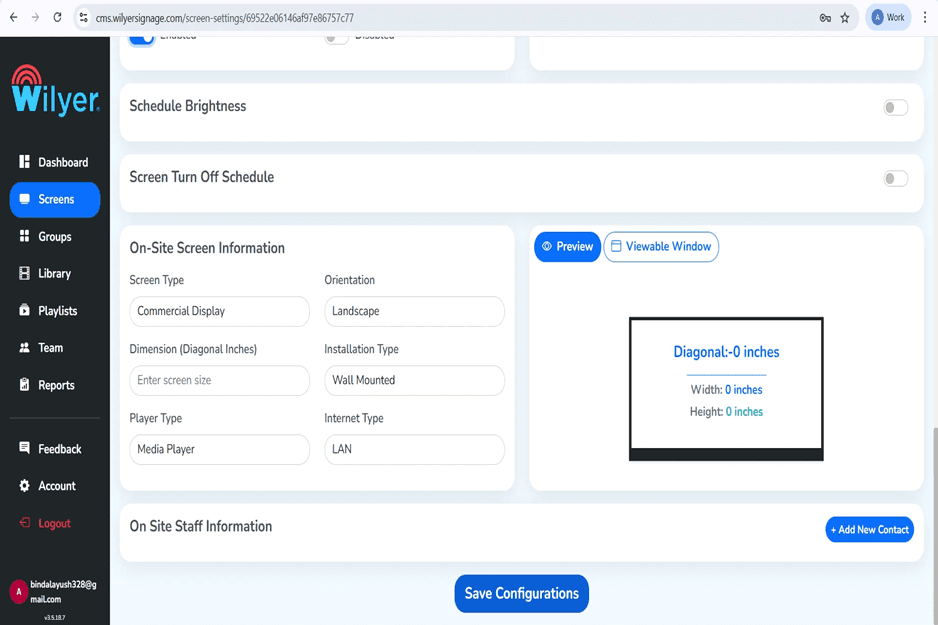
The preview window provides you with a precise view of what you can see on your digital signage display, which helps to check the proper configuration.
Step 24: Check Update of configuration.
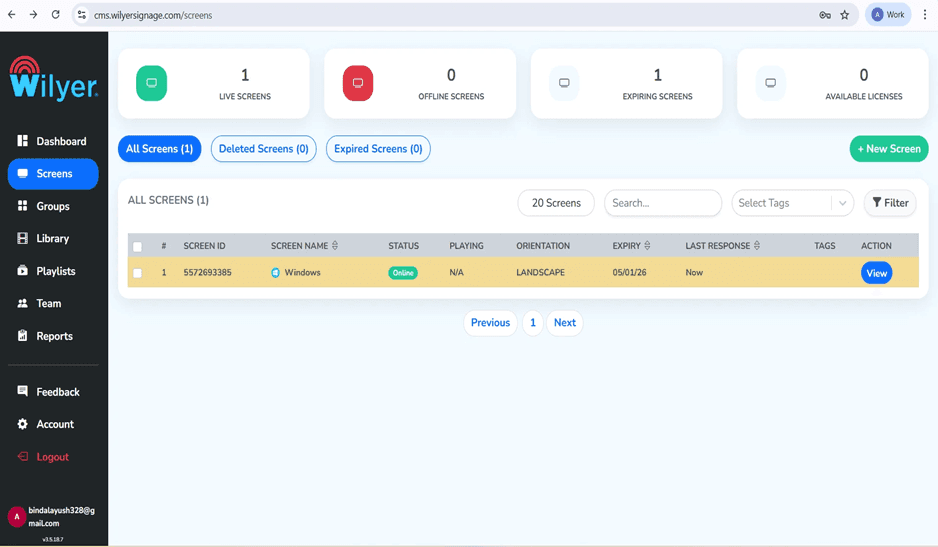
Once you have been able to click Save, you will be presented with a confirmation message: Settings saved successfully. Windows PC is successfully configured as a digital signage player.

Windows digital signage system is now prepared to accept and show content. Then you will make your initial playlist.
How to make and publish your first playlist.
After configuring your Windows PC as a digital signage player, it is high time to prepare content that will appear on your screen. The Wilyer CMS allows building of enjoyable playlists including images, videos and dynamic content easily.
Step 25: Create a New Playlist
Go to the playlists section of the Wilyer CMS, and click on the + New Playlist before beginning to create your digital menu board or promotional content.
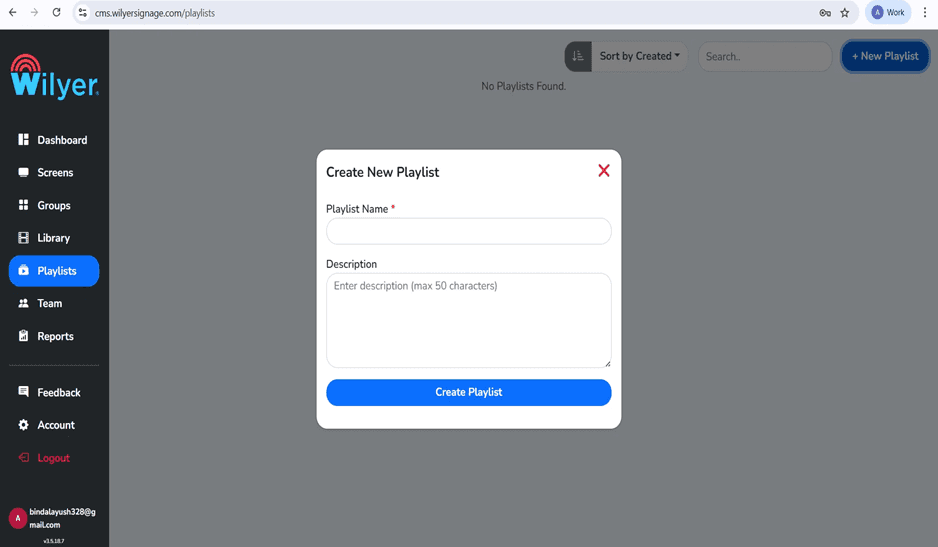
The Windows digital signage is based on playlists. They enable you to plan and arrange various pieces of information.
Step 26: Name Your Playlist
Name your playlist (e.g. Windows) and you can also give it a description. It assists you in arranging several playlists in your windows PC signage management software.
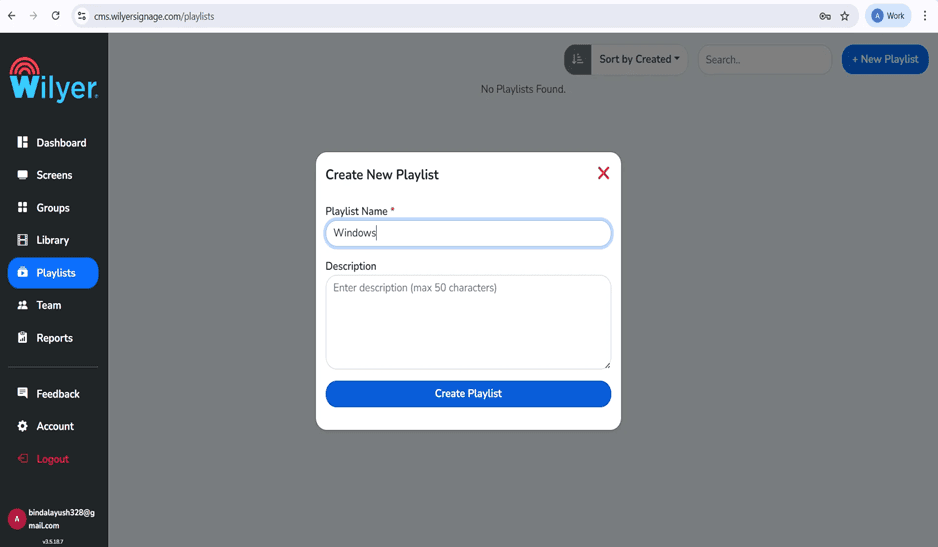
Clarity in naming conventions come in handy, when you have a number of playlists to different locations or purposes in your windows digital signage network.
Step 27: Select Your Playlist Design.
When you have created your playlist, then you can find the playlist editor where you can select your layout design. Select Vertical, Horizontal or Custom layout. It is also possible to have numerous layouts of content structure.
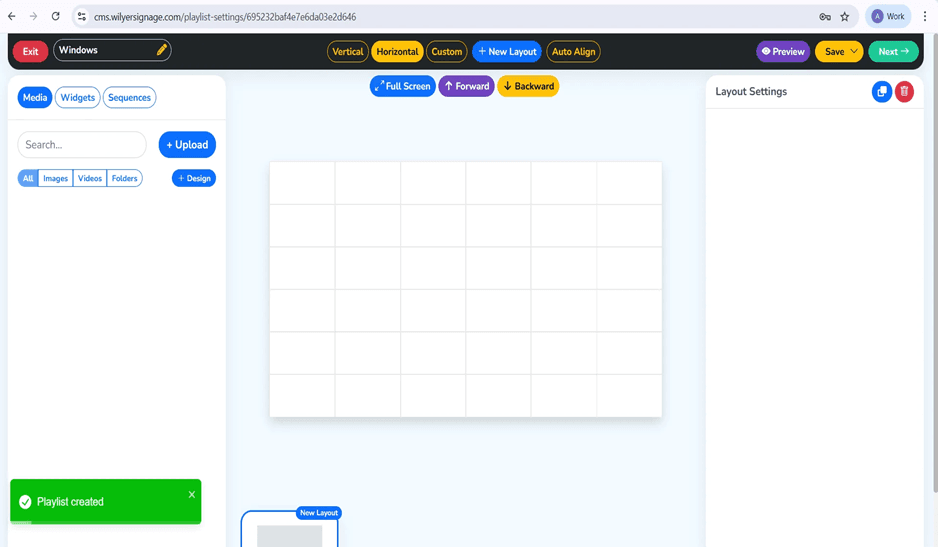
The playlist editor interface also offers drag and drop activities to easily manage contents in your windows computer digital signage display.
Step 28: Add Content to Your Playlist
Add media to your playlist, either by choosing it by your library or uploading new media. In the present case, we have incorporated a poster of a professional jazz music event to showcase the visual power of windows digital signage software.
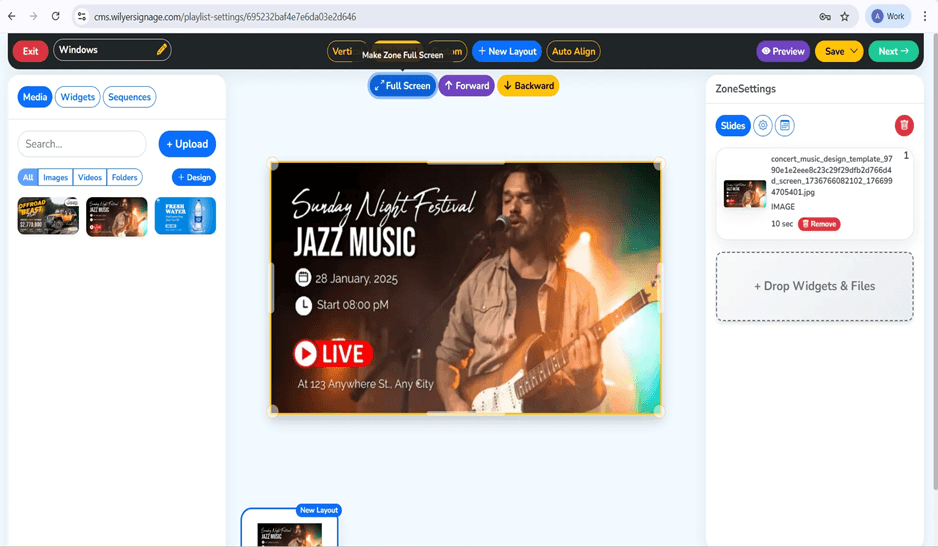
The Wilyer CMS also allows different types of content such as images, videos, web pages, and widgets - ideal in the creation of dynamic-style digital menu boards on Windows PC.
Step 29: Prepare to Publish
After being content with what you are doing, press the 'Next' button to get to the publishing screen. It is the place where you will choose your playlist for your Windows digital signage player.
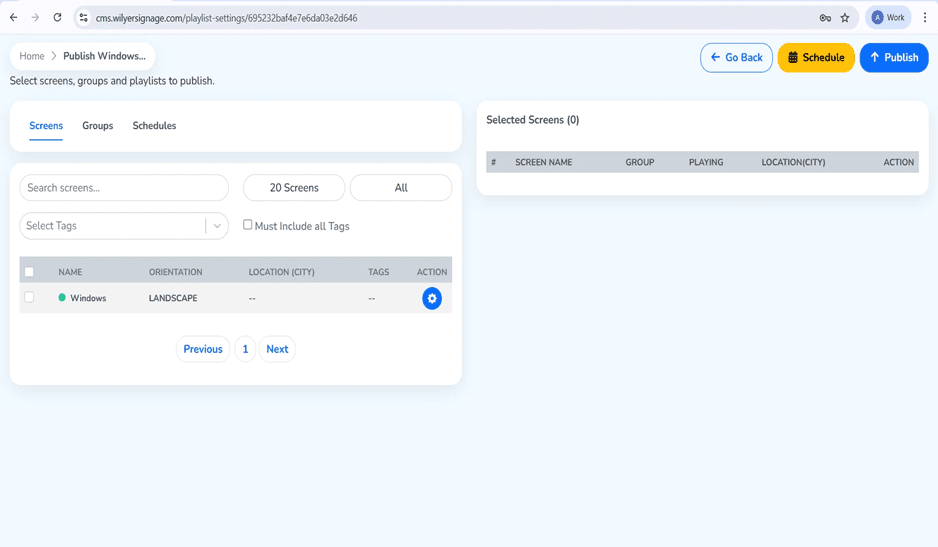
The publishing interface enables you to manage what screens are used to show your content so it is simple to manage a number of windows PC digital signage displays using a single dashboard.
Step 30: Select Target Screen
Check the box alongside the windows screen you had arranged earlier. When you have a bigger windows digital signage network you can post to many screens at the same time.
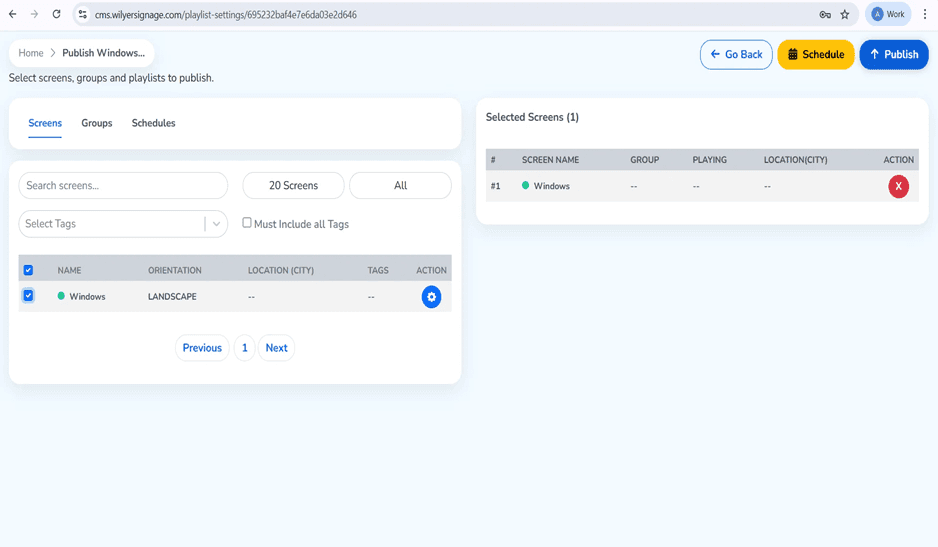
All your preferred displays are displayed in the selected panel of screens. The cloud-based digital signage of Windows PCs solution enables management of the content to be centrally located in all the locations.
Step 31: Confirm Publishing
Click on the publish button and verify when it asks to confirm whether you want to publish or not. This will be transmitting your content to the Windows PC digital signage player.
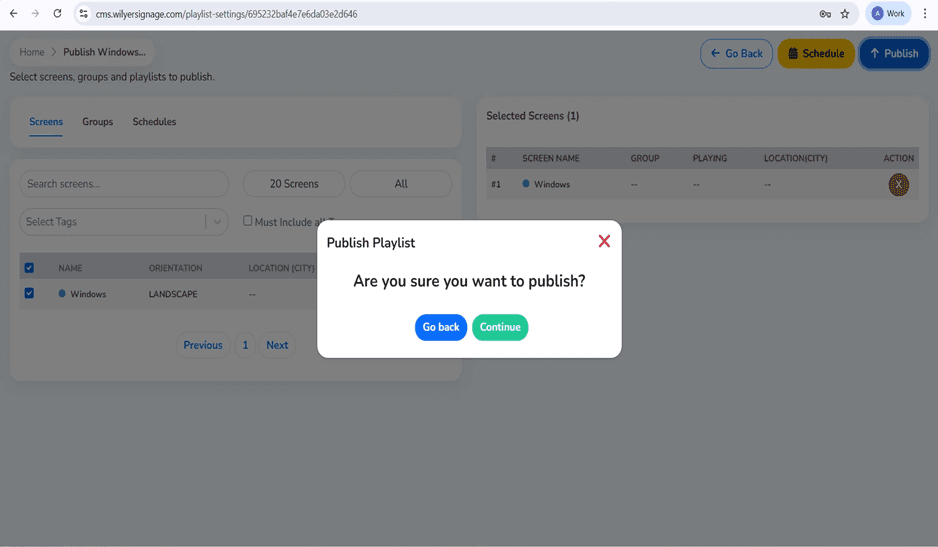
The confirmation box is in place so that you do not accidentally post unfinished texts to your windows digital signages.
Step 32: Playlist delivered in Monitoring.
Once it has been published, the Playlist Report will display delivery status. The dashboard shows file transfer progress (71.68 KB / 71.68 KB) which proves that what you are sending is being transferred to the Windows PC.
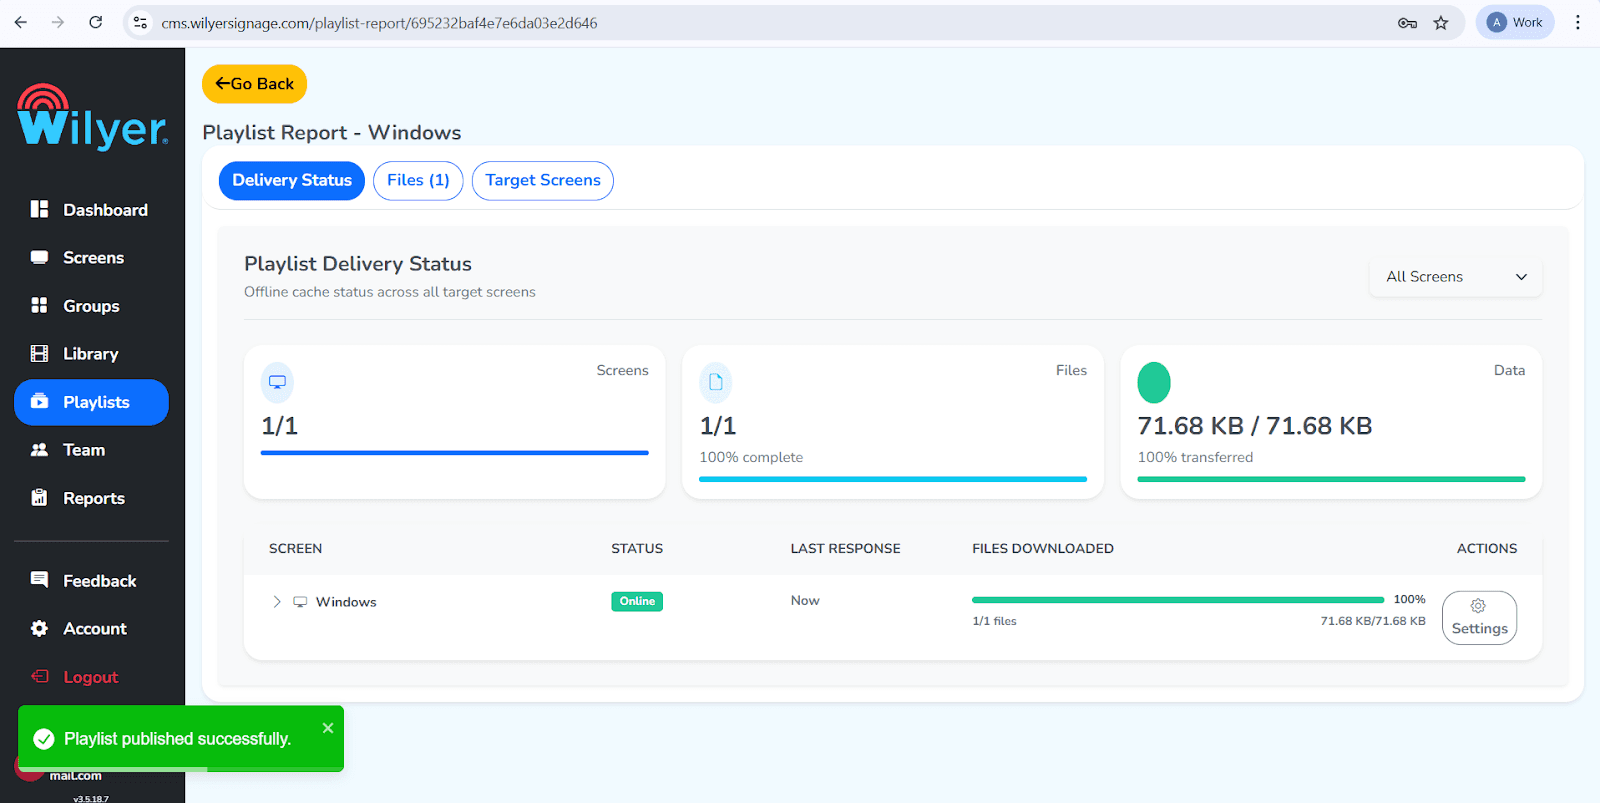
Your Windows digital signage player is operating at full capacity as shown by the delivery status which shows that 1/1 screens are online and 1/1 files have been transferred successfully. This is confirmed by the success message that the playlist is published successfully.
Final Step: Content Now Playing
It is now being shown on your windows PC digital signage! The poster on jazz music festivals is displayed in a full-screen mode where professional quality can be attained using PC-based digital signage.

Congratulations, You have managed to install a full digital signage using Windows, including installation until the content is shown. Your windows PC is now operating as a professional digital signage player and it can now interact with your audience in a dynamic manner.
Conclusion
The conversion of your Windows PC into a digital signage player is an affordable way to create professional outcomes and use specific hardware without spending a lot on it. When using the cloud digital signage platform of Wilyer Signage, you can access the features of an enterprise such as remote management, scheduling of content and multi-screen coordination at a rather low price level.
Is it a single digital menu board setup on windows PC or a multi-location windows digital signage network, this entire guide has given you all the steps to be successful. Since you can now set up and operate a professional Windows PC digital signage system because you already know how to initial install and configure it, you can also easily create interesting playlists and publish content.
Windows PCs are of great asset to any business that plans to apply professional digital signage solutions since the PC-based digital signage is flexible and has a powerful cloud management. You can use your Windows digital signage player to deliver reliable services over the years with proper configuration and maintenance.

Multi-Platform Compatibility for Every Digital Signage Display
Run Wilyer’s digital signage software on your preferred operating system with zero hassle.
