


Panasonic Displays
How to Use Panasonic Pro Displays for Digital Signage
Step-by-step setup guide for Panasonic Pro Displays in digital signage environments.
Introduction
Panasonic professional displays are one of the most reliable and able commercial based screens that can be deployed across the globe with digital signage. Designed as 24/7 operating displays with high brightness and adaptable connectivity, these displays are the best hardware platform of any professional signage network, whether it is one display in a retail store or hundreds of displays in a national chain.
This tutorial will go through the entire process of resetting, configuring and using the Panasonic Pro Display in digital signage. All the steps have real screenshots of what appears on the display interface and therefore you can proceed and follow up without fear of your technical capability. The workflow under this area consists of:
Knowing the first screen and being in the settings menu
A factory reset (System Reset) in order to get the display to defaults
The first time setup wizard that consists of 5 steps.
Connecting the display to the Wi-Fi network and setting the right time zone.
Deployment and installation of digital signage CMS application
Give authorizations and choose the appropriate home app.
This guide will take you through all the steps required to install new screens whether you are a technician or an IT administrator who is re-provisioning a fleet of displays or a business owner who is installing his own in-store signage.
Part 1: Understanding the Display Starting state
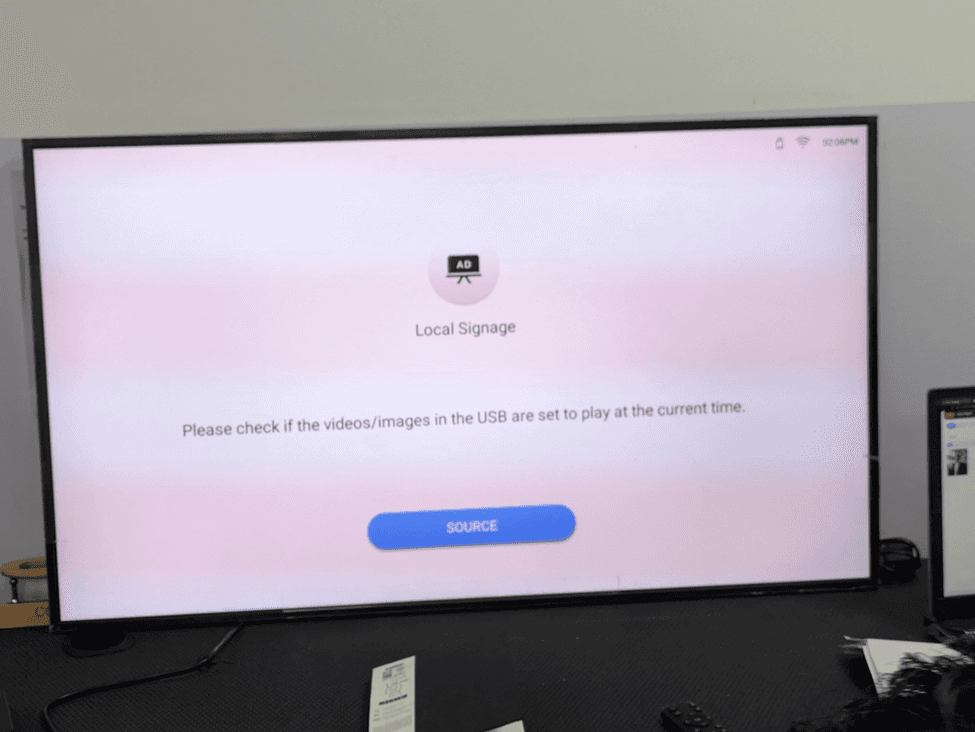
Step 1: The Local Signage Screen
A Panasonic Pro Display shows the Local Signage idle screen when it is switched on, and no scheduled content source is attached. This is the default position of the screen when no USB media is loaded, no active CMS contents are running or no HDMI source is found at the set time.
On the screen, the icon of AD displays itself, the label “Local Signage,” and the following message is presented:
Please confirm whether the videos/images in the USB are supposed to play at the present time.
There is a blue source button in the bottom part of the screen, which you can press manually to change the other input. The upper-right hand corner of the screen has the current time (2.06 PM here,) a Wi-Fi icon and a USB/Storage icon that indicates the presence of the displays in operation.
The screen will verify that the display hardware has been started, and it is being used correctly. In case you encounter this screen, then it is usually something to the effect of:
There is no content that is scheduled to run at the present time in the CMS.
The USB is inserted and the content schedule is not aligned with the time.
The pain has not been matched with a CMS application yet.
It is a newly opened or re-conditioned display that is pending the first installation.
It is based on this point that we shall go out to the settings menu to start the configuration and set up process. The remote control has a button called settings or Menu, which must be pressed to continue.
Part 2: Navigating the settings Menu
Step 2: Opening the setting panel (Picture Menu)
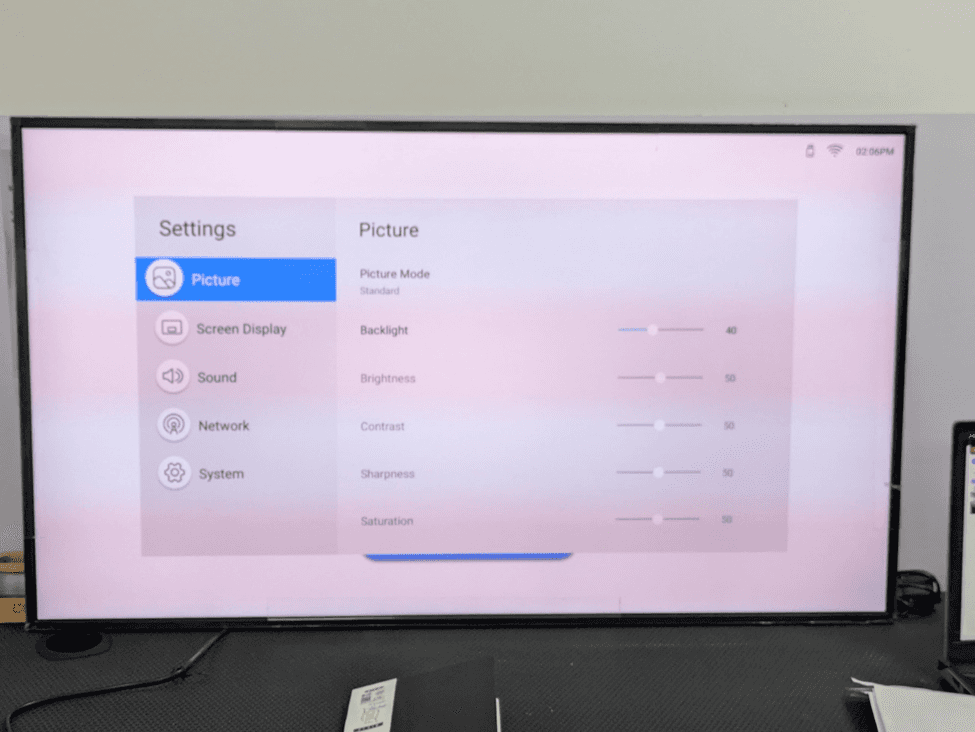
Push the setting button on the remote control. The left side bar has the picture section selected as default, which on the right hand side opens the settings panel. The left navigation has five subcategories.
Image: Set visual output quality
Screen display: adjust aspect ratio, zoom, display formatting
Sound: Audio output and equalizers
Network: WiFi, Ethernet and remote management setup.
System: Device setup, reboot and advanced settings
The picture panel on the right displays the current values of such settings as picture mode is set to standard, Backlight is set to 40 (it can be adjusted through the slider), Brightness to 50, Contrast to 50, sharpness to 50 and saturation to 50. The default values are below the factory settings.
In a bright retail or business location, to have digital signage, you will normally want to use the backlight of 80-100 to make the content readable at some distance. But in our case with this walkthrough we are going to the system menu and do a factory reset in the first place. You should go down to the left sidebar and go to the system.
Step 3: Navigate to the System Menu
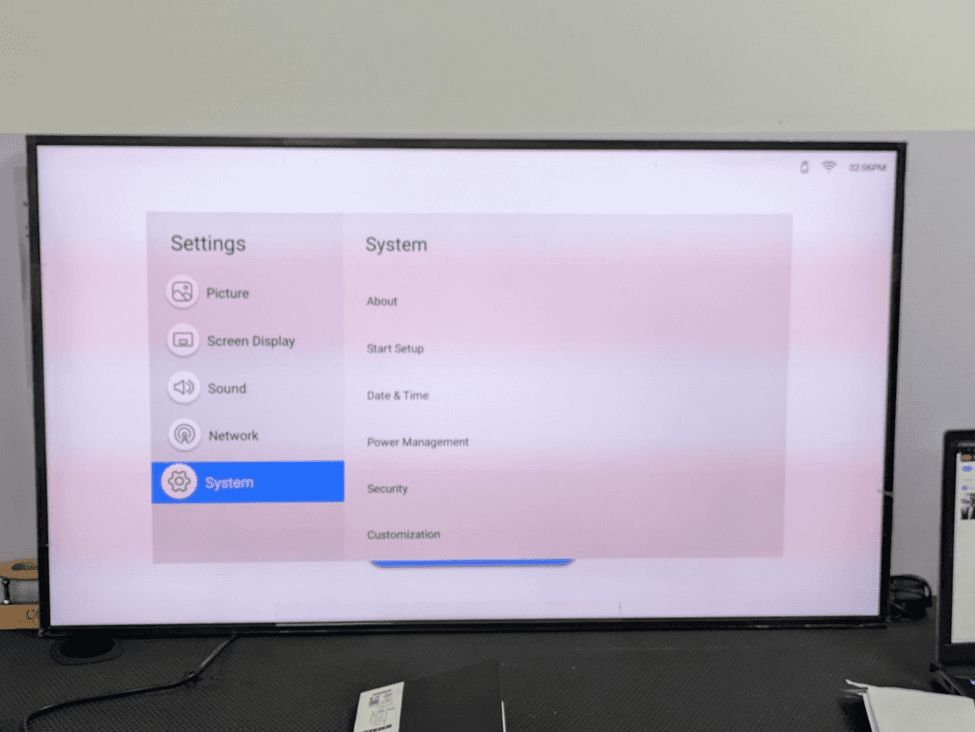
In the left sidebar, click on System, The right panel is updated to show the system sub menu that has the following options:
About - See device model, firmware version, and hardware information.
Restart Environment - Restart the original set up wizard
Date & Time - Set system clock, time zone and NTP
Power Management - Set power on/off times and set standby behaviour.
Security - Set or change the system PIN and access control settings
Customization - Adjust display branding and auto-launch application settings.
Use the Scroll down in the system panel to bring up other options such as PC Connection settings, Upgrade system and system Reset. To perform this walkthrough, we have to scroll down to get to system Reset.
Step 4: Locating the system Reset Option
Keep on rolling the system panel down. The lower section of the menu indicates:
Power Management
Security
Customization
PC Connection settings
Upgrade system
System Reset (highlightened in blue bottom)
On the right side of the screen, there is the description panel of the item that is chosen. Under system reset with a blood type, it says: It will delete all information in your internal storage, including: system, app data and settings, etc.
This is the option we need. The first step when configuring a display that has been used or configured before is always performing a system reset as it provides a clean slate and gets rid of any legacy settings or applications that might interfere with the new deployment.

Part 3: Performing the Factory Reset
Step 5: Entering the security pin
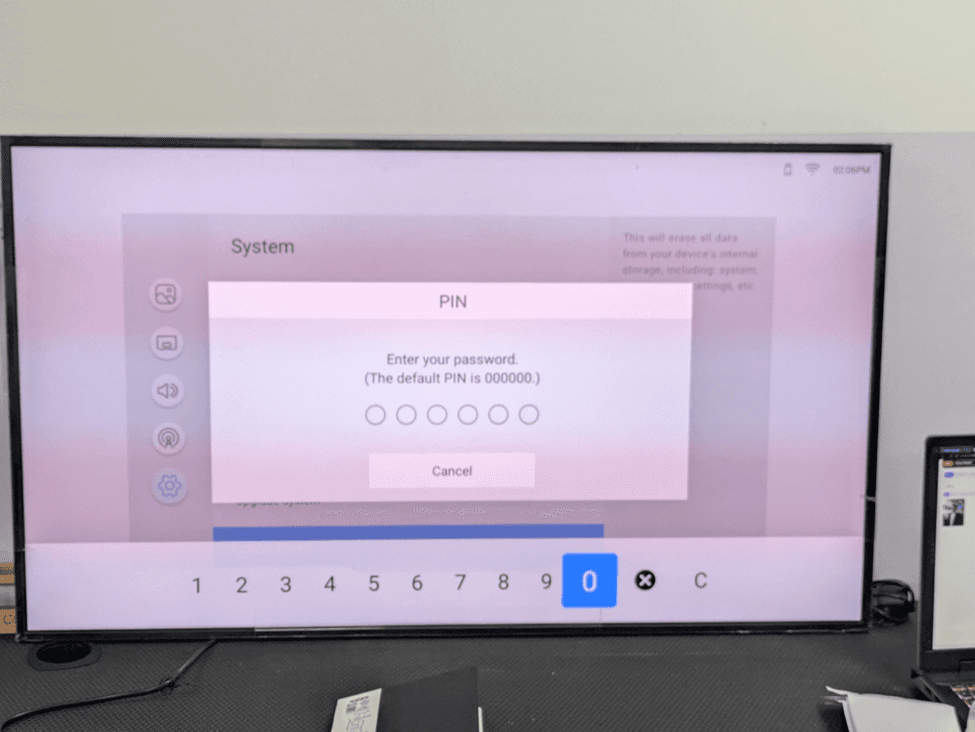
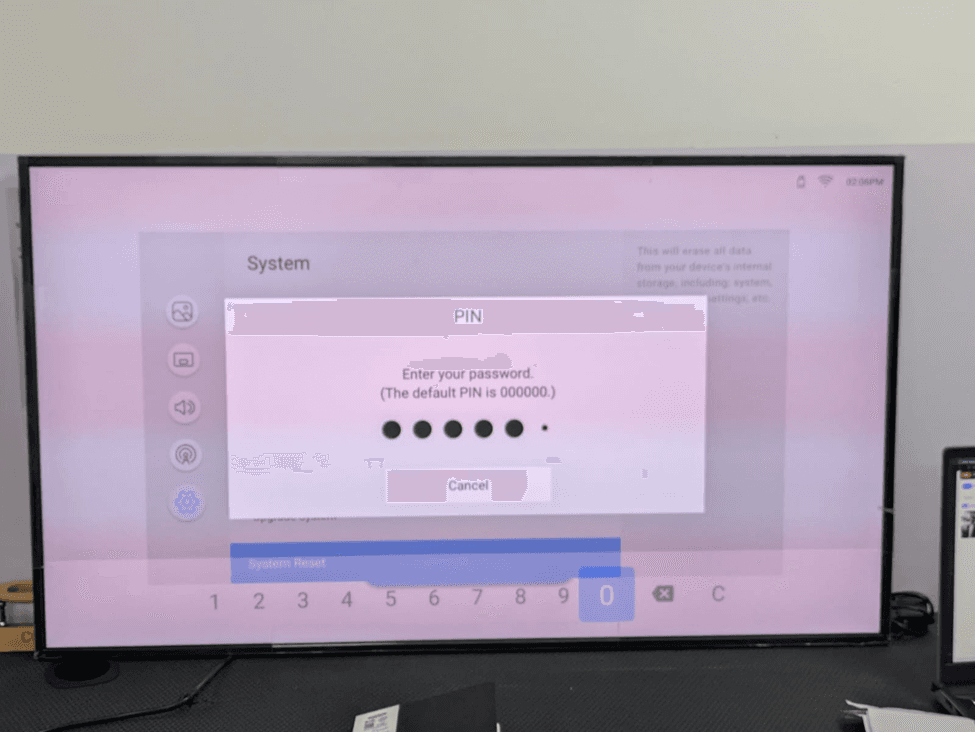
Click on the remote button, System Reset. To avoid unintentional or unauthorized reset, a PIN entry dialog is immediately shown. The dialog reads:
“Enter your password. (the default Pin is 000000)”
It features a 6-circle input field, and a numeric keypad at the bottom of the screen (0-9, a back space button denoted by, and a clear button denoted C). The keypad is blue in the number 0, so it is the default active selection.
You use the arrow keys on your remote to go through the on-screen keypad and press on OK to choose each number. The default factory PIN has six zones. “000000”
Notice: In case the PIN was altered by the former administrator, and you are unfamiliar with the PIN, you will either have to contact Panasonic support or perform the hardware reset, found in the product service manual.
Step 6: Finishing the PIN Entry
With every press of each 0 on-screen keypad, you will be alerted by a solid black dot in the PIN input field, which in turn will ensure that the right number has been entered. Keep going on with the filling of the six circles.
After the PIN is typed in, all six digits, the system automatically confirms the PIN - no additional confirm button has to be pressed. When the PIN is correct, the dialog will automatically move to the system Reset confirmation screen. In case of an incorrect PIN, the dots clear and one will be asked to retry.
Step 7: First Reset Confirmation
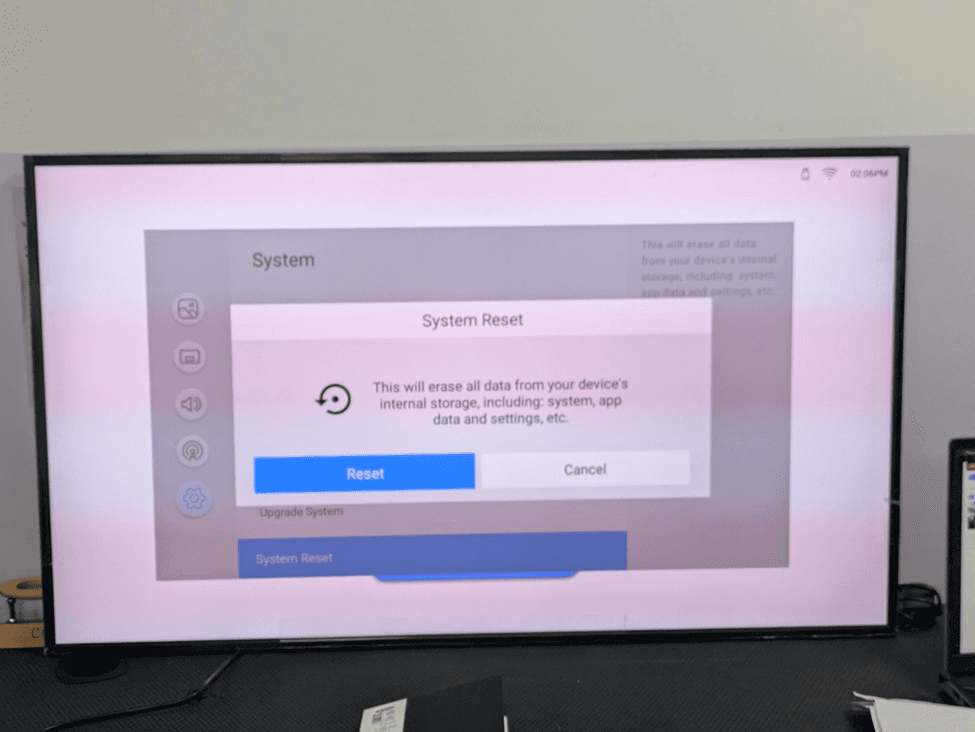
Once the PIN is verified, a dialog box of system reset is displayed. This is a confirmatory screen of the first of two, which will ensure loss of data is prevented. The dialog presents:
A reset/restore confirmation
Message: This will destroy everything in your internal storage of your device, such as: system, app data and settings, etc.
Reset button: Continues with the factory reset
Cancel Button: Cancels the operation and goes back to the system menu.
Press the blue button named Reset to ensure that you want to do the factory reset.
Step 8: Final Irreversible Confirmation
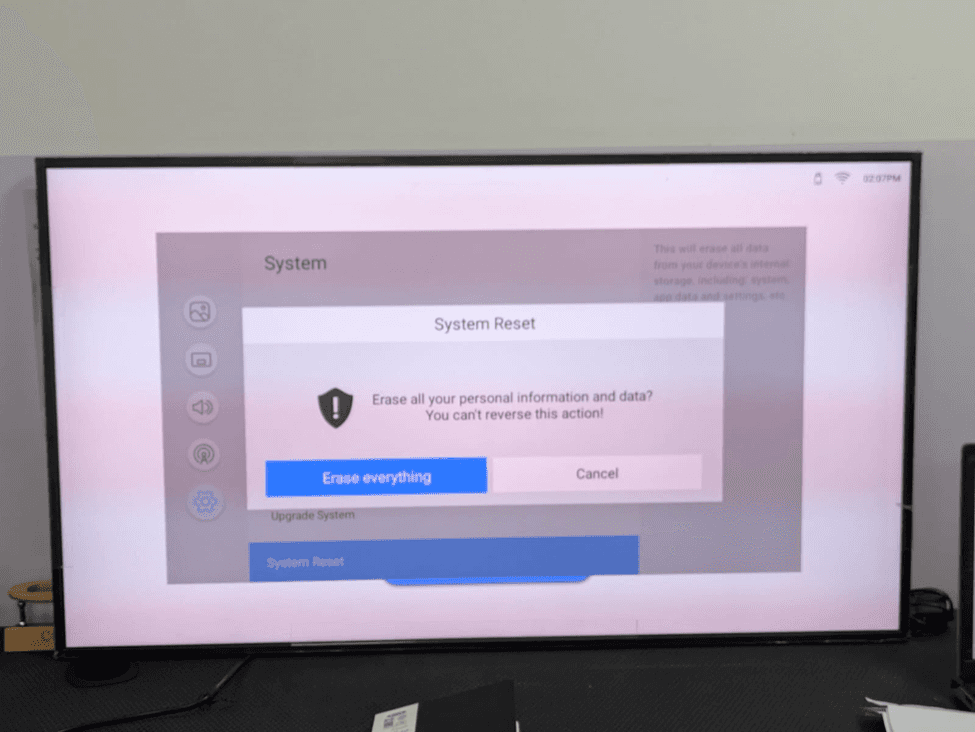
A second more forceful confirmation dialog comes up. It is the last protection before the irreversible reset will start. The dialog displays:
A warning shield icon
Message: “Destroy all your personal information and data? You can’t reverse this action.”
Erase Everything button (solid blue) - Confirms and begins with the rest.
Cancel (White) button - Cancels and takes one back to the previous screen.
This is a two step confirmation process that would not be able to wipe the data accidentally. After clicking on the Erase everything, all the applications installed, configurations, network settings and contents on the device will be erased forever and will be removed from all of the internal drive. Still, click on Erase everything.
Step 9: Factory Reset Underway
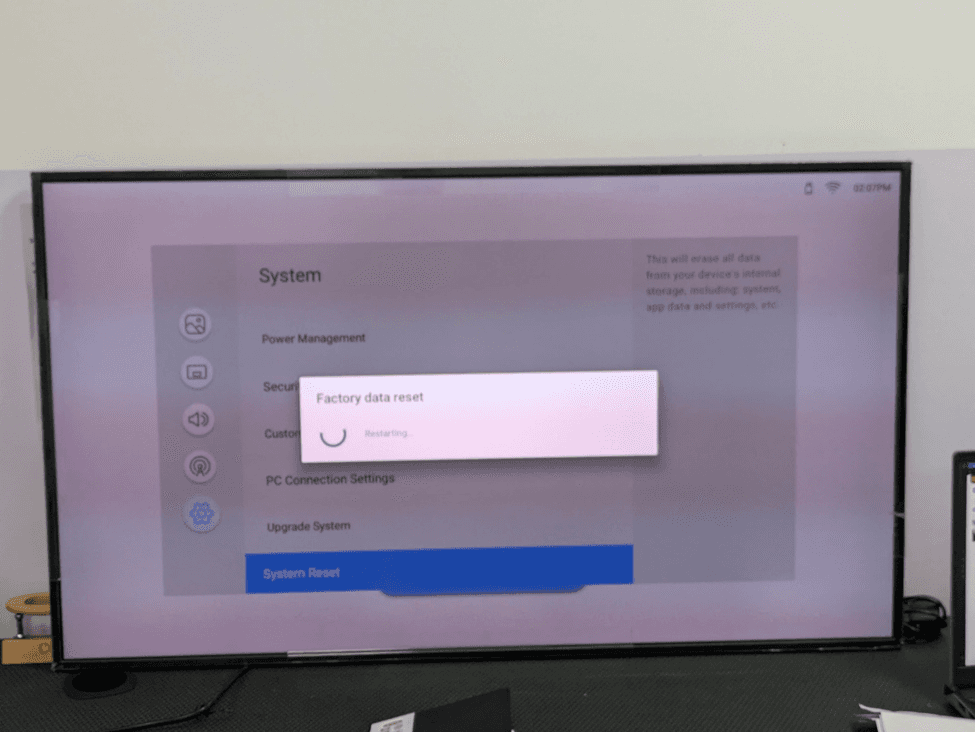
Once confirmed the display then starts the factory data reset process. The loading dialog is added in the middle of the screen with the text of Factory data reset and an indicator of progress that spins. In the sub-text, it shows Restarting means that the device is in process of deleting its internal storage and it's about to restart.
It normally consumes 30, 90 seconds to complete according to the quantity of information stored in the machine. During this time:
Do not turn off the display - breaking the reset may corrupt the firmware.
Keep on USB drives that are connected.
Do not press any buttons on the remote or the display panel
When the reset is done the display will automatically restart and start the first-time setup wizard.
Part 4: Completing the First-time Setup Wizard
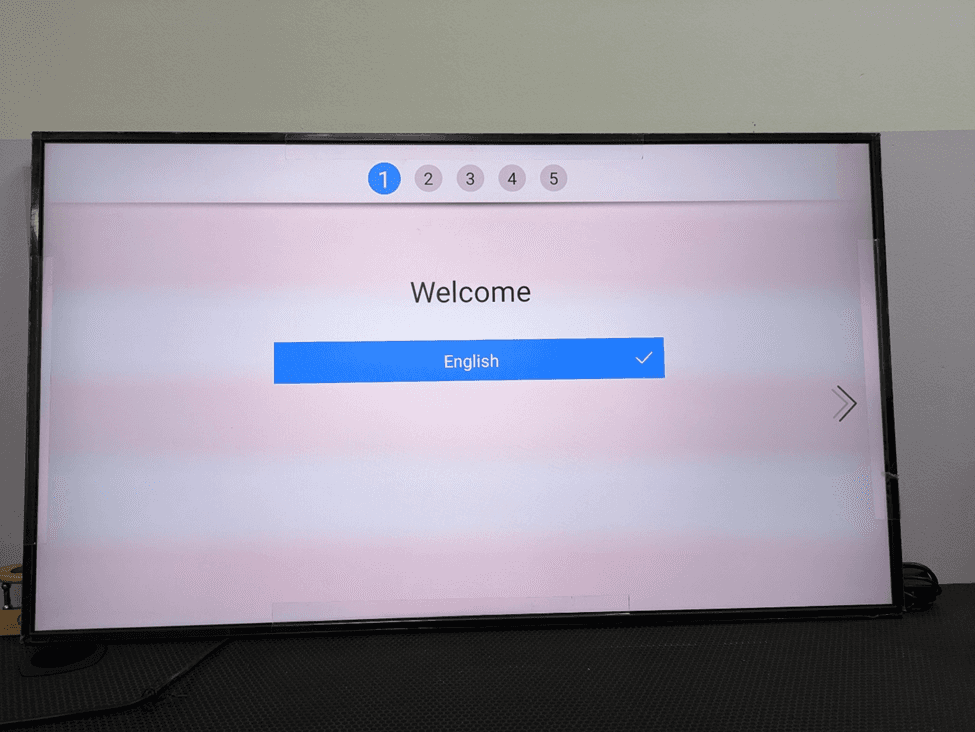
The display opens the first-time setup wizard of 5 steps after the factory reset and automatic reboot. The magician takes you through the basic setup needed before you can use the display to do digital signage. Numbers are placed on the top of the screen to indicate the five steps. The steps that have been completed have a checkmark () icon.
Step 10: Welcome : Select Your language
The wizard begins with the welcome screen (stepping 1 out of 5). This screen gives you the option of the system language through which the display interface and menus will be displayed. The option of english is pre-checked and marked in the blue color with a checkmark of the selection.
In case you have to switch the language, you can use the arrow keys to scroll up or down through the options (e.g., it can be French, Spanish, German, Japanese, Arabic, etc.) after choosing the language you want, press the right arrow (>) on the right screen or the forward functionality button on the remote control to move to Step 2.
The language chosen in this case will be employed in all the OSD menus of the display and any on screen message.
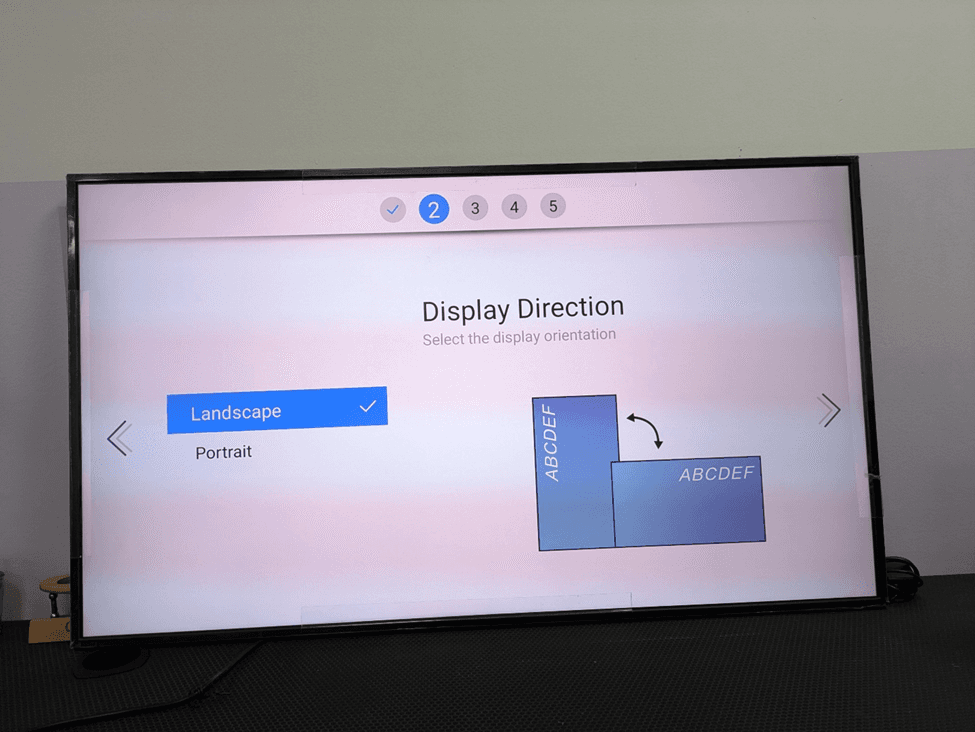
Step 11: Display Direction: Orientation Selection
The setup wizard step 2 will ask about the physical orientation of the display. Two options are presented:
Landscape (default) - Horizontal run of the ground, this would be used in most digital signage applications such as in retail, corporate, hospitality, and transportation.
Portrait - This is a vertical orientation application, and is used in menu boards, wayfinding, fashion retail, corridor displays, and kiosk style installations.
Landscape is already pre-selected. An illustrative visual model on the right hand side of the screen depicts the two orientations with label ABCDEF to indicate how the content in both modes rotate. When you are installing the screen in a vertical position, you can choose the option of portrait first and then continue with the rest as this will make the display output to be 90 degrees to the actual installation.
After verifying that your orientation has been carried out, press the right arrow and you will proceed to Step 3.
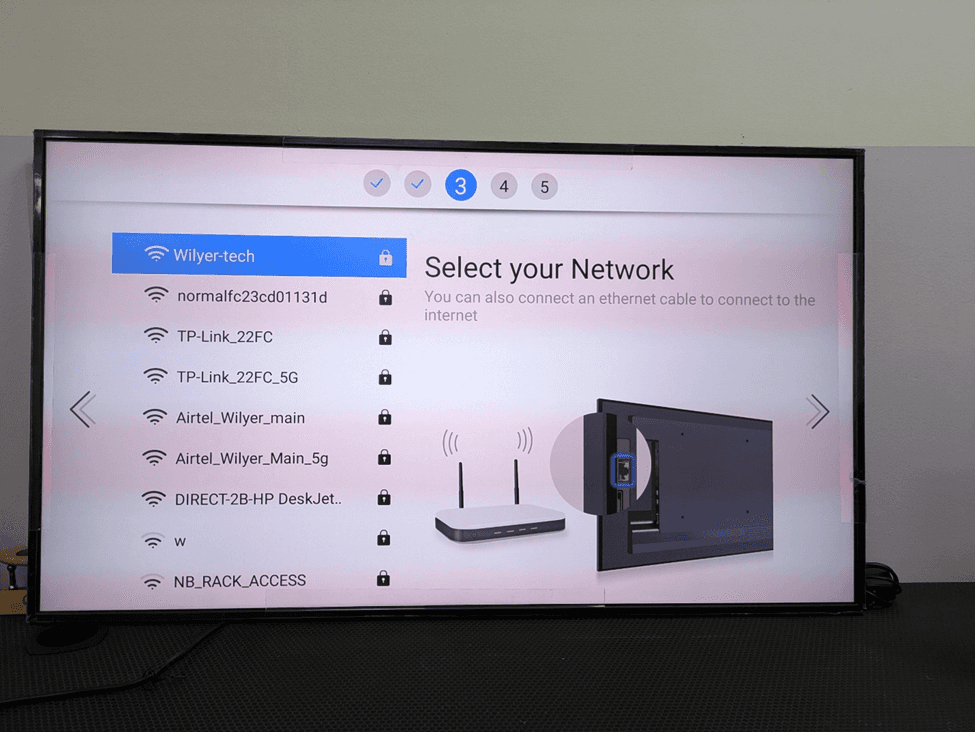
Step 12: Network: Choose your WiFi Network
Network connectivity is done in step 3 of the wizard. The display searches wireless networks available and displays them on the left side of the screen. The following networks can be seen in the screenshots:
Wilyer-tech (highlighted in blue - selected network)
Normalfe23cd01131d
TP-Link 22FC
TP-Link22FC5G
AirtelWilyerMain
AirtelWilyerMain5g
DIRECT-2B-HP DeskJet..
W
NBRACKACCESS
Every network displays a padlock symbol, which means that it is secured by a password (WPA/WPA2). There are instructions on the right. Select your Network you can also connect an Ethernet Cable to connect to the internet. There is a diagram that shows a Wi-Fi router and the Ethernet port on the display backside.
To choose the network one wants, one navigates through it and clicks on OK. In the case of a mission-critical deployment of signages, a wired Ethernet connection is highly suggested than a Wi-Fi connection due to its reliability and reduced latency.
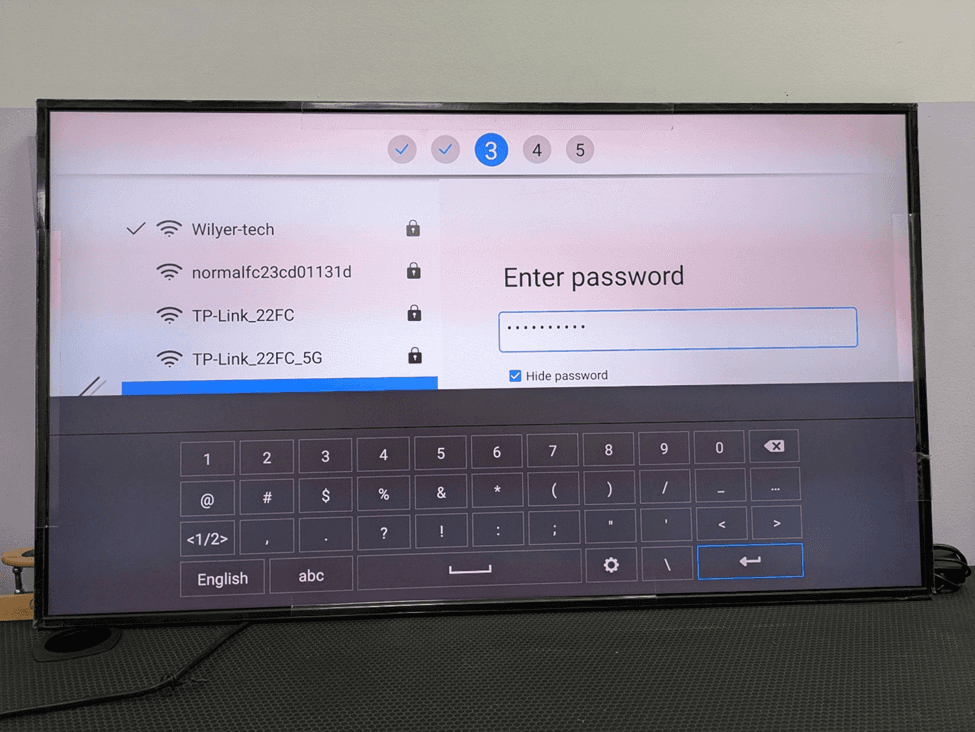
Step 13: Wi-Fi Password Entry
When a network is selected a password entry panel comes up to the right side of the screen. At the bottom, there is an on-screen keyboard with number rows, special characters and navigation keys.
Key elements of this screen:
At the top, there is a password field with dots () at every character typed in it-default password mask.
Hide password checkbox (checked) - uncheck to display the password in plain text.
On-screen keyboard that has rows of numbers (0-9), punctuation marks and a space bar.
Enter key () at the bottom right - enter the password and try to connect
Use directional arrows of the remote to navigate the keyboard and press the OK to type each character. After entering the entire password, go to the Enter key () and click ok to connect. The display will also seek to connect with the Wi-Fi network. In case of success, a connection confirmation is displayed and the wizard proceeds to step 4.
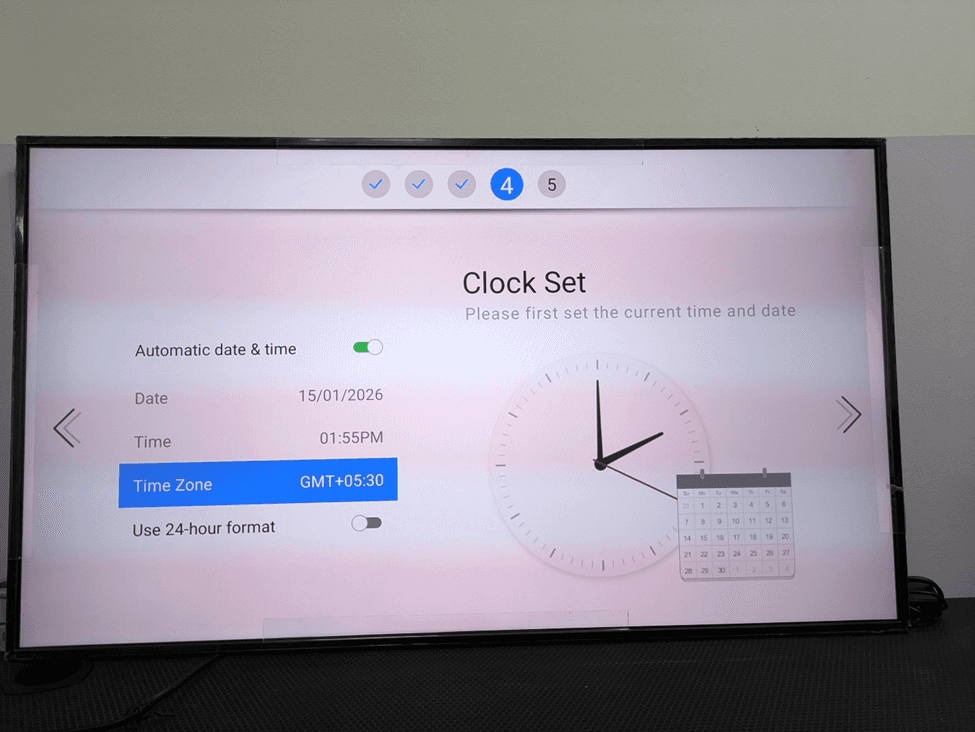
Step 14: Clock set: Date, Time and Time zone
Step 4 of the wizard sets the clock on the system. Proper time keeping is important in digital signage as most CMS systems use time based scheduling of content and therefore content will only appear at the right time when the clock of the display is adjusted accordingly.
The Clock set screen has the following settings:
Date and Time automatic switch (currently ON / green). The display automatically synchronises its clock when it is enabled and connected to the internet using the NTP (Network Time Protocol).
Date - Displays 15/01/2026 (automatically fetched with the NTP server)
Time - Showing 01:55 PM (auto-fetched)
Time zone: It is now GMT+05:30 (India Standard Time, IST). This should have the right configuration to your deployment region
Use 24-hour format - Toggle switch (presently OFF, with 12-hour AM/PM format)
Ensure that the time Zone is appropriate to your geographical position. E.g., GMT+00:00 in the UK, GMT-05:00 in the Eastern US, GMT+08:00 in Singapore/Malaysia, GMT+09:00 in Japan. In case the time zone is wrong, your content scheduling will be off and contents can play at inappropriate times. Press the right arrow in order to move on to Step 5.
Part 5: Digital Signage Application Installation
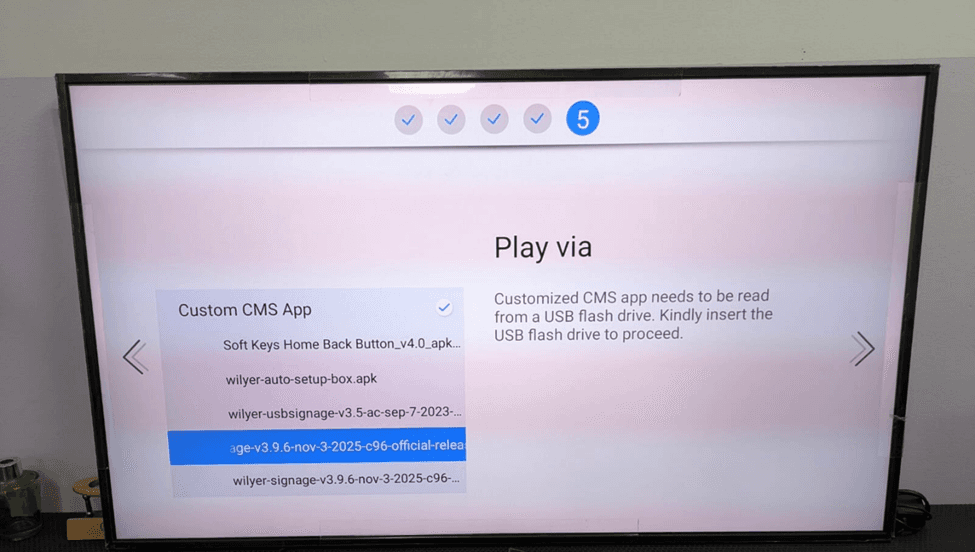
Step 15: Play via: Select the CMS Application Source
The fifth step is the Play via screen which is the most crucial step of the setup wizard when deploying digital signage. This display is used to decide which application will be used as the content player on the display. The screen also has an option of “Custom CMS Apps” which reads the application files in a USB flash drive which is connected.
In the following screenshot, a USB drive has been connected and the contents on it are shown as a list:
Soft Keys Home Back Button 4.0apk..
wilyer-auto-setup-box.apk
wilyer-usbsignage-v3.5-ac-sep-7-2023-..
age-v3.9.6-nov-3-2025-c96-official-relea…(highlighted - chosen to be installed)
wilyer-signage-v3.9.6-nov-3-2025-c96..
The right panel describes: CMS app should be read on a USB flash drive (it is a customized one). Please plug in the USB flash disk to continue. Choose the APK file one wants on the USB. The Wilyer Signage v3.9.6 release build is chosen in this instance. Press OK to start an installation.
Note: To make the display recognize your USB drive, you must make sure that the device is formatted as FAT32 and that the APK file is located in the root of the drive (not within a sub-folder) so that it is recognized by the display.
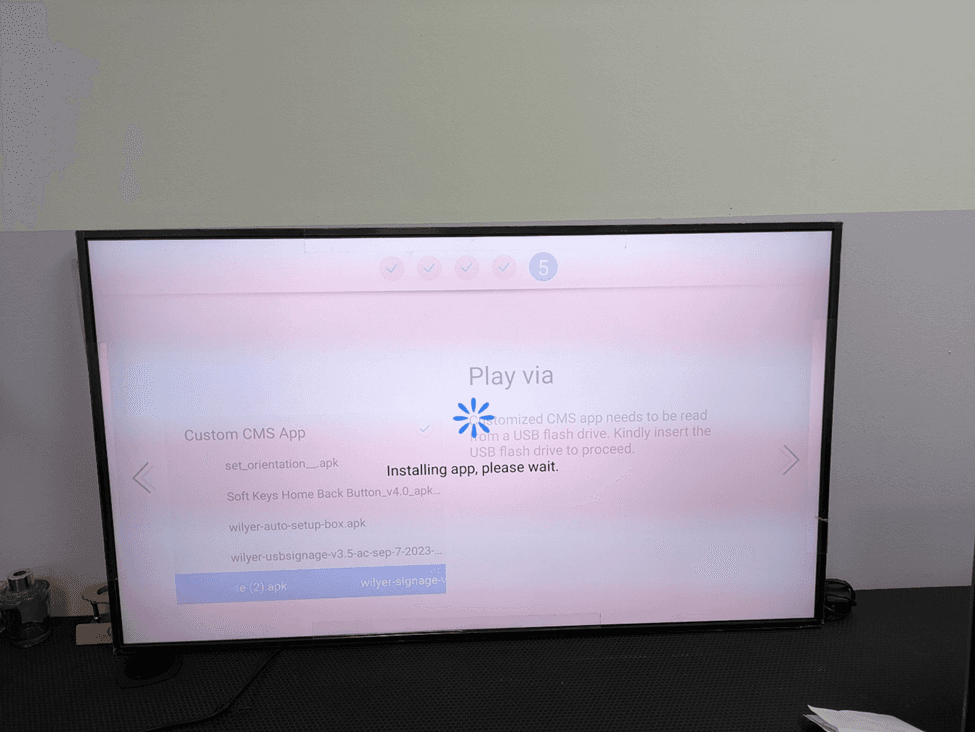
Step 16: Installation of application in progress.
Once the APK file has been selected, it starts installing automatically. In the centre of the screen, there is a spinning loader, and the message is adding the app, please wait. The list of APK is available in the background.
In the process of installation, the system:
Copy the APK file in the USB drive.
Checks the signature and integrity of the package.
Installs the app into the internal storage of the display.
Registers the application in the system launcher
The installation usually takes 10-30 seconds. Do not take out the USB or switch off the display in the process. In case of interruption with the installation, the APK can become corrupt and you will have to restart all over again with step 15.
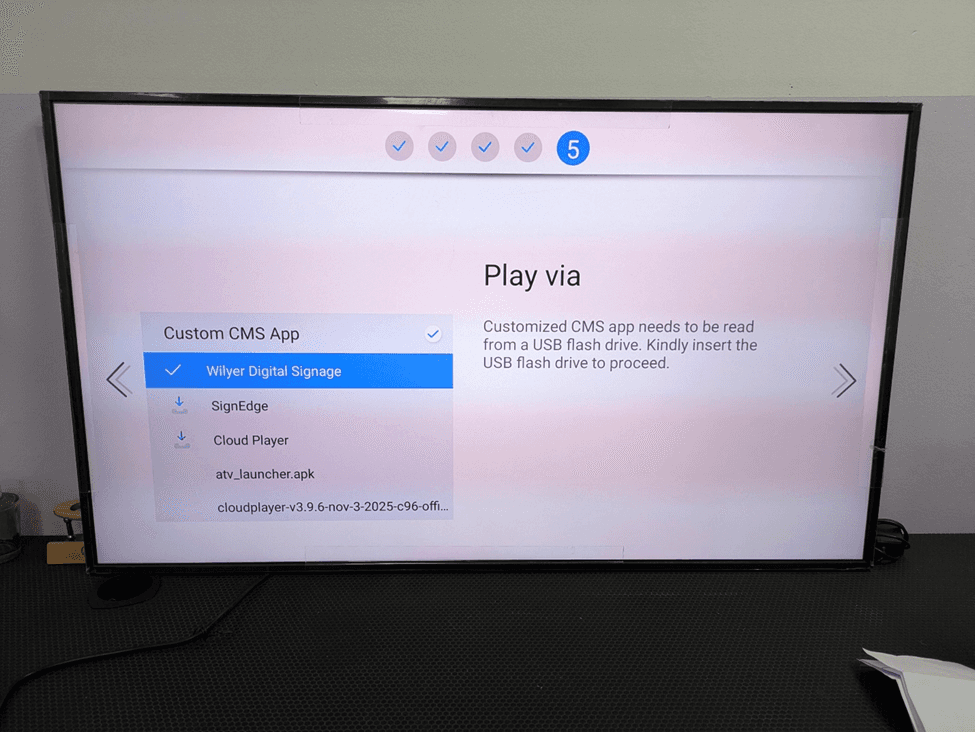
Step 17: Installation Complete: App is ready to use
After installation the app list is updated to indicate the installed application. Wilyer Digital Signage is displayed at the top and it has a checkmark () indicating that it has been installed successfully. The full list now shows:
Installation Wilyer Digital Signage (installed - demonstrated at the top with checkmark)
Sign Edge (Can be installed via USB)
Cloud Player (installs on USB)
atv_launcher.apk
cloudplayer-v3.9.6-nov-3-2025-c96-offi…
In the left column the Custom CMS App option is still active and this verifies that we are on the Custom CMS mode. Click the list and select Wilyer Digital Signage and click the OK button to set it up as the active player.
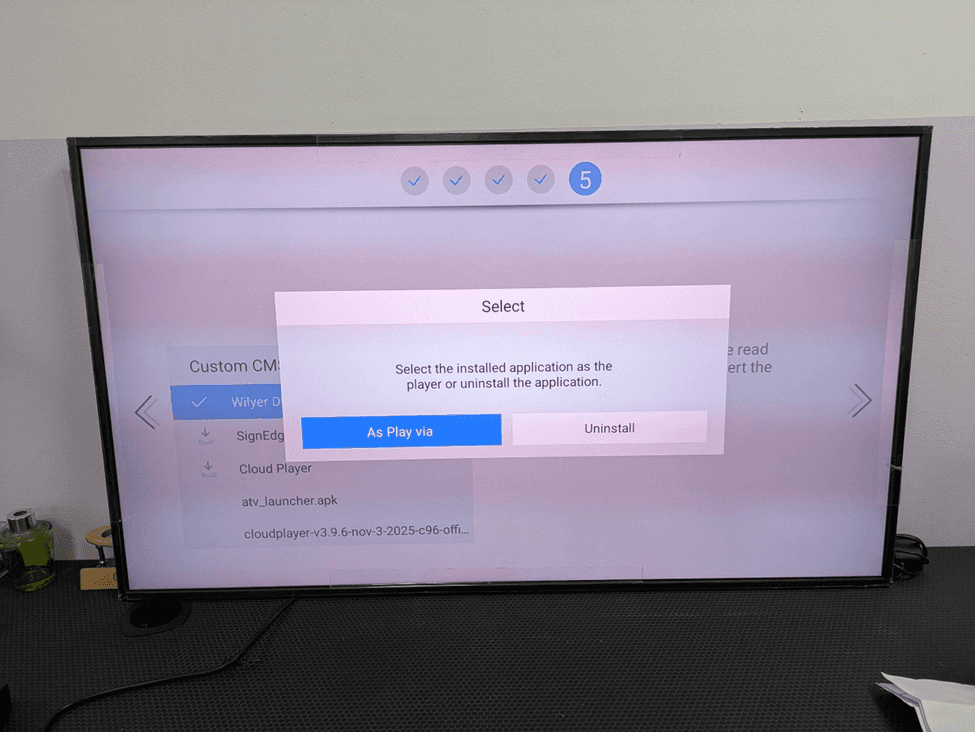
Step 18: Selecting the App as the Content Player
Once Wilyer Digital Signage has been selected in the list of installed applications, the dialog box “Select” opens which contains two options:
“As Play via” (blue button, left) - Marks this application as the primary player of content. This app will start automatically on the display and all the signage content playback will be directed to this app.
Uninstall (white button, right) - gets the application out of the screen.
Click as Play via to complete the process of application selection. This finishes the setup wizard of 5 steps. Wilyer Digital Signage is now going to be the entire to deliver your content and will be linked to the Wilyer CMS cloud to enable the delivery of your scheduled content.
Part 6: Granting Permissions and setting the Home App
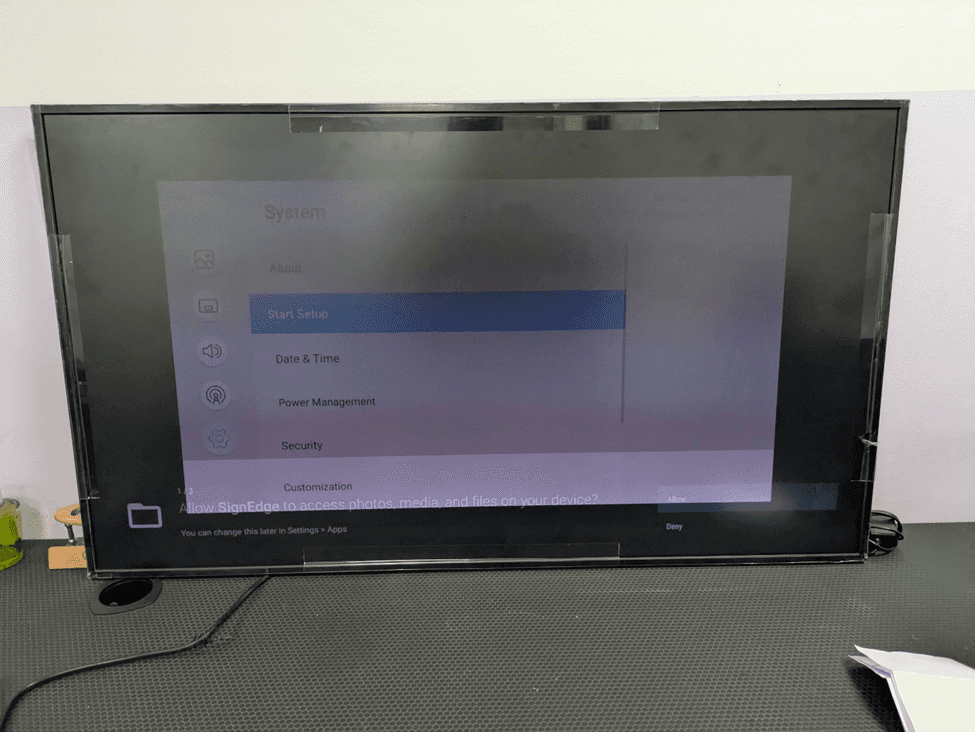
Step 19: Granting Media Access Permissions
Once the setup wizard is completed, the system starts the new signage application installed and asks to grant the permission needed in Android. On the bottom of the screen, there is a permission dialog:
Photos, media, files on your device: “Allow signedge to access files, media, and photos?
The following two response options are indicated:
Allow (blue button, top-right) - Gives the application the right to access media files in the internal storage and the USB that are connected to the display.
Deny (White Button) - Blocks file system access, which would prevent the app loading or playing content.
Always click “Allow”. Digital signage programs should be able to access files within the file system to read media resources, and to download content via the CMS, write cached files, and configuration data. Failure to allow such permission will render the application useless. This permission request is executable right after the wizard finishes and is confirmed by the presence of the system settings menu in the background with the start setup highlighted.
Note: In case you are presented with several permission requests (e.g., network access, location, notification, etc.,) grant all the permissions requested by the CMS app to be fully functional.
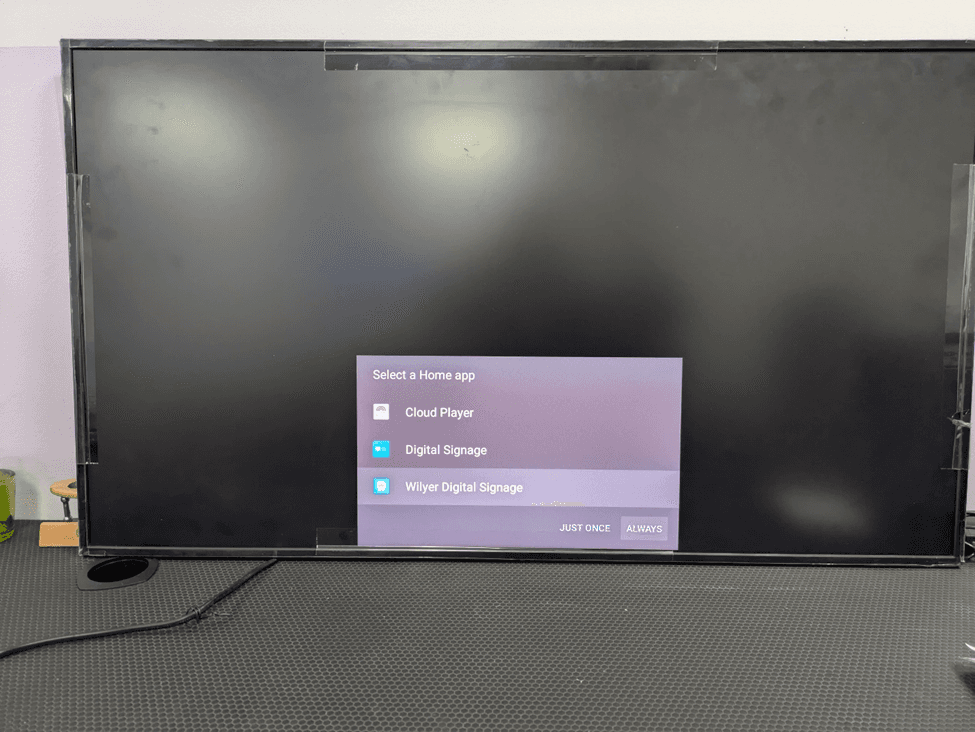
Step 20: Selecting the Default Home App
The last configuration procedure is the default Home application choice. This is followed by a dialog called a Select a Home app, and it displays all the launcher applications that have been installed on the display.
Cloud Player Panasonic native cloud Playback application.
Digital signage the Panasonic Digital Signage launcher which is built in.
Wilyer Digital Signage - application that we have just installed.
Two action buttons are indicated at the bottom of the dialog:
“JUST ONCE” - Opens the chosen application to this session only. The next time it is started, the Home app choice dialog will show again.
“ALWAYS” - Permanently makes the chosen app the default home page. The displays will automatically open this app without any further requests on each new start-up.
Choose the option of Wilyer Digital Signage and press the button “Always” to make it permanently the home screen launcher. From this point on, every time the display powers on it will automatically launch Wilyer Digital Signage, connect to the CMS, and begin playing scheduled content without any manual intervention.

Part 7: Post-Setup – Pairing with your CMS
Having installed the digital signage application and giving consent, the last two steps complete the installation: confirming the home app option once again (because the system might require it after a reboot), and connecting the display with the Wilyer CMS with the help of the unique device pairing code.
Step 21: Check Home App Selection Post Reboot
Upon all permission being received, the display can restart or restart at the launcher selection screen. A “Select a Home app” dialog becomes visible again with the three launcher options that are available:
Cloud Request - The native cloud playback application developed by Panasonic.
Digital Signage - The inbuilt Panasonic Digital Signage launcher
Wilyer Digital Signage - CMS application that we have installed.
This second prompt normally follows after the first permission grants have been made and the system sees what app is to assume permanent ownership of the home screen. The bottom right of the dialog has the choices of JUST ONCE and ALWAYS.
Click Wilyer Digital Signage and again click ALWAYS to enable the permanent confirmation as the home launcher. This is so the Wilyer app starts up each and every time the display boot-ups and shuts down and then again afterwards, such as an overnight scheduled power outage, or even a power failure, without the user having to do any more interaction with the computer.
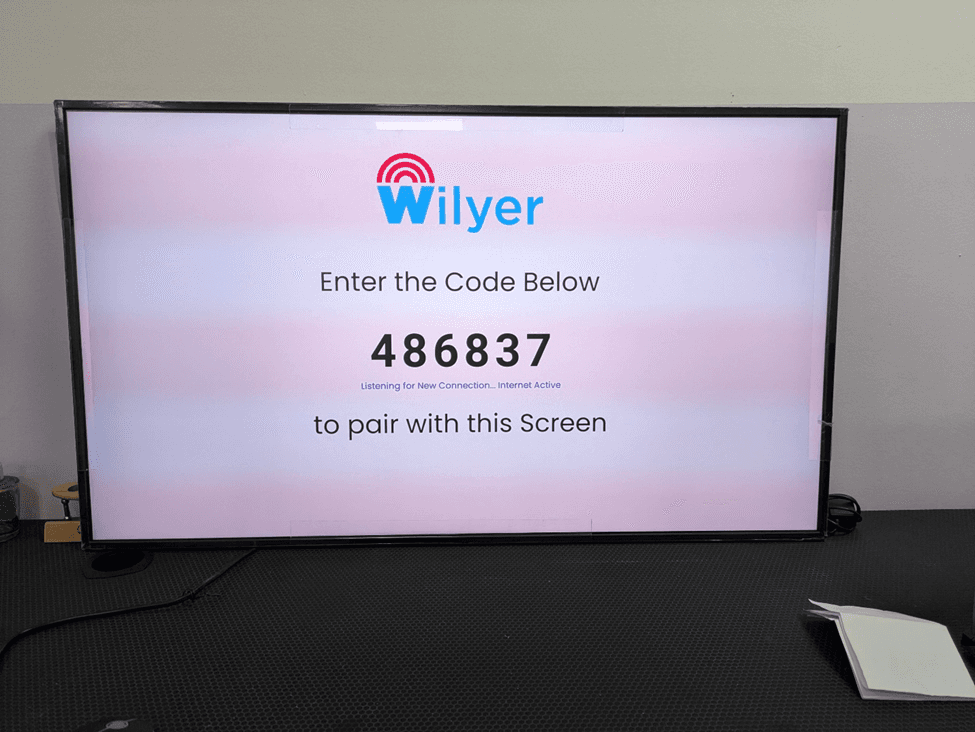
Step 22: Wilyer CMS Pairing code screen
Upon choosing Wilyer digital signage as the long-term home application, the display starts the first time the Wilyer application is initiated. At the top of the screen, one sees the Wilyer logo prominently, and then the instruction on the pairing.
“Enter the code Below”
There is a massive, bold 6-digit pairing code displayed in the center of the screen. In this example the code is 486837. The code contains a lower code line, which is “Listening to New Connection and Internet active ensuring that the display is connected to the Internet, the Wilyer application is operating, and the device is actively waiting to be connected with a CMS account.
Under the code, it is written: To pair with the screen. This is the most important screen linking your physical screen to your Wilyer cloud account. Pairing can be done in the following steps:
Record the 6 digit displayed on your screen (e.g., 486837)
Open your smartphone or computer and use a web browser and visit app.wilyer.com
Use your registered email and password to log in to your Wilyer account.
Go to Wilyer dashboard, Devices - Add new device
Type in the 6 digit number on the screen that shows the pairing code into the code field.
Give the device a descriptive name (e.g., “Lobby Screen”, Store 1 - window display)
Label the device to a place or a group where it is possible
Click Save or Pair The display will show pairing after a few seconds and the CMS dashboard status will be changed to “Connected”
Add or designate a Playlist or Campaign to the new paired device
The Panasonic display will automatically start playing the content.
Important: The code of pairing is display and session specific. In case the code runs out before you pair (usually 10-15 minutes of inactivity), it is sufficient to relaunch the Wilyer app on the display to create a new code.
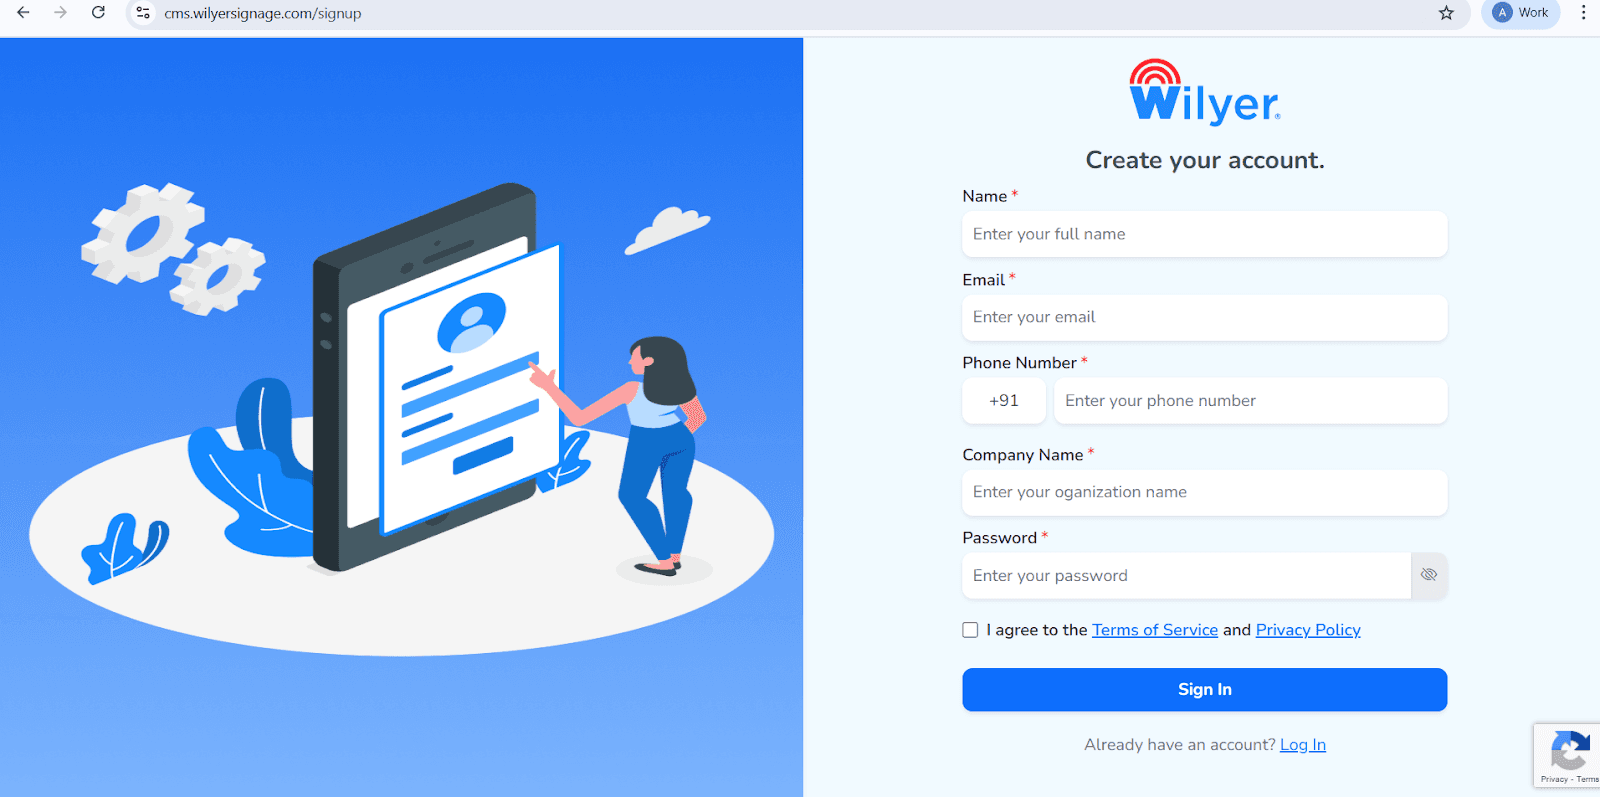
Step 23: Create your Wilyer Account
To get started using Wilyer through your Panasonic Professional Display you’ll first need an account so complete the registration form by providing the information required: Your full Name, Email Address, Phone Number, Company Name, and create a password.
Make sure to read through the terms & conditions as well as the privacy policy and check the box saying that you agree with them before clicking on the Sign Up button at the bottom of the page to finish off registering your new account.
If you already have an account then just click on the Log In link to access the site.
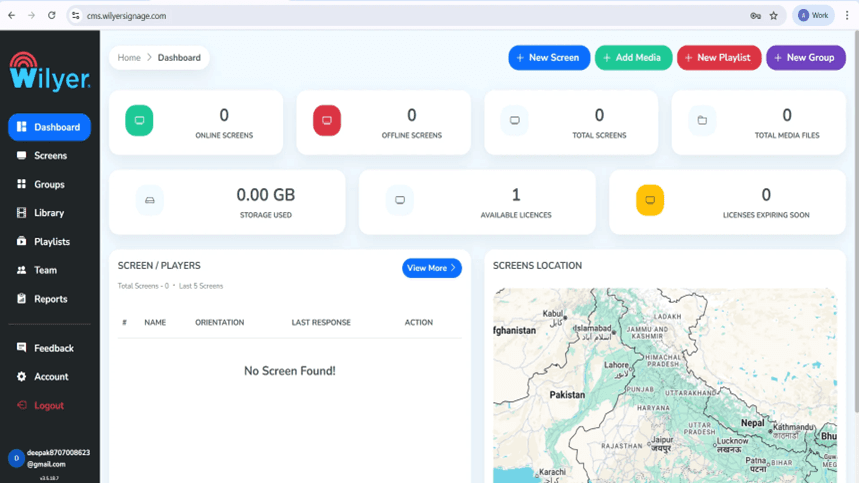
Step 24: Log In to the Wilyer Dashboard
When you Sign In you’ll go straight to the Wilyer Dashboard
The Wilyer Dashboard will help you keep track of your complete digital signage network. You will able to see the following items:
Your screen and Whether they are currently online or offline
All registered Panasonic Pro Displays in your network
All media files uploaded to your system or your devices
How much storage you are currently using
Your license information, including expiration dates.
The Wilyer Dashboard is your central control panel that allows you to manage your digital signage environment effectively.
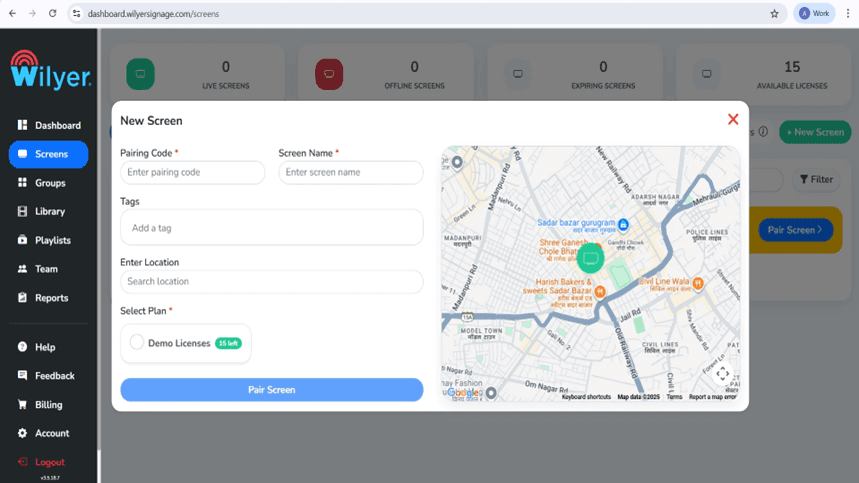
Step 25: Add and Pair your Panasonic Pro Display
To add the screen to the dashboard, click on +New Screen or Add screen. After, open the Wilyer application on your Panasonic Pro Display and get the 6 digit pairing code. Authorize it using the following information:
Screen Name
Tags (optional for better organization)
Installation Location
Your appropriate License Plan
After all of this information has been entered in, Click Pair Screen to complete the process.
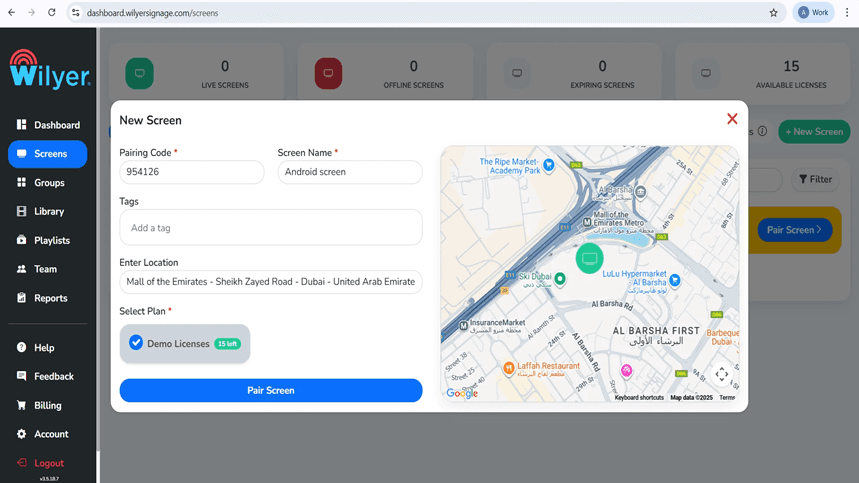
Step 26: Complete Screen Pairing from the Screens Menu
To link and activate your display please do the following steps:
Go to Screens in Dashboard
Select Enter code OR add screen
Insert the code being displayed by “Your Panasonic Pro display”
Click on verify in order for your screen to be detected
When successfully detected, provide a name, any applicable tags, and a designated location for the screen
Select an available License from options provided
Select activate or confirm to finish setting up your screen.
You have successfully connected your screen and it is ready for content to be deployed.
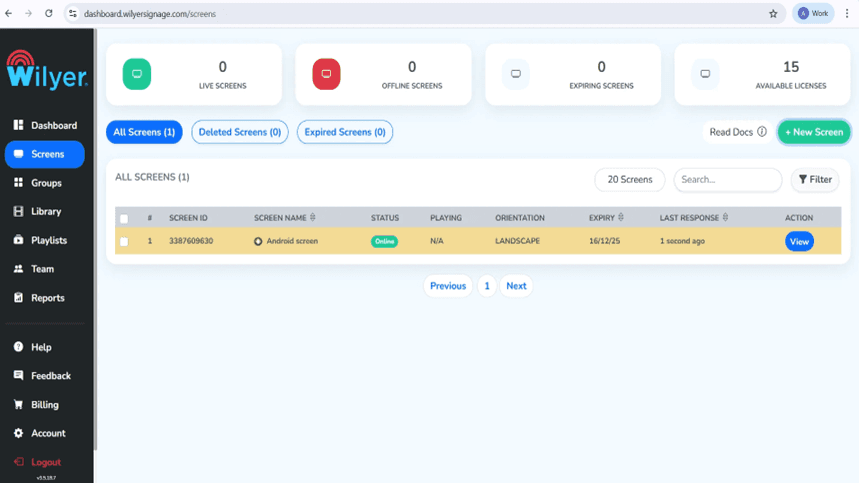
Step 27: Screen Successfully Connected
When you are connected to your Panasonic Pro Display, it will be displayed in the Screens section of the software and show an Online Status. You will find the following information about your Panasonic Pro Display:
Screen ID
Orientation of Display
License Status
Last communication Date
Now that the display has been successfully activated, you can assign content, configure the content display, and monitor it in real-time.
Designing Digital Signage Content
Step 28: Upload Media Files
Visit the Library section and upload your video/movies/images into the Media Library.
Supported formats include:
JPG, PNG, and MP4
Use the Media Library to build professional and engaging video playlists for your Panasonic Pro Display.

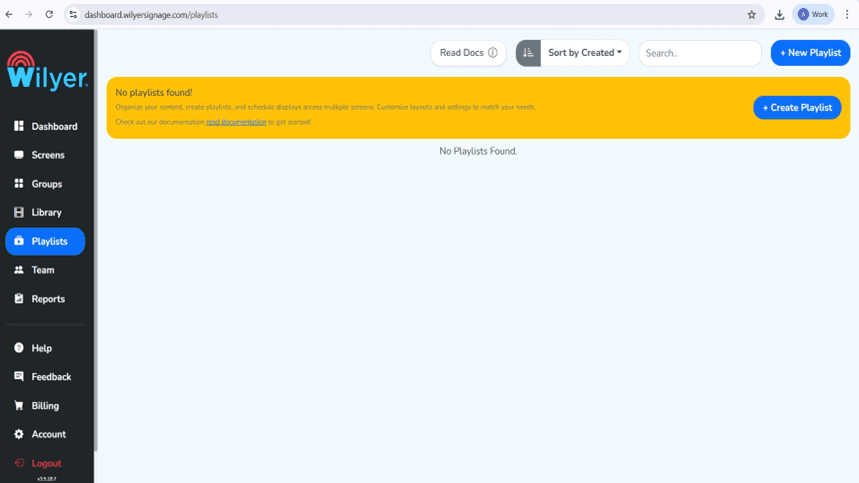
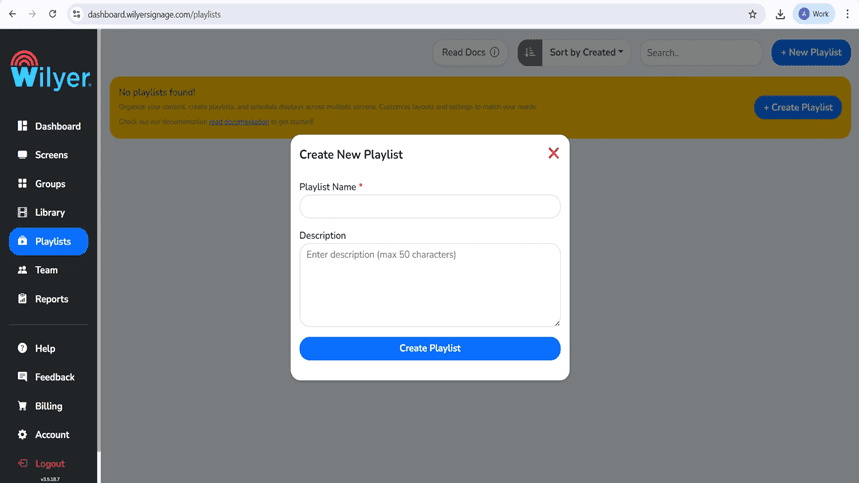
Step 29: Create a Playlist
Create new playlist from Playlists page
Choose a name for the playlist as well as an optional description to help you organize your content lists.
This playlist will hold all your scheduled and display content for the screens you have connected to run these playlists.
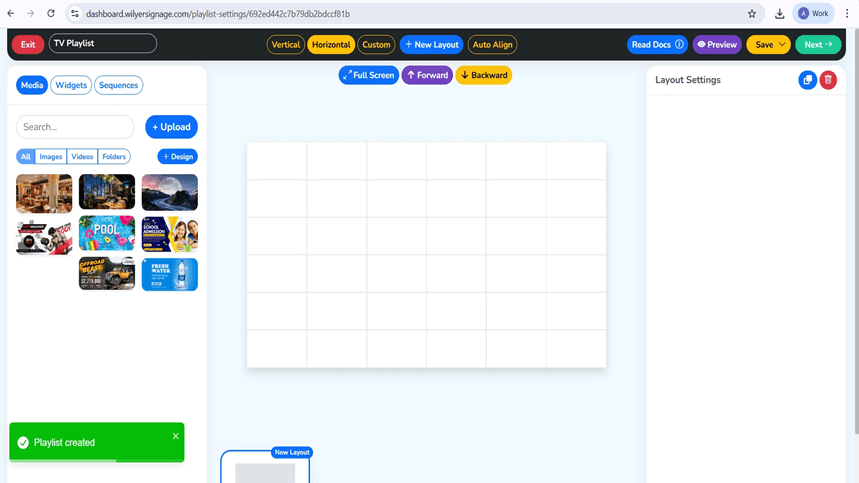
Step 30: Design your Playlist Layout
Select a design format:
Vertical Format
Horizontal Format
Custom Format
Drop your videos onto your layout creator for use.
Set the length of the slides and their motion transitions as needed.
Check your layout as you design it, using the Live Preview tool.
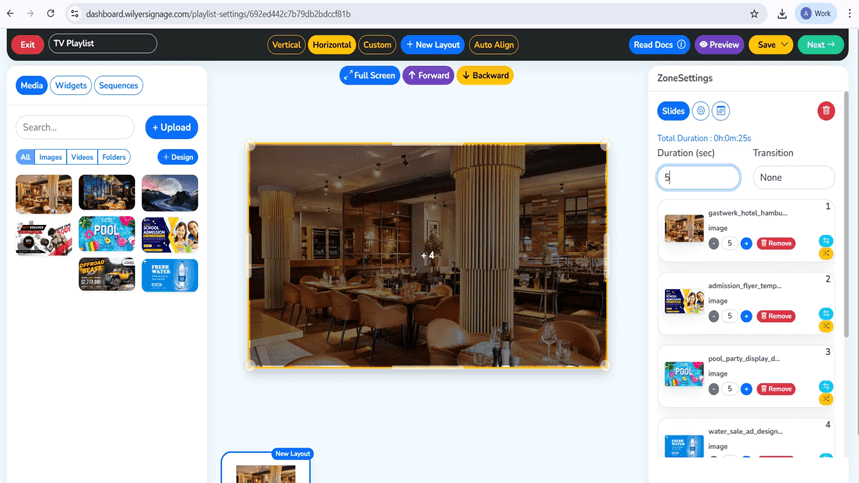
Step 31: Configure Media Playback Settings
Insert media at the relevant areas of layout. Every object is turned into a slide so that you can manage where to display and how long to display and transitions. The length of the playlist is automatically updated. Preview mode goes through content before savings.
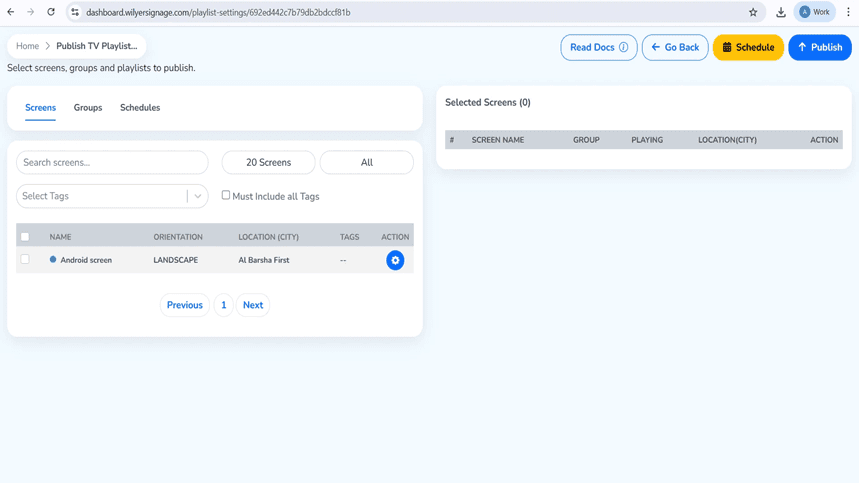
Step 32: Publish Content to Screens
Once the playlists are finished, you can click on Publish button on the top of the right side.
You can then select either your required main targets on your final display groups and then click on Publish to quickly publish your selected playlists.
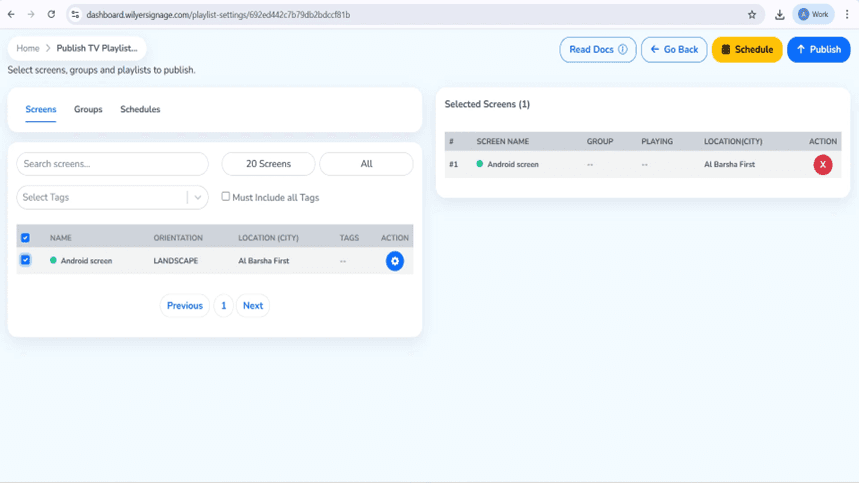
Step 33: Schedule or Publish Immediately
You can Publish the Playlist right now or schedule it to be published at a specific time.
After selecting the display or groups of displays, you will need to confirm the deployment settings for those displays.
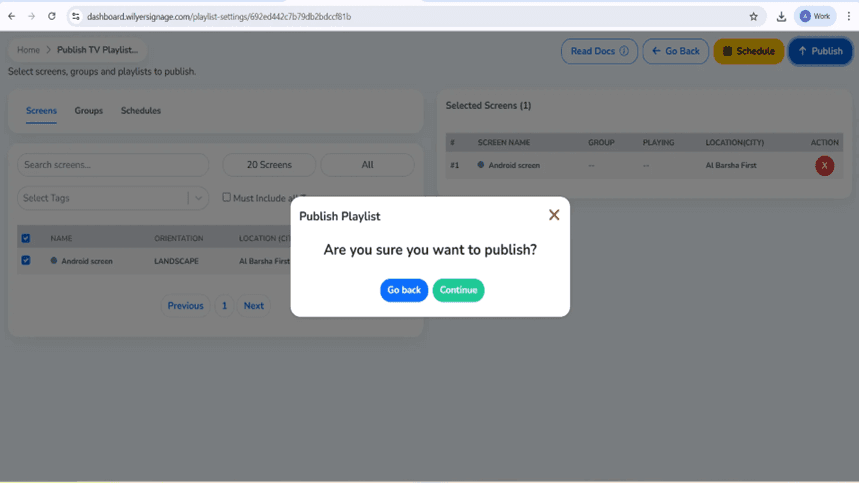
Step 34: Confirm Publishing
Please check the summary of what you are publishing in the confirmation window.
If you want to continue, click continue. To make changes, go back.
Step 35: Monitor Playlist Playback
Using the Playlist Report section, you can check on the success of your content being displayed.
If the content has been delivered, your Panasonic Pro Display is powered on, and the playlist is up and running, it will show success in your store tracking report.

Final Step: Playlist Live on Panasonic Pro Display
You have a working playlist that is now playing through the connected Panasonic Pro Display.
Your playlist will play according to the selected layout, your selected sequence, and your selected timing.
It is very important to check screen visuals and positions regularly to ensure your audience receives a professional and consistent experience while they view what is on the screen.

Conclusion
The use of Digital Signage with Panasonic Pro Displays give businesses of all sizes an excellent, capable, and professional solution for their Digital Signage requirements. All while ensuring through each stage of this process, i.e., power-on/local signage screen factory reset, first time set-up wizard, network configuration, Content Management system (CMS) installation, grant of permissions and pairing with the Wilyer Digital Signage platform, that their display is optimally set up deliver continual and reliable (24/7) content delivery.
This is a step by step guide to deploying your digital signage solution from Start to Finish including:
Resetting your display, ensuring that you have a clean configuration
Correctly configure your display to use the appropriate language, orientation, network, and time zone.
Identifying and installing the Content Management System (CMS) application is to be used.
Granting any required permissions for it to operate fully
Selecting the default Home (UI Application) application to automatically launch when your display is powered.
Securing the pairing of your display to your CMS account.
Uploading your media, creating your playlist, scheduling when your media will show, and then publishing your media onto your displays.
By following this process, you should have eliminated many common problems such as having the wrong time zone selected and therefore impacting the scheduled time that your media will be provided to your displays; or having an unstable network configuration or incorrect launcher settings (causing the display not to automatically start-up after turning it off) preventing your display from starting up and displaying media automatically (without user intervention) after an unexpected power interruption. The proper initial configuration of your display will allow your display to boot directly into your signage application and continue playing out your media with no user intervention.

Multi-Platform Compatibility for Every Digital Signage Display
Run Wilyer’s digital signage software on your preferred operating system with zero hassle.
